V9.7
Overview
You can manage the Personal Identifiable Information (PII) and the Sensitive Personal Identifiable Information (SPII) in Cora SeQuence. With this functionality, you can facilitate data privacy and security to your customers, and adhere to the Global Data Protect Regulations (GDPR). You can also allow your customers to be selective about the information they want you to collect and save in your database.
Managing personal and sensitive data
Managing personal and sensitive data in Cora SeQuence involves the following steps:
| Steps | Performed by |
|---|---|
| Cora SeQuence implementor |
| Cora SeQuence Administrator |
| Cora SeQuence Administrator |
| Cora SeQuence Administrator |
1. Manage the purge key column
The purge key column is the column according to which the personal data is replaced. To purge data based on this purge key, the Implementors first need to add and manage this column in all personal data tables. It is recommended that each value is managed with an active date, to enable lifecycle automatic purge.
For example, Customer Id and Customer Email can be added as the purge key columns to the personal data tables.
2. Mark the personal data
To start managing the personal and sensitive data, you need to first identify and mark which information can be considered as personal and sensitive. This is done per customer requirement.
Procedure
You can either search for a table with the table name or choose a table from the existing workflows.
Search with the table name
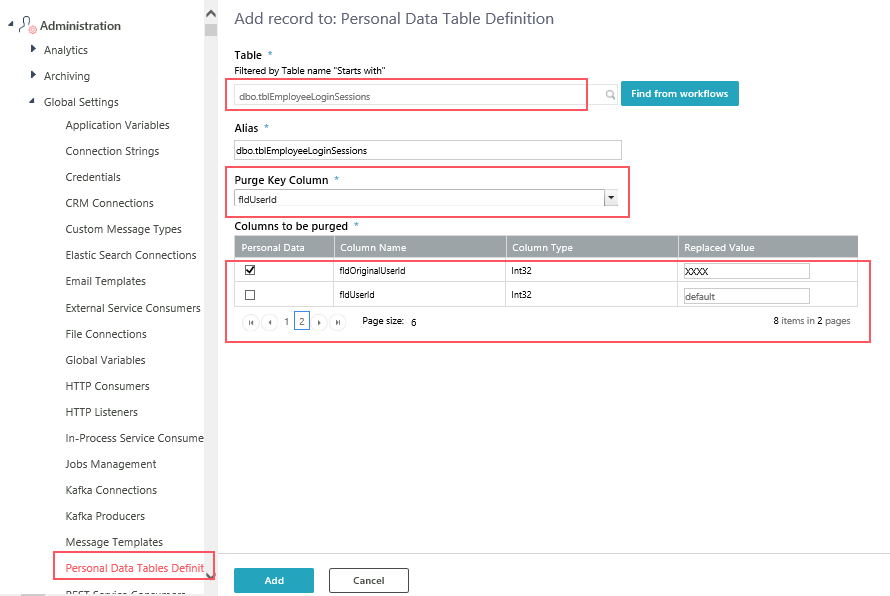
- Go to Administration > Global Settings > Personal Data Tables Definition, and click Add New Record.
- In the Table field, enter at least the first three letters of the table name whose data you want to mark as personal.
For example, tbl, roles, or UACT.
Keying in tblatt displays tblAttachments, tblAttachmentsClosed and tblAttachmentsTemp tables in the list.NOTE
You can search for a table with the table schema. For example, dbo or rbac. - Select the table to purge.
- Edit the table alias if required.
- In the Purge Key Column, select the table column to be considered as the primary key for fetching purged columns.NOTE
Only integer and string datatype columns appear for selection as Purge key column. - In the Columns to be purged, select the columns which are to be considered as personal data. The system populated the default value as a replacement for these column values. If you want, then you can also enter a replacement value of your own for each column.
- Select the Null check box to purge the column and not have a replaced value.
- Select the Is Attachment check box to specify that the record is an attachment. This option validates that the actual attachment is also purged along with.
- Click Add.


Search from the existing workflows
- Go to Administration > Global Settings > Personal Data Tables Definition, and click Add New Record.
- Click Find Workflow Tables.
- In the Find Workflow Tables screen, navigate to the path where the table is located.
- Select the table from the list. The Table virtual path and Table fields get auto-populated on selection.
- Click OK.
- Follow steps 3 to 9 from the above procedure.
3. Collect the personal data
To collect the marked personal data from the tables, you need to add the Add Personal Data Purge Request built-in command to the workflow.
- In the Administration site, open your workflow.
- From the Toolbox, under the Server Side category, click the Built-in Command activity.
- Double-click the Built-in Command activity in the workflow.
- In the Select Built-in Command screen, select:
- Category as Personal Data Operations.
- Commands as Add Personal Data Purge Request.
- Click Next.
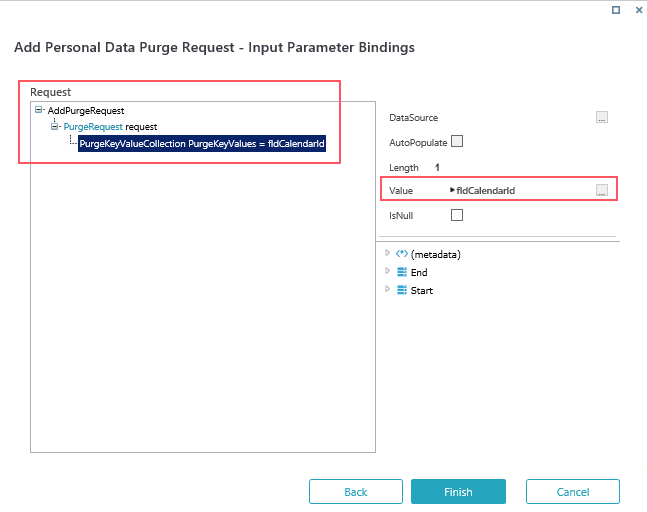
- In the Input Parameter Bindings screen, click the PurgeRequest request parameter and clear the IsNull check box.
- Expand the PurgeRequest request parameter.
- Click the PurgeKeyValueCollection PurgeKeyValues parameter.
- In the Length field, add the number of purge key values you want to add. Based on the number added in this field an equal number of Value fields appear.
- Add in the Value field the purge key based on which the activity will fetch the purged columns.
- Click Finish.

4. Purge the personal data
To purge the marked personal data from the tables, you need to create a Personal Data Purge job.
- Go to Administration > Global Settings > Jobs Management.
- Click +Add Job.
- In the Create New Job window, select the Personal Data Purge job.
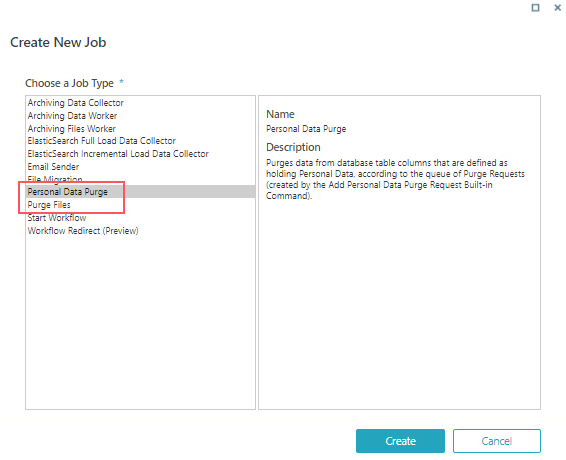
- Click Create.
- Configure the job like any other job, and click Finish.
For details, see this article.

To purge files from the database, create a Purge Files job along with the Personal Data Purge job.
Archive the personal data
An archive database is a separate database from the Cora SeQuence operational database. Cora SeQuence does not handle any personal data already moved to the archive database.
You can add the following application variable to initiate the column purging of the marked personal data while archiving.
| Application variable | Value |
|---|---|
| JES.Archiving.PurgePiiDuringArchiving |
|
Limitations
- Only Cora SeQuence database manages the personal data. Any data moved to other systems, archives, or backups is not handled.
- System tables, except tblEmployees are not handled.
V9.6
Overview
You can manage the Personal Identifiable Information (PII) and the Sensitive Personal Identifiable Information (SPII) in Cora SeQuence. With this functionality, you can facilitate data privacy and security to your customers. You can also allow your customers to be selective about the information they want you to collect and save in your database.
Managing personal and sensitive data
Managing personal and sensitive data in Cora SeQuence involves the following steps:
| Steps | Performed by |
|---|---|
| Cora SeQuence implementor |
| Cora SeQuence Administrator |
| Cora SeQuence Administrator |
Manage the purge key column
The purge key column is the column according to which the personal data is replaced. To purge data based on this purge key, the Implementors first need to add and manage this column in all personal data tables. It is recommended that each value is managed with an active date, to enable lifecycle automatic purge.
For example, Customer Id and Customer Email can be added as the purge key columns to the personal data tables.
Mark the personal data
To start managing the personal and sensitive data, you need to first identify and mark which information can be considered as personal and sensitive. This is done per customer requirement.
Procedure
You can either search for a table with the table name or choose a table from the existing workflows.
Search with the table name
- Go to Administration > Global Settings > Personal Data Tables Definition, and click Add New Record.
- In the Table field, enter at least the first three letters of the table name whose data you want to mark as personal.
For example, tbl, roles, or UACT.
Keying in tblatt displays tblAttachments, tblAttachmentsClosed and tblAttachmentsTemp tables in the list.NOTE
You can search for a table with the table schema. For example, dbo or rbac. - Select the table to purge.
- In the Purge Key Column, select the table column to be considered as the primary key for fetching purged columns.NOTE
Only integer and string datatype columns appear for selection as Purge key column. - In the Columns to be purged, select the columns which are to be considered as personal data. The system populated the default value as a replacement for these column values. If you want, then you can also enter a replacement value of your own for each column.
- Click Add.

Search from the existing workflows
- Go to Administration > Global Settings > Personal Data Tables Definition, and click Add New Record.
- Click Find from workflows.
- In the Table Wath Wizard screen, select the folder where the table is located.
- Select the table from the list. The Table virtual path and Table fields get auto-populated on selection.
- Click OK.
- Follow steps 3 to 6 from the above procedure.
Collect the personal data
To collect the marked personal data from the tables, you need to add the Add Personal Data Purge Request built-in command to the workflow.
- In the Administration site, open your workflow.
- From the Toolbox, under the Server Side category, click the Built-in Command activity.
- Double-click the Built-in Command activity in the workflow.
- In the Select Built-in Command screen, select:
- Category as Personal Data Operations.
- Commands as Add Personal Data Purge Request.
- Click Next.
- In the Input Parameter Bindings screen, click the PurgeRequest request parameter and clear the IsNull check box.
- Expand the PurgeRequest request parameter.
- Click the PurgeKeyValueCollection PurgeKeyValues parameter.
- In the Length field, add the number of purge key values you want to add. Based on the number added in this field an equal number of Value fields appear.
- Add in the Value field the purge key based on which the activity will fetch the purged columns.
- Click Finish.
