Starting with V4.0, Cora OpsManager has been renamed to Cora Case Manager.
V4.1 and later
In Cora Case Manager you as a user from the product team, can create new actions, known as custom actions, as per need.
To add custom actions:
- Create your new action workflow in the Administration site.
We recommend doing it by duplicating the ICM Put On Hold Action or the ICM Template workflow. - If you want to display a pop-up before performing the custom action, create a workflow to hold the dialog view, and add a Form Activity to it, or use the already built custom action workflow.
- Name the View created inside the Form.
- Copy the markup from the Custom action view template activity (inside ICM Template workflow).
If you don’t want to display reason in the dialog, remove the reason div from the markup.
If you need to interact with the Main Case data, add the ICM Data model/Shared Data to the data model of the activity: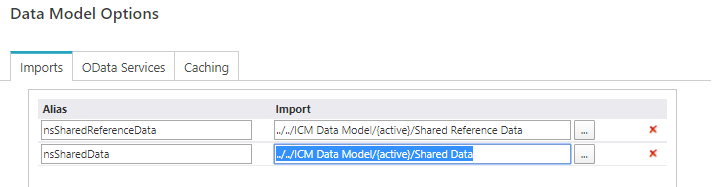
- Go to Administration > Lookup Tables > ICM Data Model > Actions.
- Add a new record, and add the following details:
- Action name: Unique name of the action.
- Text: A brief text about the action.
- Validation group: to validate required fields.
- Dialog name: Name of the View.
- Workspace guid: the workspace guid of the custom action.
- Display for config set: to display this action in the config set actions menu.
- Manage reasons: to allow the user to pick reason for performing this action (the reasons should be added on the config set page).
- Dialog path: full path for the dialog view (if created in step 2 above).

NOTE
Consult the product team before implementing a new action in your project.
V3.4
Cora OpsManager allows you to create new actions as per need. These actions are referred to as custom actions. You can create custom actions only if you are from the product team.
To add custom actions:
- Create your new action workflow in the Administration site.
We recommend doing it by duplicating the ICM Put On Hold Action workflow. - If you want to display a pop-up before performing the custom action, create a workflow that will hold the dialog view, and add a Form Activity to it, or use the already built custom action workflow.
- Name the View created inside the Form.
- In the beginning of the Form's markup, add the below code:
<%@ Control %>
<script>
additionalMessage=true;
var actionSetting={isAudit:false,isAction:true,isComment:false,newStatus:0,nextUser:""}
</script>
<sq8:HiddenField runat="server" ID="hdnCaseMessageReason"></sq8:HiddenField>
<sq8:HiddenField runat="server" ID="hdnMessageGuid"></sq8:HiddenField>
To use the reason, copy and paste the following code:
<div class="sqf-row"> <div class="sqf-col-xs-12 sqf-control-group-v"> <sq8:Label runat="server" ID="lblReason" Text="<%$ Resources: OpsCenter, Reason %>" /> <sq8:DataSource runat="server" ID="dsReason" QueryName="ref:nsSharedData/USP_GetReasonsByConfigSetActionStatus"><WhereParameters> <sq:ExpressionParameter Expression='<%$ sq:{rt.httprequest["ActionId"]} %>' Name="ActionId" Type="Int32"></sq:ExpressionParameter> <sq:ExpressionParameter Expression="mwf.variables["ICMLCaseCategoryId"]" Name="CaseCategory" Type="Int32"></sq:ExpressionParameter> <sq:ExpressionParameter Expression="{DataModel}.Query("ref:nsSharedReferenceData/Statuses").where(StatusCode = {DataModel}.Query("ref:nsSharedData/CaseDetails").asqueryable().First().CaseStatusCode).select(StatusCode).first()" Name="statusid" Type="Int32"></sq:ExpressionParameter> <sq:ExpressionParameter Expression="mwf.variables["ICMLCaseTypeId"]" Name="CaseType" Type="Int32"></sq:ExpressionParameter> <sq:ExpressionParameter Expression="mwf.variables["ICMLCaseSubTypeId"]" Name="CaseSubType" Type="Int32"></sq:ExpressionParameter> <sq:ExpressionParameter Expression="rt.CurrentUser.CultureName" Name="languageCulture" Type="String"></sq:ExpressionParameter> </WhereParameters> </sq8:DataSource> <sq8:ComboBox runat="server" ID="cmbActionReason" Width="100%" ValidationGroup="OnSubmit" EmptyMessage="<%$ Resources: OpsCenter, ComboEmptyMessage %>" DataSourceID="dsReason" DataTextField="ReasonText" DataValueField="fldId"/> <sq8:RequiredFieldValidator runat="server" ControlToValidate="cmbActionReason" ValidationGroup="OnSubmit" SetFocusOnError="true" ErrorMessage="<%$ Resources: OpsCenter, ValidReasonError %>" CssClass="validationMessage" Display="Static" /> </div> </div> <sq8:HiddenField runat="server" ID="hdnCaseMessageReason"></sq8:HiddenField>If you need to interact with the Main Case data, add the ICM Data model/Shared Data to the data model of the activity:
- Go to Administration > Lookup Tables > ICM Data Model > Actions.
- Add a new record, and add the following details:
- Action name
- Text
- Validation group: to validate required fields.
- Dialog name: Name of the View
- Workspace guid: the workspace guid of the custom action.
- Display for config set: to display this action in the config set actions menu.
- Manage reasons: to allow the user to pick reason for performing this action (the reasons should be added on the config set page).
- Dialog path: full path for the dialog view (if created in the step 2 above).
Consult the product team before implementing new action in your project.
V3.0-V3.3
Cora OpsManager allows you to create new actions as per need. These actions are referred to as custom actions. You can create custom actions only if you are from the product team.
To add custom actions:
- Create your new action workflow.
We recommend to do it by duplicating one of the existing actions found on Admin console, Workflows > OpsCenter > Actions. - To display a pop-up before performing the custom action, create a workflow that will hold the dialog view.
- Create and open a form activity.
- Name the View created.
- In the beginning of the form, add the below code:
<%@ Control %>
<script>
additionalMessage=true;
var actionSetting={isAudit:false,isAction:true,isComment:false,newStatus:0,nextUser:""}
</script>
<sq8:HiddenField runat="server" ID="hdnCaseMessageReason"></sq8:HiddenField>
<sq8:HiddenField runat="server" ID="hdnMessageGuid"></sq8:HiddenField>
To use the reason, copy and paste the following code:
<div class="sqf-row"> <div class="sqf-col-xs-12 sqf-control-group-v"> <sq8:Label runat="server" ID="lblReason" Text="<%$ Resources: OpsCenter, Reason %>" /> <sq8:DataSource runat="server" ID="dsReason" QueryName="ref:nsSharedData/USP_GetReasonsByConfigSetActionStatus"><WhereParameters> <sq:ExpressionParameter Expression='<%$ sq:{rt.httprequest["ActionId"]} %>' Name="ActionId" Type="Int32"></sq:ExpressionParameter> <sq:ExpressionParameter Expression="mwf.variables["ICMLCaseCategoryId"]" Name="CaseCategory" Type="Int32"></sq:ExpressionParameter> <sq:ExpressionParameter Expression="{DataModel}.Query("ref:nsSharedReferenceData/Statuses").where(StatusCode = {DataModel}.Query("ref:nsSharedData/CaseDetails").asqueryable().First().CaseStatusCode).select(StatusCode).first()" Name="statusid" Type="Int32"></sq:ExpressionParameter> <sq:ExpressionParameter Expression="mwf.variables["ICMLCaseTypeId"]" Name="CaseType" Type="Int32"></sq:ExpressionParameter> <sq:ExpressionParameter Expression="mwf.variables["ICMLCaseSubTypeId"]" Name="CaseSubType" Type="Int32"></sq:ExpressionParameter> <sq:ExpressionParameter Expression="rt.CurrentUser.CultureName" Name="languageCulture" Type="String"></sq:ExpressionParameter> </WhereParameters> </sq8:DataSource> <sq8:ComboBox runat="server" ID="cmbActionReason" Width="100%" ValidationGroup="OnSubmit" EmptyMessage="<%$ Resources: OpsCenter, ComboEmptyMessage %>" DataSourceID="dsReason" DataTextField="ReasonText" DataValueField="fldId"/> <sq8:RequiredFieldValidator runat="server" ControlToValidate="cmbActionReason" ValidationGroup="OnSubmit" SetFocusOnError="true" ErrorMessage="<%$ Resources: OpsCenter, ValidReasonError %>" CssClass="validationMessage" Display="Static" /> </div> </div> <sq8:HiddenField runat="server" ID="hdnCaseMessageReason"></sq8:HiddenField>And also add the ICM Data model/Shared Data for the data model of the activity:
- Go to Administration > Lookup Tables > ICM Data Model > Actions.
- Add a new record, and add the following details:
- Action name
- Text
- Validation group: to validate required fields.
- Dialog name: Name of the View
- Workspace guid: the workspace guid of the custom action.
- Display for config set: to display this action in the config set actions menu.
- Manage reasons : to allow the user to pick reason for performing this action (the reasons should be added on the config set page).
- Dialog path: full path for the dialog view (if created in the step 2 above).
Disclaimer: Consult the product team before implementing new action in your project.
Previous to V3.0
Cora OpsManager allows you to create new actions as per need. These actions are referred to as custom actions. You can create custom actions only if you are from the product team.
To add custom actions:
- Create your new action workflow.
We recommend to do it by duplicating one of the existing actions found on Admin console, Workflows > OpsCenter > Actions. - To display a pop-up before performing the custom action, create a workflow that will hold the dialog view.
- Create and open a form activity.
- Name the View created.
- In the beginning of the form, add the below code:
<script>

  var popupDataIsSaved=false;
  var msgGuid;

  var prm = Sys.WebForms.PageRequestManager.getInstance();
    if (prm != null) {
        prm.add_endRequest(function (sender, e) {
            if (sender._postBackSettings.panelsToUpdate != null) {
              if(popupDataIsSaved)
              {
                  var owind = GetRadWindow();
                  if (owind && owind.Argument && owind.Argument.callback) {
                      var sourceArgs = owind.Argument;
                  }
                var cs = new ActionEntity.initial(sourceArgs.actionName, sourceArgs.actionId, false, true, false, false, 0, "", "", true, "", msgGuid);
             OnPopupSubmit(cs, false, null);
                 popupDataIsSaved=false;
              }
            }
        });
    };
NOTE
To have reason combo box, copy and adjust this section from one of the OOTB actions dialog that exists in ICM Forms > ICM Case Dialog. - Go to Administration > Lookup Tables > ICM Data Model > Actions.
- Add a new record, and add the following details:
- Action name
- Text
- Validation group: to validate required fields.
- Dialog name: Name of the View
- Workspace guid: the workspace guid of the custom action.
- Display for config set: to display this action in the config set actions menu.
- Manage reasons : to allow the user to pick reason for performing this action (the reasons should be added on the config set page).
- Dialog path: full path for the dialog view (if created in the step 2 above).
Disclaimer: Consult the product team before implementing new action in your project.
