Overview
Portal grids display a menu with the actions available for the user handling a case. 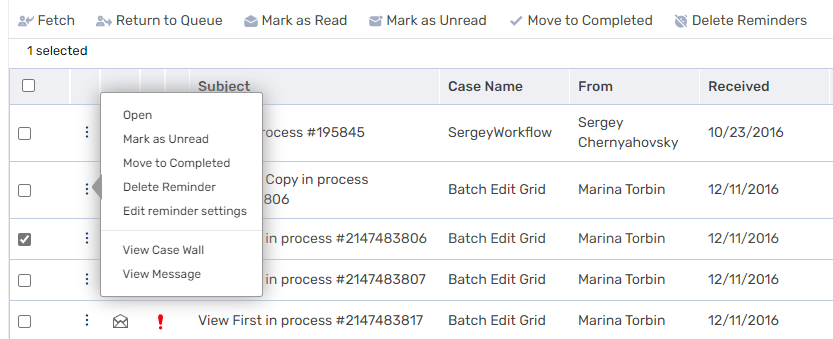
You define the commands available for each grid by:
- Editing the Commands Name block in the ServiceMetadata file
- Editing or creating copies of the config files in the Commands folder. You can add, remove, and create new commands as necessary for your solution.
After editing the files, you must add them to the Commands folder, otherwise your changes don't take effect.
IMPORTANT
The file name must begin as defined in the Commands Name block in the ServiceMetadata file.

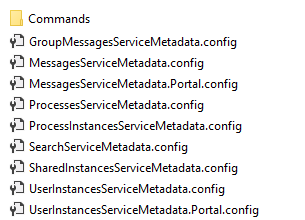
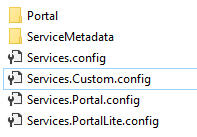
Commands folder
Location: ~\Shared Resources\Components\Flowtime\Config\ServiceMetadata\Commands
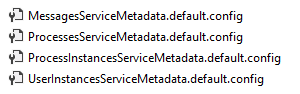
ServiceMetadata files
Location: ~\Shared Resources\Components\Flowtime\Config\ServiceMetadata
NOTE
ProcessInstances: Used for the instances grid of a specific workflow (In the portal, go to All Cases and then select a specific workflow.)
UserInstances: Used for the Cases I Started grid
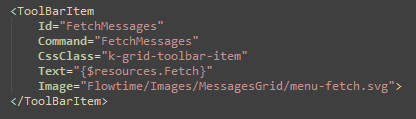
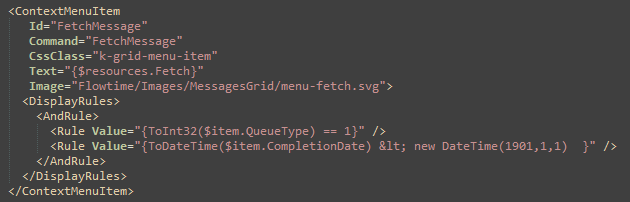
Example of the message grid command config file
Config files code blocks
The Commands config files include several code blocks.
You can create, edit, or remove code blocks to customize which commands to display in the grid menu.
| Block | Description |
|---|---|
| ContextMenu Id | Defines the commands that are displayed for each record in the grid. This block references several ContextMenuItem blocks. |
| ContextMenuItem | Defines the details and functionality of each menu command. |
| ToolBar Id | Defines the commands that are displayed from each grid’s toolbar. This block references several ToolBarItems blocks. |
| ToolBarItem | Defines the details and functionality of each toolbar command. Each Command/ToolbarItem block contains the following fields: Id: The Id of the commands Command: The command function CssClass: The CSS class that defines the display of the command |
| Text | The command text. Take this text from the relevant resource file. |
| DisplayRules | Defines which commands to display based on a set of rules. |
The commands functions are stored in a Command Table block, which is also part of the config file. The Command Table can include several types of commands.
- JavaScript
- OpenWindow
- Custom command
NOTE
To ensure that your JavaScript code is not lost with application upgrades, place it in the folder: ~\Shared Resources\externals\portal\js
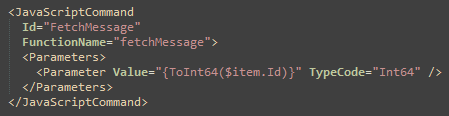
JavaScript commands
JavaScript commands contain the following tags:
- Id: The Id of the command
- FunctionName: The name of the JavaScript function in the system
- Parameters: The parameters to pass to the function, which can be an expression.
For example, for the Menu>Open command, you must pass the Id of the item you have selected, so that the value of the parameter is the expression: $Item.Id.
Create a new command (example)
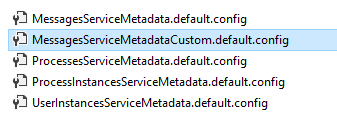
Create a new custom Service.config file, ServiceMetadata file, and Comand.config file named as follows:
- Services.Custom.config
- MessagesServiceMetadataCustom.config
- MessagesServiceMetadataCustom.default.config
Procedure
- In Services.Custom.config file reference the custom ServiceMetadata file: MessagesServiceMetadataCustom.config.

- In MessagesServiceMetadataCustom.config, reference the custom command config file: MessagesServiceMetadataCustom.default.config.


NOTE
The grid component contains the ConfigName property, which maps the grid component to its configuration file. For example, when you set ConfigName=”Custom”, the grid takes its configuration from Services.Custom.config.
DisplayRules
The DisplayRules code block defines which commands to display based on a set of rules.
Example
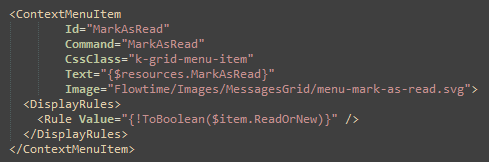
The $item context object holds the row’s data item properties.
For more details, see this article.
NOTE
Make sure that you deploy the board and grid customization via the project template only and create the required XML transformations as described in this article.
