V10.4.1 and later
Overview
As a user you can add a substitute for yourself and for other users in the Cora Orchestration portal. This functionality helps the users to assign their responsibilities to other users and complete tasks on their behalf in their absence.
A substitute user has access to the principal user's following items in the portal:
- All Cases
- My Work
- Notifications
- Tasks
- Archive
The substitute feature uses the same approach as the already existing delegation feature.
The “rt.CurrentUser” is the logical user performing the actions, and the “rt.OriginalUser” is the actual user that is using the application. For both runtime objects, it is the same user ID.
When signing in as a different user (meaning in delegation mode), the original user is substituting the current user, and the actions are logged in the database respectively.
Enable substitution
To enable the substitute functionality, do the following:
- In the Admin site, add
Portal.Substitutionapplication variable, and set the value to True.
The option to set substitute is then visible in the avatar menu in the portal. With this option, you can set substitute user(s) for yourself.
You can also grant permissions to users with specific roles to set and edit substitute for other users. To enable this functionality, you need to add in the Admin site, the Portal.Substitution.Roles application variable and set the roles as comma-separated values.
For example:
Portal.Substitution.Rolesas Group Manager, Team Leader allows any user with Group Manager or Team Leader role to set or edit substitute for other users.
For example, assume the team G1 has members U1, U2, U3, where U1 is the Group Manager, and team G2 has members U1, U4, U5.
With the default setting, U1 can set substitute users for himself and for other members of G1 (that is, U2 and U3), but not for other members from G2 (that is, U4 and U5).Portal.Substitution.Rolesas empty means no user has the privilege to set or edit substitutes for other users.
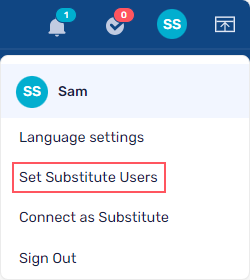
Add a substitute
To add a substitute, do the following:
- In the portal, click Set Substitute Users in the avatar menu.
- In the Set Substitute Users window, for Principal user select the user for whom you want to set the substitute.
By default, the current user is set as principal user.NOTE
If your role is set in thePortal.Substitution.Rolesvariable, then you can set substitute for other principal users. - Click Add, to add a substitute user.
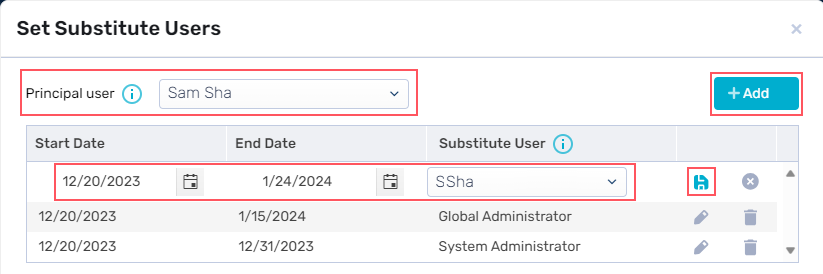
- Add the following details:
- Start Date: Select the date from which the substitute will be active. By default, current date is set as start date.
- End Date: Select the date till which the substitute user will stay active. By default, no date is selected.
- Substitute User: Select the user you want to set as substitute user for the principal user.
- Click
 to add the substitute.


Edit a substitute
You can edit the start and end date for an existing substitute.
To edit a substitute user, follow steps 1 to 3 from the above section, and do the following:
- In the grid, click
 for the substitute user for whom you want to change the dates.
 - Update the dates, and click to save the changes.
Remove a substitute
You can remove a substitute user for a principal user by following the steps 1 to 3 from "Add a substitute" section, and do the following:
- In the grid, click
 for the substitute user you want to remove. A message is displayed to ask for your confirmation.
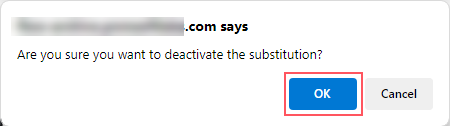
- Click OK to delete the substitute.

Connect as substitute
If you are set as a substitute user for another user, then you can connect as a substitute user in the portal and work on behalf of the other user.
- In the portal, log in with your credentials.
- Click Connect as Substitute in the avatar menu.
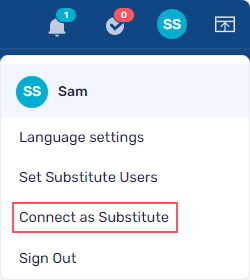
- In the Connect as Substitute window, select the user you want to substitute for.
The list displays all the users for whom you are set as a substitute. If you are not set as a substitute for any user then list appears empty.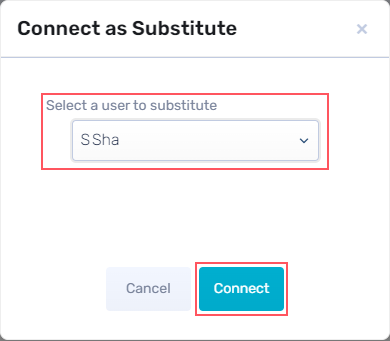
- Click Connect.
A message appears asking for your confirmation and warning you of the consequences.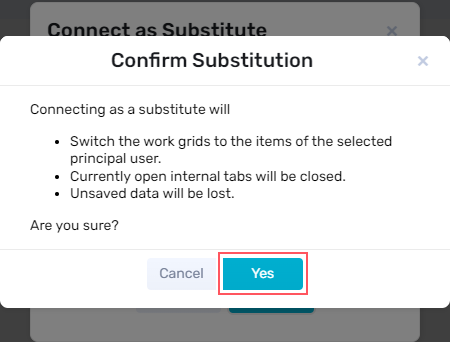
- Click Yes. You are then connected as the substitute user.


As a substitute user, you can see the principal user's name with an eye icon in the top bar in the portal, and your avatar name appears within a red circle.
When you collapse the header your avatar name appears in a red circle with an eye icon.

While connected as a substitute, the substitute user uses the principal user's signatures.
End substitution
While you are connected as a substitute user, and you want to end the substitution and connect back as current user, do the following:
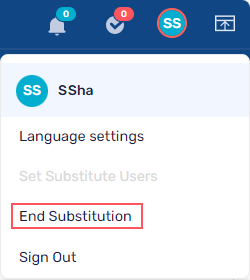
- In the portal, click End Substitution in the avatar menu.
 A message is displayed asking for your confirmation, and warning you of the consequences.
 - Click OK to confirm. And you are then connected as current user.
 A message is displayed asking for your confirmation, and warning you of the consequences.