Starting with V10.0, Cora SeQuence has been renamed to Cora Orchestration.
V10.3 and later
Overview
The Attachments View solution-level reusable component enables you to add a case attachments section to a workflow instance. This functionality allows users to attach one or more files to a case.
The Attachments View component is enabled by default in Solutions. Starting from V10.9.1, you can configure change the default display mode on page load. When the Attachments View component is not part of a Solution, there is no option to add it through UI, built-in commands, and API.
You can make the case attachments as read-only. For read-only attachments, the users can only download and preview (if enabled) the existing attachments. They can't add new attachments.
Attachments View settings are deployed with the solution package so, implementors don't have to configure it at their end.
Configure the Attachments View
To enable case attachments functionality in a workflow instance, you need to configure the Attachments View component in the Solution of which the workflow is part of.
- In the Administration site, open the relevant Solution.
- In the Solution Components section, click Attachments View.
- In the Attachments View screen, configure the following:
- Columns: Select the columns to display in the attachment section in a case.
All columns except the Attachment Type are selected by default.
Comment column is by default selected to be mandatory. Clear the Is mandatory check box to make this column optional. - Attachment Types: Types of attachment categories you want to create for a case. For example, Request Related and Complain Related can be two attachment types for a business.
NOTE
This is relevant only when the Attachment Type column is selected under Columns. If Is mandatory check box is selected, then you need to add at least one attachment type. - Other Settings: Set the default column and order by which to sort the attachments.
- Columns: Select the columns to display in the attachment section in a case.
Add the Attachments View to a form
You can add the Attachments View to a form in two ways:
- Add a code snippet to the form source
- Add the Attachments View control from the Toolbox
Add snippet to the form source
- In a workflow, add or edit a form or a task activity.
- Add the following script to the source in the relevant location.
<div>
<sq:AttachmentsView runat="server" ID="AttachmentsView1"></sq:AttachmentsView>
</div>
Add the Attachments View control from Toolbox
- In a workflow, edit a form or a task activity.
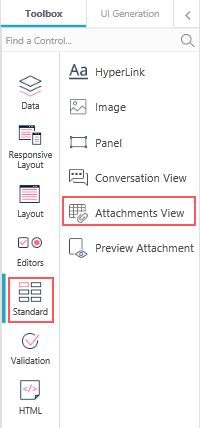
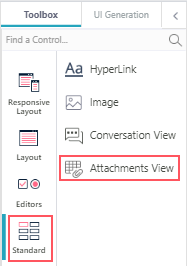
- Click the location in the form where you want to add the Attachments View, and then select Standard > Attachments View.
In the Attachments View properties, select Read-only under Behavior to make the attachments read-only. - Save the form.

Add Case Attachments built-in command
You need to add the Add Case Attachments built-in command activity in the workflow to create a link between the Attachments View component and the UACT. The Attachments View control in the form accesses data from the UACT and displays it.
- Add a Built-In Command activity.
- Select Case Operations > Add Case Attachments.
- Click Next.
- Add the command parameters:
- workflowInstanceId
- attachments
IMPORTANT
Make sure you have Execute permissions in the master workflow.
To use Attachments View in a sub-workflow, the workflowInstanceId parameter should be mapped to the master workflow instance Id.
Example
- Create a solution and a workflow within the solution.
- Add an Attachments View component to the Solution.
- In the Solution workflow, create a form with Attachments View control.
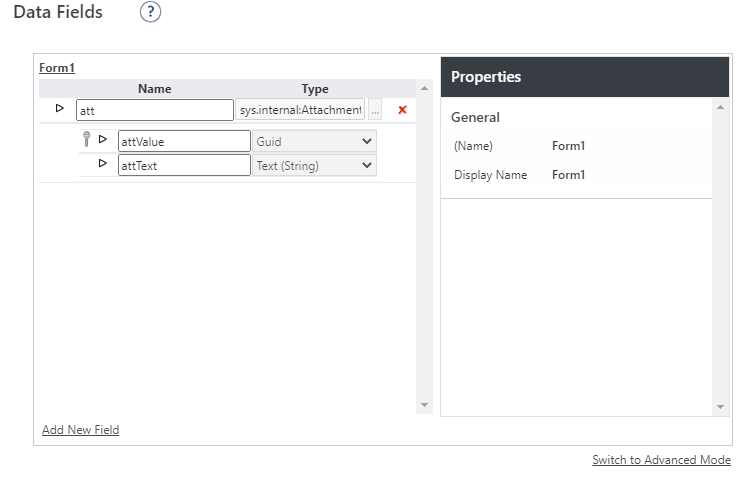
- For the form, set the data model:
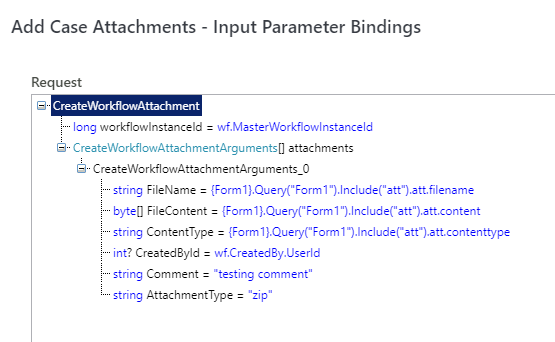
- Add the Add Case Attachments built-in command activity to the workflow, and then map the input parameters.
- Run the workflow instance to display the attachment in the Attachments View section in the form.


Preview attachments
The AttachmentsView control supports preview functionality out-of-the-box.
Currently, preview for the following file formats is supported:
- JPEG
- PNG
- GIF
- TXT
- CSV
- XLSX
- DOCX
- XLS
- RTF
For other file formats, the system downloads the attachment file to your computer.
NOTE
The preview functionality does not support Right-to-Left (RTL) languages, for example, Hebrew and Arabic.
Enable preview attachments
Set the following parameter in the Administration and portal web.config file to enable or disable the attachment preview:
| Parameter | Value |
|---|---|
PNMsoft.Sequence.Components.PreviewAttachments.PreviewEnabled |
|
Set maximum preview size
Set the following parameters in the Administration and Flowtime web.config file to add the maximum preview size for different types of attachments.
| Parameter | Supported files | Default maximum preview size |
|---|---|---|
PNMsoft.Sequence.Components.PreviewAttachments.AttachmentMaxSize |
PDF, JPEG, PNG, GIF, TXT, and CSV | 4 MB |
PNMsoft.Sequence.Components.PreviewAttachments.PassThroughAttachmentMaxSize |
XLSX, DOCX, XLS, and RTF | 1 MB |
By enabling preview in the web.config file, a preview button appears in the attachment list. One-click on the preview button displays the file preview in the same form.
Starting from V10.5, the users can download the attachment, or edit and delete an attachment from the Preview view of attachments.
Starting from V10.6, the Preview attachments view provides thumbnails for attachments. Thumbnails makes it easier for users to quickly access the attachments preview.
NOTE
Thumbnail capability is supported only when using Azure File Storage for the attachments and NOT supported with the "default" SQL storage.
Configure Attachments View display mode
Starting from V10.9.1, you can configure the Attachments View default display mode. You need to add properties to the markup control to configure the following display mode for the portal.
- Set the default tab to show on Attachments View page load; List or Preview.
SelectedTab = "List" (default) | "Preview"
- Set the tab visibility for the List and Preview.
ShowListTab = True (default) | FalseShowPreviewTab = True (default) | False
- Open the control in "read only" mode (default false).
ReadOnly = True | False- when user permissions = "read", then bypass this property.
- when user permissions = "modify" and ReadOnly = True, then the control loads in read only mode.
- Hide the header row is not available or shown.
- The actions upload/edit/delete (in the UI) are not allowed. The API is not limited.
- Control action button visibility.
ShowButtonDownload = True (default) | FalseShowButtonEdit = True (default) | FalseShowButtonDelete = True (default) | FalseShowButtonOpen = True (default) | False
V9.5.1, V9.6 and later
Overview
The Attachments View solution-level reusable component enables you to add a case attachments section to a workflow instance. This functionality allows users to attach one or more files to a case.
The Attachments View component is enabled by default in Solutions. When the Attachments View component is not part of a Solution, there is no option to add it through UI, built-in commands, and API.
You can make the case attachments as read-only. For read-only attachments, the users can only download and preview (if enabled) the existing attachments. They can't add new attachments.
Attachments View settings are deployed with the solution package so, implementors don't have to configure it at their end.
Configure the Attachments View
To enable case attachments functionality in a workflow instance, you need to configure the Attachments View component in the Solution of which the workflow is part of.
- In the Administration site, open the relevant Solution.
- In the Solution Components section, click Attachments View.
- In the Attachments View screen, configure the following:
- Columns: Select the columns to display in the attachment section in a case.
All columns except the Attachment Type are selected by default.
Comment column is by default selected to be mandatory. Clear the Is mandatory check box to make this column optional. - Attachment Types: Types of attachment categories you want to create for a case. For example, Request Related and Complain Related can be two attachment types for a business.
NOTE
This is relevant only when the Attachment Type column is selected under Columns. If Is mandatory check box is selected, then you need to add at least one attachment type. - Other Settings: Set the default column and order by which to sort the attachments.
- Columns: Select the columns to display in the attachment section in a case.
Add the Attachments View to a form
You can add the Attachments View to a form in two ways:
- Add a code snippet to the form source
- Add the Attachments View control from the Toolbox
Add snippet to the form source
- In a workflow, add or edit a form or a task activity.
- Add the following script to the source in the relevant location.
<div>
<sq:AttachmentsView runat="server" ID="AttachmentsView1"></sq:AttachmentsView>
</div>
Add the Attachments View control from Toolbox
- In a workflow, edit a form or a task activity.
- Click the location in the form where you want to add the Attachments View, and then select Standard > Attachments View.
In the Attachments View properties, select Read-only under Behavior to make the attachments read-only. - Save the form.
Add Case Attachments built-in command
You need to add the Add Case Attachments built-in command activity in the workflow to create a link between the Attachments View component and the UACT. The Attachments View control in the form accesses data from the UACT and displays it.
- Add a Built-In Command activity.
- Select Case Operations > Add Case Attachments.
- Click Next.
- Add the command parameters:
- workflowInstanceId
- attachments
IMPORTANT
Make sure you have Execute permissions in the master workflow.
To use Attachments View in a sub-workflow, the workflowInstanceId parameter should be mapped to the master workflow instance Id.
Example
- Create a solution and a workflow within the solution.
- Add an Attachments View component to the Solution.
- In the Solution workflow, create a form with Attachments View control.
- For the form, set the data model:
- Add the Add Case Attachments built-in command activity to the workflow, and then map the input parameters.
- Run the workflow instance to display the attachment in the Attachments View section in the form.
Preview attachments
The AttachmentsView control supports preview functionality in two ways. The preview is displayed either in a pop-up window or in a specific location in the same form.
Currently, preview for the following file formats is supported:
- JPEG
- PNG
- GIF
- TXT
- CSV
- XLSX
- DOCX
- XLS
- RTF
For other file formats, the system downloads the attachment file to your computer.
NOTE
The preview functionality does not support Right-to-Left (RTL) languages, for example, Hebrew and Arabic.
Enable preview attachments
Set the following parameter in the Administration and Flowtime web.config file to enable or disable the attachment preview:
| Parameter | Value |
|---|---|
PNMsoft.Sequence.Components.PreviewAttachments.PreviewEnabled |
|
Set maximum preview size
Set the following parameters in the Administration and Flowtime web.config file to add the maximum preview size for different types of attachments.
| Parameter | Supported files | Default maximum preview size |
|---|---|---|
PNMsoft.Sequence.Components.PreviewAttachments.AttachmentMaxSize |
PDF, JPEG, PNG, GIF, TXT, and CSV | 4 MB |
PNMsoft.Sequence.Components.PreviewAttachments.PassThroughAttachmentMaxSize |
XLSX, DOCX, XLS, and RTF | 1 MB |
Preview attachments in a pop-up window
By enabling preview in the web.config file, one-click on the filename displays the preview in a pop-up window. For Attachments View control, the attachment preview is opened in a pop-up window if the PreviewControlID property is not set.
Display the Attachments View files in the Preview Attachment control
To preview the Attachments View files in a form add the Preview Attachment control in a form in two ways:
- Add a code snippet to the form source
- Add the Preview Attachment control from Toolbox
Add snippet to the form source
- In a workflow, add or edit a form or a task activity.
- Add the following script to the source in the relevant location.
<div>
<sq:PreviewAttachmentView runat="server" ID="PreviewControl" Display="Static" Width="800" Height="500"></sq:PreviewAttachmentView>
</div>
By default, the Display property of the Preview Attachment control is set to Static so it preserves space for the preview according to the given width and height. You can set the Display property to change the preview size to dynamic.
Add the Preview Attachment control from Toolbox
- Edit the form.
- Select from the Toolbox, Standard > Preview Attachment control.
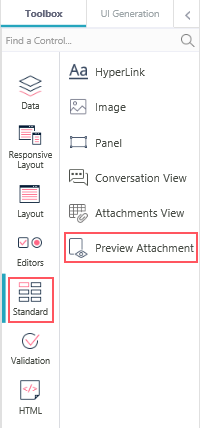
Add the Preview Attachment control in the specific location in the form where you want to display the preview. - Save the form.

V9.5
Overview
The Attachments View solution-level reusable component enables you to add the case attachments section to a workflow instance. This functionality allows users to attach one or more files to a case.
The Attachments View component is enabled by default in Solutions. When the Attachments View component is not part of a Solution, there is no option to add it through UI, built-in commands, and API.
Attachments View settings are deployed with the solution package.
Configure Attachments View
To enable case attachments functionality in a workflow instance, you need to configure the Attachments View component in the Solution of which the workflow is part of.
- In the Administration site, click and open the Solution from the list.
- In the Solution Components section, click Attachments View.
- In the Case Attachments window
- Select columns to be displayed in the attachment section in a case.
By default, all columns are selected.
Attachment Type and Comment columns are by default selected to be mandatory. Clear the Is mandatory check box for each to make these columns optional. - Add attachment types that can be selected while adding attachments in a case.
NOTE
Add at least one attachment type as Attachment Type is by default a mandatory column to be displayed in the case attachments section. - Make other settings like sorting order, default sorting column, and maximum size of attachment file preview.
- Select columns to be displayed in the attachment section in a case.
Add case attachments to Cora SeQuence form
You can add the case attachments section to a form in two ways:
- Add a code snippet to the form source
- Add Attachments View option from Toolbox
Add snippet to form source
- In a workflow, add or edit a form or task activity.
- Add the following script to the source in the relevant location.
<div>
<sq:AttachmentsView runat="server" ID="AttachmentsView1"></sq:AttachmentsView>
</div>
Add Attachments View from Toolbox
- In a workflow, edit the form activity.
- Add Attachments View from the toolbox.

Case Attachments built-in command
You need to add the Case Attachments built-in command activity in the workflow to create a link between the form and the database. The case attachments section in the form access data from the database and displays it.
- Add a Built-In Command activity.
- Select Case Operations > Add Case Attachments.
- Click Next.
- Add the following command parameters:
- workflowInstanceId
- attachments
IMPORTANT
Make sure you have Execute permissions in the master workflow.
To use Attachments View in a sub-workflow, the workflowInstanceId parameter should be mapped to the master workflow instance Id.
