Overview
In the customization template project, there are two configuration files that you can edit to customize the main menu items and subitems.
- Default.config: Configure the main portal menu items.
- HotOperations.config: Configure menu items related to the case management pages (known as Hot Operations up to version 9.x).
Location: src\addons\transform\Shared Resources\Components\Flowtime\Config\Portal\Commands
In these files, you can edit existing links, set up their URLs, and add links to new pages.
Add a new menu item
In this example, you add a menu item that links to a custom MyForm.aspx page.
To open the new menu item in a new tab:
<?xml version="1.0"?>
 <CommandDocument xmlns:xdt="http://schemas.microsoft.com/XML-Document-Transform" xmlns="http://schemas.pnmsoft.com/sequence/2013/01/ui/commands">
     <CommandTable xdt:Transform="InsertIfMissing">
         <NavigateToUrlCommand xdt:Transform="InsertIfMissing" xdt:Locator="Match(Id)" Id="MyFormCommand" Url="~/MyForms/MyForm.aspx"/>
     </CommandTable>
     <ControlTable xdt:Transform="InsertIfMissing">
         <Menu xdt:Transform="InsertIfMissing" xdt:Locator="Match(Id)" Id="Portal">
             <Items>
<MenuItem xdt:Transform="InsertIfMissing" xdt:Locator="Match(Id)" Id="MyFormMenuItem" Command="MyFormCommand" Text="My Form" Tab="true"/>
             </Items>
         </Menu>
     </ControlTable>
 </CommandDocument>
To open the new menu item in the main view:
<?xml version="1.0"?>
 <CommandDocument xmlns:xdt="http://schemas.microsoft.com/XML-Document-Transform" xmlns="http://schemas.pnmsoft.com/sequence/2013/01/ui/commands">
     <CommandTable xdt:Transform="InsertIfMissing">
         <NavigateToUrlCommand xdt:Transform="InsertIfMissing" xdt:Locator="Match(Id)" Id="MyFormCommand" Url="/MyForms/MyForm.aspx"/>
     </CommandTable>
     <ControlTable xdt:Transform="InsertIfMissing">
         <Menu xdt:Transform="InsertIfMissing" xdt:Locator="Match(Id)" Id="Portal">
             <Items>
<MenuItem xdt:Transform="InsertIfMissing" xdt:Locator="Match(Id)" Id="MyFormMenuItem" Command="MyFormCommand" Text="My Form"/>
             </Items>
         </Menu>
     </ControlTable>
 </CommandDocument>
Set an image for the menu item
Each menu item includes an image. You define the image attribute in the MenuItem section.
For example: Image="Flowtime/Images/Menu/Processes.png"
Reorder menu item
You can change the order of the menu items, by adding the Sequence attribute.
For example: Sequence="1"
Add a submenu
The Flowtime site menu can include up to two menu levels.
In this example, you add one submenu item to the Processes menu item.
- Open the Default.config file.
- In a new or existing
MenuItemsection, add the propertySubMenuId="Processes.
This setting links the submenu to the correct menu item. - To define the submenu, add a new
MenuItemtag that includes the new submenu item.
For example:<Menu xdt:Transform="InsertIfMissing" xdt:Locator="Match(Id)" Id="Processes"> <Items> <MenuItem xdt:Transform="InsertIfMissing" xdt:Locator="Match(Id)" Id="ActiveProcessesMenuItem" Command="ActiveProcesses" Text="Active Processes" Tab="true"/> </Items> </Menu>
NOTE
Make sure that the command that you specify exists under the commandTable tag.
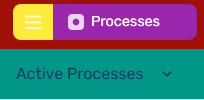
Following the configuration described in the example above, the resulting submenu should look like this:

Menu item configuration for case management pages
Case management menu items display based on the user roles.
The DisplayRules code block defines which commands to display based on a set of rules.
You set the case management (previously called Hot Operations) display rules in the HotOperations.config file, under <MenuItem><DisplayRules>.
| Setting | Description |
|---|---|
<ho:IsOpsManagerRule /> | Displays the relevant menu item for the Manager role. |
<ho:IsTeamLeaderRule /> | Displays the relevant menu item for the Team Leader role. |
The context of the rule may come from different sources, for example:
- Runtime expression
- SolutionId or GroupId
- Resources (localization)
- AppSettings from web.config
Example
<MenuItem
      Id="CaseManagement"
      Text="Case Management"
      Tooltip="Case Management"
      Image="sqpi-CaseManagement"
      SubMenuId="HotOperationsManager">
    <DisplayRules>
       <ho:IsOpsManagerRule />
    </DisplayRules>
</MenuItem>
Localize custom portal components
- Add the following attribute to the portal web.config file:
<resources resXFilesLocation="Resources" externalGlobalResourceName="CustomResourceFileName" /> - Under Shared Resources/Resources/Sequence, add the localized files.
For example: CustomResourceFileName.resx or CustomResourceFileName.es.resx - Use the following expression to get the resource value:
{$resources.KeyName}
Example
<MenuItem Id="CoraOpsProcessesIStarted"
     Command="CoraOpsProcessesIStartedCommand"
     Text="{$resources.CasesIStarted}"
     Tooltip="{$resources.CasesIStarted}"
     Image="sqpi-Processes">
</MenuItem>