V3.4
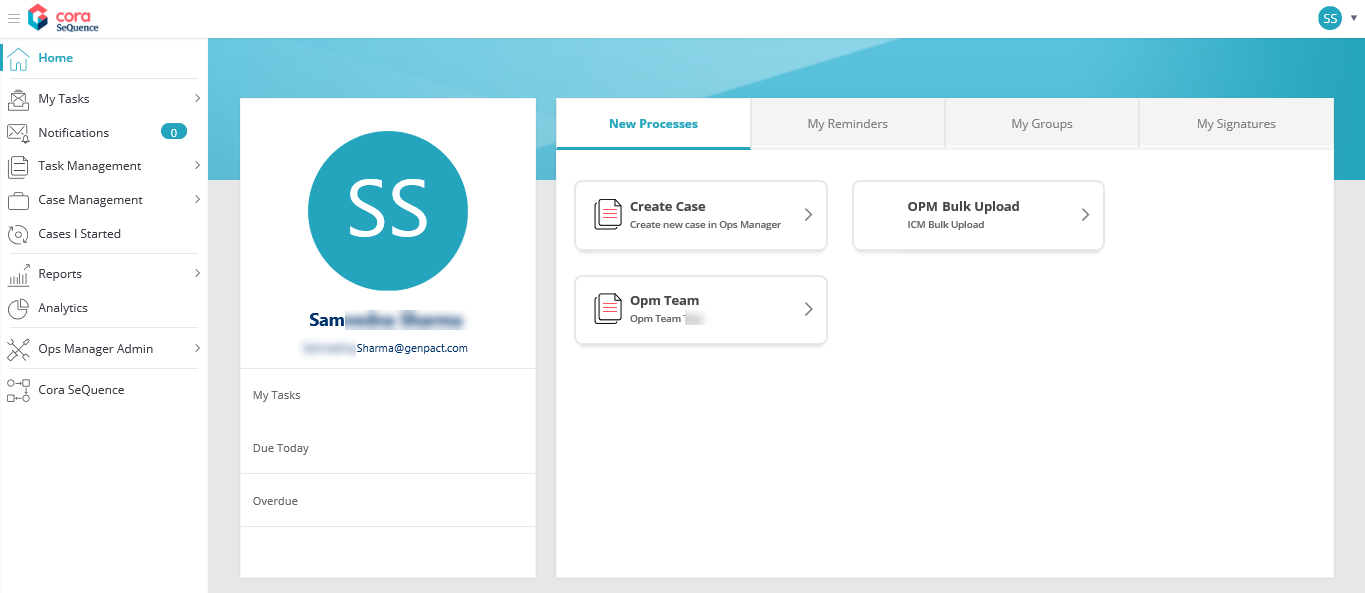
You can manage your profile on the Cora OpsManager home page. The home page displays a fixed section with a user profile picture, name, and Email Id. The same section displays the count of My Tasks, Due Today, and Overdue.
On the Home page, you can create a new case, view your profile picture, view a list of all the groups you are associated to along with the role(s) assigned to you in respective groups, and add your personalized signatures for email communications.
To access your user profile settings, follow the steps below:
- Go to Flowtime > Ops Manager. The home page is displayed with your details.

The My Reminders tab enables you to choose how reminder notifications are sent to you. You can choose from the following three options.
- Don't send me reminder emails: No email notification is sent to you for reminders.
- Send me a daily summary: You receive a daily summary email of all the reminders you have set.
- Send me each reminder separately: You receive separate emails, one for each reminder you have set.
This section also displays a list of all the personal reminders you have added on cases.

The My Groups tab displays a list of groups you are aligned to, with roles assigned to you within the group.
On the My Signature tab, you can add new signatures and view a list of all the signatures you have previously added to your profile. You can use these signatures on the compose email window while sending an email from a case.
(My Signatures is not valid from V4.1, and is now available in the Avatar menu.)
Create a new signature
- On the My Signature tab click + Add Signature.
- In the Signature window, add the Signature Name and text.
NOTE
You can embed an image in the signature text by simple copy-paste. - Click Add.
Choose from the Default Signature list, the signature to be set as the default. The chosen signature appears by default on the compose email window while sending an email from a case.
To navigate to the user profile from any page in Flowtime, click Home in the left panel menu.
V3.2
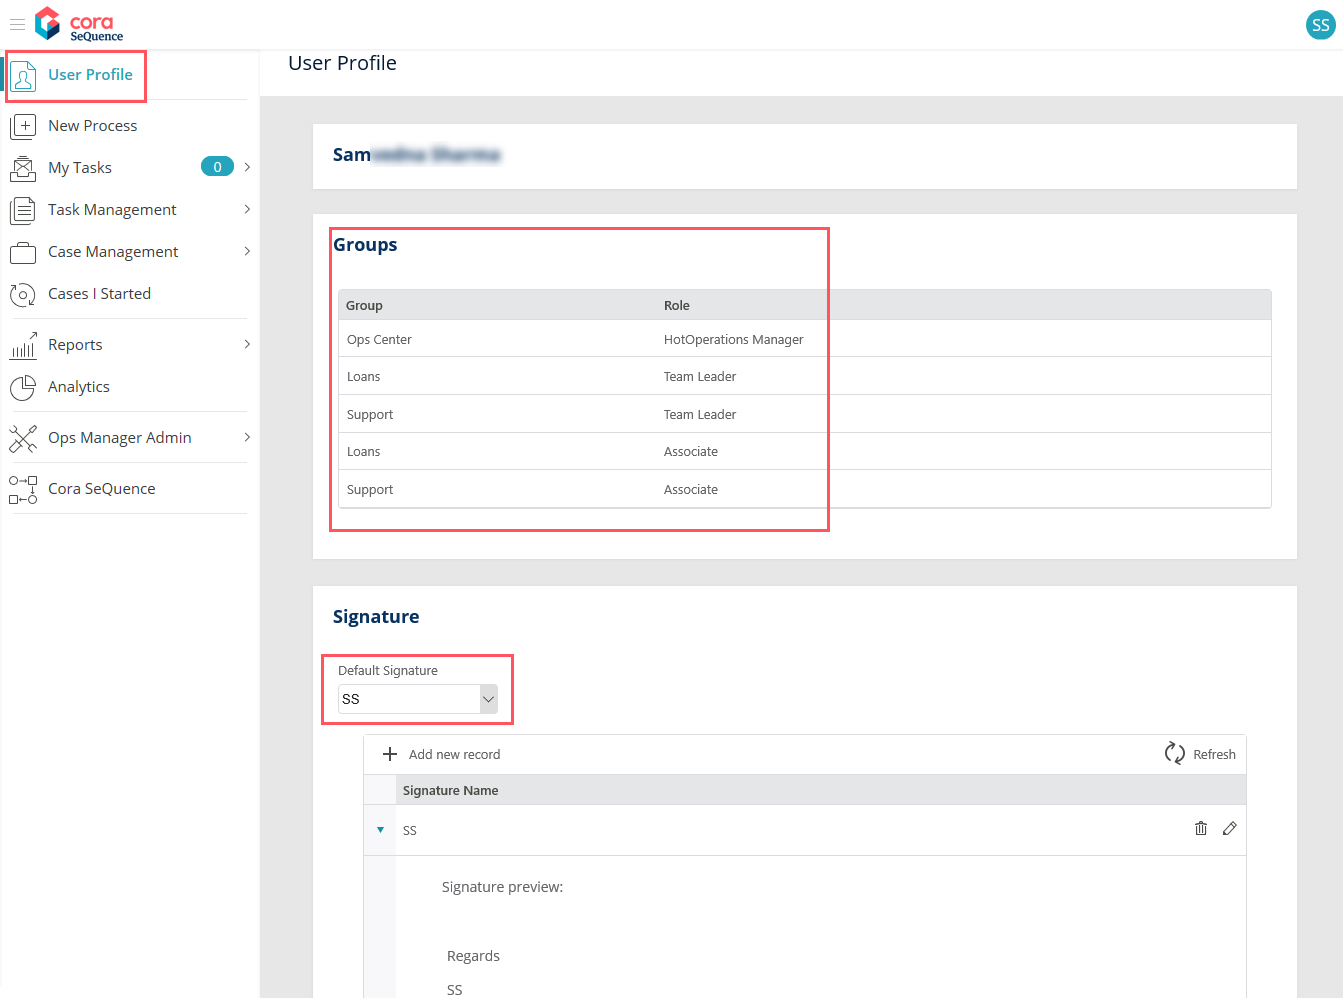
On the User Profile page, you can view your profile picture, view list of all the groups you are associated to along with the role(s) assigned to you in respective groups, and add your personalized signatures for email communications.
To access the User Profile page, follow the steps below:
- Go to Flowtime > Ops Manager.
- Click User Profile on the left panel menu. The User Profile page is displayed with your name on the top.

Groups section displays the list of groups you are aligned to, with roles assigned to you within the group.
Signature section allows addition of new signatures, and lists all the signatures you have previously added to your profile. You can use these signatures on the compose email window while sending an email from a case.
To add a signature, follow the steps below:
- Click +Add new record. A Signature pop-up window appears.
- On Signature window, add the Signature Name and Signature text.
NOTE
You can embed an image in the signature text by simple copy paste. - Click Add. The pop-up window gets closed, and the newly added signature is listed under the Signature section on User Profile page.
Choose from the Default Signature list, the signature to be set as the default. The chosen signature appears by default on the compose email window, while sending an email from a case.
My Reminders section enables you to choose how reminder notifications are sent to you. There are three options to choose from.
- Don't send me reminder emails: No email notification is sent to you for reminders.
- Send me a daily summary: You receive a daily summary email of all the reminders you have set.
- Send me each reminder separately: You receive separate emails, one for each reminder you have set.
This section also displays a list of all the reminders you have added on cases.

V3.1
On the User Profile page, you can view your profile picture, view the list of all the groups associated to you along with the role(s) assigned to you in respective groups, and add your personalized signatures for email communications.
To access the User Profile page, follow the steps below:
- Go to Flowtime > Ops Manager.
- Click User Profile option on the left panel menu. The User Profile page is displayed with your name on the top.

The Groups section displays the list of groups you are aligned to, with roles assigned to you within the group.
The Signature section allows addition of new signatures and lists all the signatures you have previously added to your profile. You can use these signatures on the compose email window while sending an email from a case.
To add a signature, follow the steps below:
- Click +Add new record. A Signature pop-up window appears.
- On Signature window, add the Signature Name and Signature text.
NOTE
You can embed an image in the signature text by simple copy paste. - Click Add. The pop-up window gets closed and the newly added signature is listed under the Signature section on User Profile page.
Choose from the Default Signature list, the signature to be set as the default. The chosen signature appears by default on the compose email window while sending an email from a case.
The My Reminders section enables you to make reminder email settings like choosing if you want to receive an email notification of the reminder or not. It also displays list of all the reminders you have added on the cases.

V3.0
On the User Profile page, you can view your profile picture, view the list of all the groups associated to you along with the role(s) assigned to you in respective groups, and add your personalized signatures for email communications.
To access the User Profile page, follow the steps below:
- Go to Flowtime > Ops Manager.
- Click User Profile option on the left panel menu. The User Profile page is displayed with your name on the top.

The Groups section displays the list of groups you are aligned to, with roles assigned to you within the group.
The Signature section allows addition of new signatures and lists all the signatures you have previously added to your profile. You can use these signatures on the compose email window while sending an email from a case.
To add a signature, follow the steps below:
- Click +Add new record. A Signature pop-up window appears.
- On Signature window, add the Signature Name and Signature text.
NOTE
You can embed an image in the signature text by simple copy paste. - Click Add. The pop-up window gets closed and the newly added signature is listed under the Signature section on User Profile page.
Choose from the Default Signature list, the signature to be set as the default. The chosen signature appears by default on the compose email window while sending an email from a case.
Previous to V3.0
On the User Profile page, you can view the list of all the groups associated to you along with the role(s) assigned to you in respective groups, and add your personalized signatures for email communications.
To access the User Profile page, follow the steps below:
- Log in to the Cora OpsManager.
- Hover over the user icon on the top right corner of the landing page. A drop-down menu is displayed with two options, User Profile and Logout.

- Click User Profile. The User Profile page is displayed with your name on the top.
The Groups section displays the list of groups you are aligned to, with roles assigned to you within the group.
The Signature section allows addition of new signatures and lists all the signatures you have previously added to your profile. You can use these signatures on the compose email window while sending an email from a case.
To add a signature, follow the steps below:
- Click +Add new record. A Signature pop-up window appears.
- On Signature window, add the Signature Name and signature text.
NOTE
You can embed an image in the signature text by simple copy paste. - Click Add. The pop-up window gets closed and the newly added signature is listed under the Signature section on User Profile page.
Choose from the Default Signature drop-down, the signature to be set as the default. The chosen signature appears by default on the compose email window while sending an email from a case.


