V9.6
Overview
The UI rule engine simplifies the creation and maintenance of a form's UI behavior. As a developer, with this new feature, you don't have to add complicated JavaScript snippets in code, and you can write the form's UI behavior controlling methods in simple coding language.
NOTE
This feature is currently available in Preview mode.
The rules manager in form view enables suggestions, auto-complete options, and validation checks for the rule's syntax. The rules are saved to the form’s markup as part of the Rules control markup. In runtime, the UI Rule engine processes each rule and generates an anonymous JavaScript function registered on the page.
IMPORTANT
Do not try to change or tamper with the Rules control markup. This will break the rules integrity and the form will crash in runtime.
Use cases
The UI rules replace the JavaScript snippets to control the UI behavior of a form view. You can use UI rules for:
- Hiding or showing controls and labels
- Enabling or disabling controls and inputs
- Setting values to form fields.
For example, multiplying two inputs from the user and setting a third field value - Adding conditions on the form fields
- Validating business logic such as comparing field values.
For example, to validate if a From date is a date before a To date. Watch this video to learn how to customize a form using the UI Rules control.
Adding the Rules control to a form
- In the Administration site, edit a form's view.
- In the UX Studio, from the Toolbox, add Standard > Rules control.
- For the newly added Rules control, click Manage rules.
- In the Rules Editor screen, click Add Rule. A new rule appears in the list and is selected by default.
A new rules manager always starts with an empty rule list. - Add the following details in the Edit Selected Rule section:
- Name: a unique name of the rule.
- Description: a short description of what this rule does.
- Rule definition.
For details, see the Rule definition section in this article.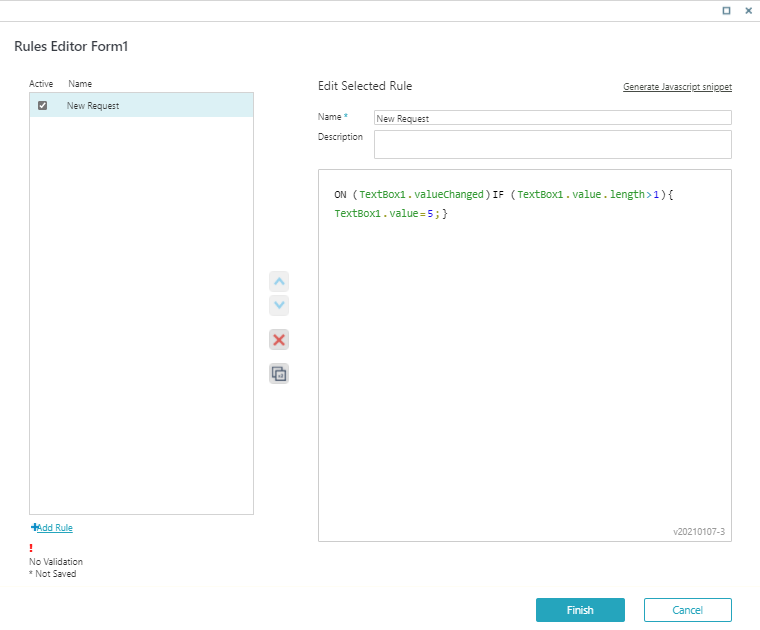
- Click Finish.
- Save the form.
The created rules are not saved until you save the form.

Rules editor
The rules editor screen uses smart suggestions to assist a developer in writing a valid rule using the simple Cora script language. The suggestions list adjusts itself to the current location and section of the rule to show and allow only valid options to be written to the rule.
Rules manager control can have a maximum of 100 rules. All related rules appear listed on the left of the Rules Editor screen.
NOTE
Only the selected rules are enabled and implemented at runtime.
Rules are processed and registered to the runtime page by order of appearance in the list.
- A rule name with an asterisk suggests that it was changed and not saved yet.
- A rule name with a red exclamation mark suggests an invalid rule.
- To change the order of the rules in the list, use the up and down arrows in the Rules Editor screen.
IMPORTANT
On enabling invalid rules, the form view crashes at runtime.
Rule definition
A rule definition includes the following elements:
- ON statement: All rules must start with the ON keyword following by the event to register the rule to. Events can be a control event such as getting the focus or a window/document event such as window load.
- Body: a block of statements that consist of one or more instructions.
Best practices
- End each instruction with a semicolon (;).
- For multiple instructions, use curly brackets {} to wrap all instructions as one block.
- The keywords and values in rules are case sensitive.
Examples
- The following rule registers itself when the value of Field1 text box is changed.
If the value of Field1 is NewRequest (case sensitive), then the numeric textbox Num1 value is set to 12, and another numeric textbox Num2 is hidden. In any other case, the Num1 value is 21, and the Num2 is made visible.
ON (Field1.valueChanged)
{
IF (Field1.value=NewRequest)
{
Num1.value=12;
Num2.visible=false;
}
ELSE
{
Num1.value=21;
Num2.visible=true;
}
}
- The following rule uses the scope variable 'sender' to test whether the value of the field "Hello World" raises the event.
ON (Field1.valueChanged) {
IF(sender.value==Hello World){
Field1.updateCssClass(HelloWorldClass);}
- The following rule registers when TextBox1 is clicked and changes the TextBox1 value to 5.
ON (TextBox1.focus) {TextBox1.value=5;}Limitations
- The UI rule engine applies to the properties and methods fields only.
- The UI rule editor has indentation and line-breaking issues.
 | Want to learn by doing? Check out this hands-on exercise. Note that only internal users can access the link. |
