Overview
Before you start to customize the portal, you need to prepare the development environment, which can be a dedicated server or your local computer. This preparation involves installing the 3rd-party software and Cora Orchestration components required to apply the customization.
![]() Watch a demo of the setup process.
Watch a demo of the setup process.
Set up the development environment
The first step for setting up the environment is to download and extract the Cora Orchestration Custom PS Scripts ZIP file from the repository and run the oneClick_Install_Env_Local.ps1 function.
IMPORTANT
Make sure that the WCF HTTP Activation service is installed and enabled on the Windows server.  Click to enlarge.
Prerequisites
Before you begin, make sure that you have:
- Set up a Cora Orchestration database
- The connection string to the database
- A valid product license
- Access to the Cora Orchestration repository
NOTE
Contact Support to obtain credentials to access the Cora SeQuence repository.
Procedure
- Download and extract the CustomPSScripts ZIP file from the repository.
IMPORTANT
The folder to which you extract the CustomPSScripts ZIP is your customization working folder.
You must run all the PowerShell functions from this folder. - In the downloaded structure, locate the tools folder.
- Under the tools folder, do the following:
- Create a folder named "License", and place the Cora Orchestration license files in it.
- Confirm that the secrets.json file is updated with the correct database connection string.
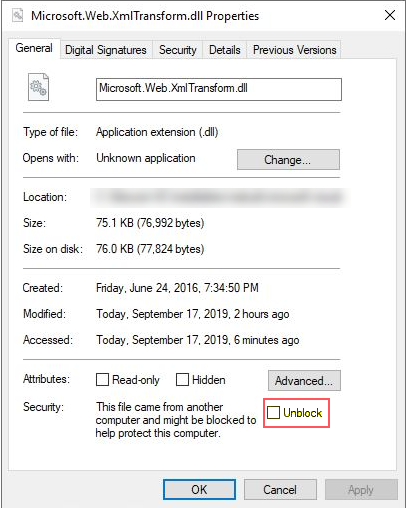
- Right-click the Microsoft.Web.XmlTransform.dll file, and then click Properties.
- On the General tab, if there is a Security section, make sure that the Unblock checkbox is selected.
- Locate the 2_download_Original_File_Local.ps1 PowerShell script, and set the portal version and port value.
Parameter Description Type FLOW_TIME_VERSIONVariable that specifies the portal version Numeric -Port Value that determines the portal number Numeric - Run the oneClick_Install_Env_Local.ps1 function.
- Optional: Install the Redux Developer Tools browser extension.
- Restart your computer.
NOTE
At a later stage, the portal version and port value parameters will be added to the oneClick_Install_Env_Local.ps1 function, and there will be no need to edit them separately.
PowerShell screen after deployment

Required 3rd-party components
The oneClick_Install_Env_Local.ps1 function installs the required 3rd-party components.
| Component | Details |
|---|---|
| Visual Studio Code | For a better developing experience working with Visual Studio Code, it's recommended to download the following extensions: |
| Latest NodeJS | Download the LTS Version |
| Microsoft URL Rewrite | Module for IIS |
| Chocolatey package manager for Windows | Package manager for Windows |
| .NET Framework 4.8 | - |
| Git-LFS | Git Large File Storage replaces audio samples, videos and other large files with text pointers inside Git and stores the file contents on a remote server. |
| Notepad++ | - |
| Microsoft Windows and IIS features |
|
| WriteAscii | For PowerShell functions |
Additional software
It is recommended to install the Redux Developer Tools extension for your browser. You need this extension to develop React components with state, which may be required for advanced customization scenarios.
Cora Orchestration components
Besides downloading and installing the required 3rd-party software, the oneClick_Install_Env_Local.ps1 function does the following:
- Installs the PowerShell modules with the required functions to deploy and configure Cora Orchestration.
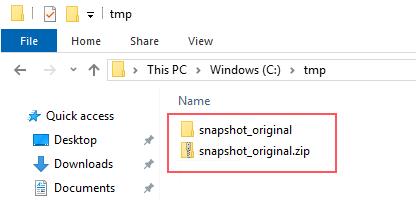
- Deploys the portal web application in IIS in this location C:\inetpub\wwwroot\Cora SeQuence\Flowtime 1.
- Creates a snapshot of the deployed portal site in this location C:\tmp\snapshot_original.
- Downloads the Template project from the repository, and unpacks it in the folder from which you ran the oneClick_Install_Env_Local.ps1 function.

Validate the development environment setup
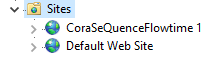
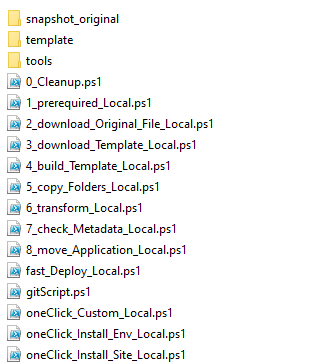
After setup, check that the CoraSequenceFlowtime 1 site has been added to the IIS Sites folder, the prerequisite 3rd-party software have been installed, and that the customization working folder includes the required components.
| IIS | Customization working folder |
|---|---|
 |  NOTE 0_Cleanup.ps1 is available from V10.3 onwards. |
Redeploy the development environment
In case you have already deployed development environment and for some reason you need to redeploy the portal with the Template project, run only the oneClick_Install_Site_Local.ps1 PowerShell function.
- Remove the CoraSeQuenceFlowtime 1 site and all its contents from IIS.
- Delete all the existing files from the customization working folder, except the PowerShell functions and the Tools folder.
- Run the oneClick_Install_Site_Local.ps1 PowerShell function.
