Starting with V10.0, Cora SeQuence has been renamed to Cora Orchestration.
V10.5 and later
Overview
Use the File Writer activity to create, edit, and save a file into the database as part of a workflow. After you create the file, you can access and use its data in other activities.
You can also use the File Writer activity to generate a PDF file with data from forms.
Use cases
- Create a spreadsheet of all support tickets with a designated severity level.
- Create a file from large, unstructured data, and import it to Cora SeQuence.
- Create a file and use it as an attachment in File Activities.
- Create PDF files for archiving or printing purposes. For example, you can create a PDF that includes all the sign-off forms of a workflow for future auditing procedures.
- Create a PDF file by merging content from two or more files of different type. (Supported from V10.5 onwards)
Configuration properties by file type
You can create the following three types of files with the File Writer activity.
- CSV
- Docx (supported from V10.6 onwards)
- OpenXML
- Compressed (supported from V10.6 onwards)
For all file types, you need to define the file's access mode:
- Internal (default): The system can access the file and share it with a different workflow.
- Private: Only you can access the file.
- Public: Anyone can access the file.
Each file type requires different properties.
Main CSV file properties
| Property | Description | Interface |
|---|---|---|
| Format | Defines the language, date, and time format for the CSV file. For example: English (United States) format will set language as en-US, date format as M/d/yyyy, and time format as h:mm tt. | 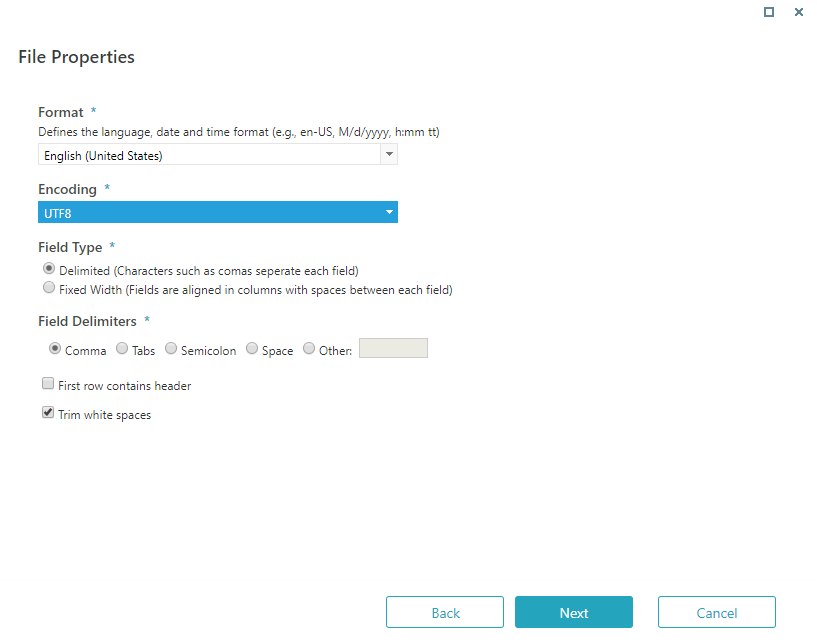 Click image to enlarge it. Click image to enlarge it. |
| Encoding | Supported character encoding types:
| |
| Field Type | Select Delimited to separate each field with a special character like comma (,) or select Fixed Width to align fields in columns with a space between each field. | |
| Field Delimiters | Select the character you want to use as a delimiter. Enabled only when field type is Delimited. | |
| First row contains header | Select this option, if the first row of the source file contains a header. In this case, the first row is skipped when the file is processed. | |
| Trim white spaces | Removes unnecessary spaces in cell values. This option is selected by default for both field types and can be unselected for Delimited field type only. |
Main Docx file properties
| Property | Description | Interface |
|---|---|---|
| Action | Select an action to perform. Each action generates different capabilities.
|  Click image to enlarge it. Click image to enlarge it. |
| HTML Details (For Create file from HTML) | Paste the HTML code from which the Docx file is to be created. Example: Literal string "<html><body><h1>my content</h1></body></html>"Expression returning string {Approval Task}.Tasks.Last().Body | |
| URL Details (For Create file from URL) | Enter the URL where the Docx file content is. Example: {Request}.Query("MyRequest").URL or"HTTP://myServer/myPage.aspx?myParam="+{Request}.Query("MyRequest").["ActInstanceNumber"]&config=form | |
| Credential Type Credential Name (For Create file from URL) | If the URL that you entered requires credentials, set the credential type and name. | |
| Source Query (For Merge and convert file list) | Enter the query to select files which need to be merged to create the file. Example: {Request}.Query(“MyRequest”).AsQueryable().Select(GUID) | |
| Source Query (For Extract from a PDF file) | Enter the query to select the PDF file from which pages are to be extracted. Example: {Request}.Query(“MyRequest”)[FileGuid] | |
| Start Page End Page (For Extract from a PDF file) | Select the page range from the PDF file from which pages are to be extracted. | |
| Page Size | Select the required paper size to print the PDF file.
| |
| Add page numbering | Select this option to display page numbers in the PDF file. | |
| Landscape page orientation (Available from V9.9.2 and V10.3 onwards) Only for creating from HTML and URL | Select this option to set the page orientation to landscape while printing. The default page orientation is portrait. | |
| Contain Header/Footer (Available from V10.5) Only for creating from HTML and URL | Select this option if your file contains some header or footer content. |
Main OpenXML file properties
| Property | Description | Interface |
|---|---|---|
| Format | Defines the language, date, and time format for the CSV file. For example: English (United States) format will set language as en-US, date format as M/d/yyyy, and time format as h:mm tt. | 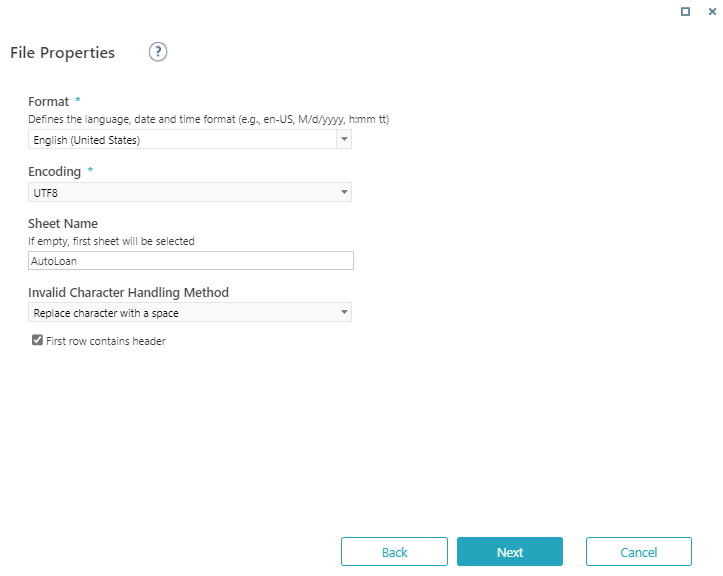 Click image to enlarge it. Click image to enlarge it. |
| Encoding | Supported character encoding types:
| |
| Sheet Name | If the source file contains more than one sheet, specify the name of the sheet that you want to process. | |
| Invalid Character Handling Method | Selects how the invalid characters will be handled in the sheet. In case of an invalid character, either the invalid character will be replaced with a space or the activity will fail. | |
| First row contains header | Select this option, if the first row of the source file contains a header. In this case, the first row is skipped when the file is processed. |
Main PDF file properties
Most of the properties for generating PDF files is similar to Docx files.
| Property | Description | Interface |
|---|---|---|
| Action | Select an action to perform. Each action generates different capabilities.
| 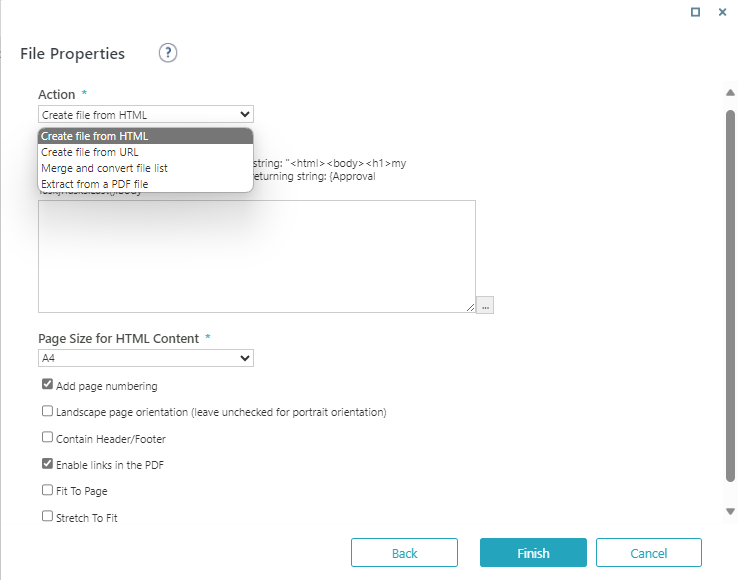 Click image to enlarge it. Click image to enlarge it. |
| HTML Content (For Create file from HTML) | Paste the HTML code from which the PDF file is to be created. Example: Literal string "<html><body><h1>my content</h1></body></html>"Expression returning string {Approval Task}.Tasks.Last().Body | |
| URL Details (For Create file from URL) | Enter the URL where the PDF file content is. Example: {Request}.Query("MyRequest").URL or"HTTP://myServer/myPage.aspx?myParam="+{Request}.Query("MyRequest").["ActInstanceNumber"]&config=form | |
| Credential Type Credential Name (For Create file from URL) | If the URL that you entered requires credentials, set the credential type and name. | |
| Source Query (For Merge and convert file list) | Enter the query to select files which need to be merged to create the PDF. Example: {Request}.Query(“MyRequest”).AsQueryable().Select(GUID) | |
| Source Query (For Extract from a PDF file) | Enter the query to select the PDF file from which pages are to be extracted. Example: {Request}.Query(“MyRequest”)[FileGuid] | |
| Start Page End Page (For Extract from a PDF file) | Select the page range from which PDF is to be created. | |
| Page Size | Select the required paper size to print the PDF file.
| |
| Add page numbering | Select this option to display page numbers in the PDF file. | |
| Landscape page orientation (Available from V9.9.2 and V10.3 onwards) Only for creating from HTML and URL | Select this option to set the page orientation to landscape while printing. The default page orientation is portrait. | |
| Contain Header/Footer (Available from V10.5) Only for creating from HTML and URL | Select this option if your file contains some header or footer content. | |
| Enable links in the PDF | Select this option to activate hyperlinks from the source in the PDF file. | |
| Fit to page (Available from V10.5) | Select this option to fit the file content to the page in PDF. | |
| Stretch to fit (Available from V10.5) | Select this option to ensure system stretches the file content to fit the page size. |
Best practices for creating PDF files
When you specify a URL, make sure that:
- All the external resources, such as CSS, JavaScript, and image files, referenced in the HTML can be accessed.
- You don't use any JavaScript that dynamically changes the HTML DOM, as the changes may not be reflected in the generated PDF document.
- The Persist on Creation property of a Form or a Task activity is enabled, if the URL is of a Form or a Task activity that is on the same workflow execution path.
While creating PDF files from URL based on a form, when the Enable links option is selected, the result PDF shows black borders around checkbox and button controls. As a workaround, consider a form design without those controls. Or leave the Enable links option un selected if links are not required in the form.
When designing your own HTML:
- Take into consideration the target paper size dimensions (width and height), and use the correct units of measurement when placing controls on the page.
- If you don't need to print the PDF file, then select a larger paper size for complex forms. For example, select A3 instead of A4.
- Use a simple page layout.
- Reduce image size and avoid embedded objects and JavaScript.
- Design the HTML code to fit a PDF output, and not as a regular HTML page.
Main Compressed file properties (supported from V10.6 onwards)
With compressed file type option, you can generate a ZIP type compressed file through the File Writer Activity.
| Property | Description | Interface |
|---|---|---|
| Action | Create a ZIP file from file list: Generates a ZIP file from a query. |  Click image to enlarge it. Click image to enlarge it. |
| Source Query | Enter the query to select files which need to be compressed into ZIP file. Example: {Request}.Query(“MyRequest”).AsQueryable().Select(GUID) |
Configure the File Writer activity
- Add the File Writer activity to your workflow.
- In the File Writer Activity Properties screen, enter the activity name, and then click Next.
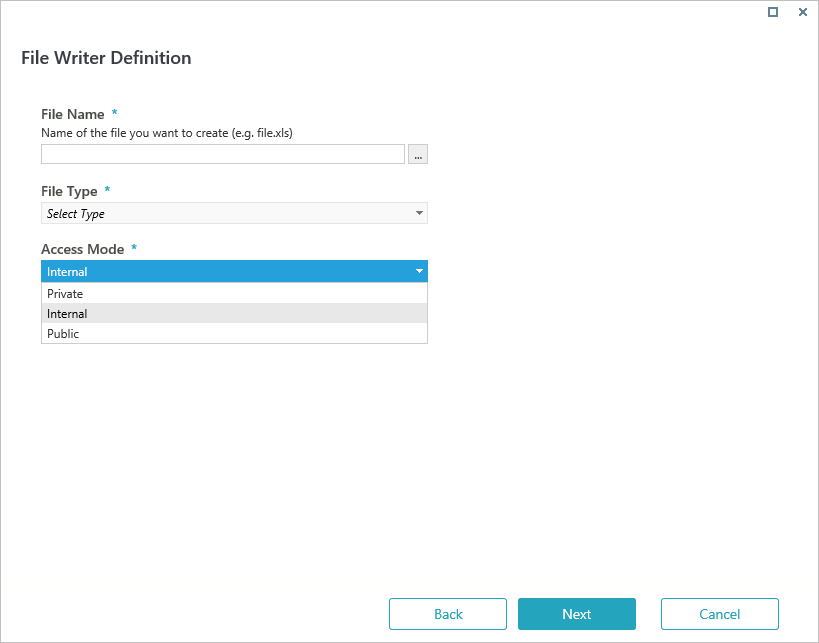
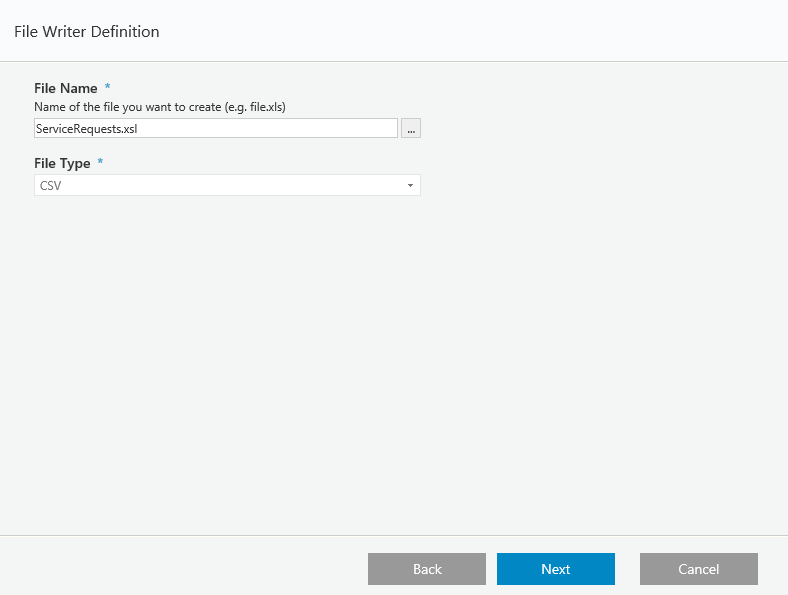
- In the File Writer Definition screen, enter file properties.
- File Name: Enter a name for the file that you want to create, including file extension.
- File Type: Select a file type: CSV, Docx, OpenXML, PDF, or Compressed.
- Access Mode: Select an access mode, Private, Internal, Public.
For details, see the Configuration properties by file type section above.IMPORTANT
After you select a file type and click Next, you cannot change the file type. To change the file type, cancel the current activity wizard and start a new.
- For Docx, PDF, or Compressed file, add file properties and then click Finish.
- Click Next, if you are creating CSV and OpenXML files. In the File Field Properties screen map the fields in the file with values from a source file.
For more details, see the Define field properties section below.
Define field properties
When configuring CSV and OpenXML files, you need to map the fields in the file with values retrieved from the source file.
You can set up advanced formatting properties for Date, Time, DateTime, and Boolean values.
- In the File Field Properties screen, set the source file used to create the file.
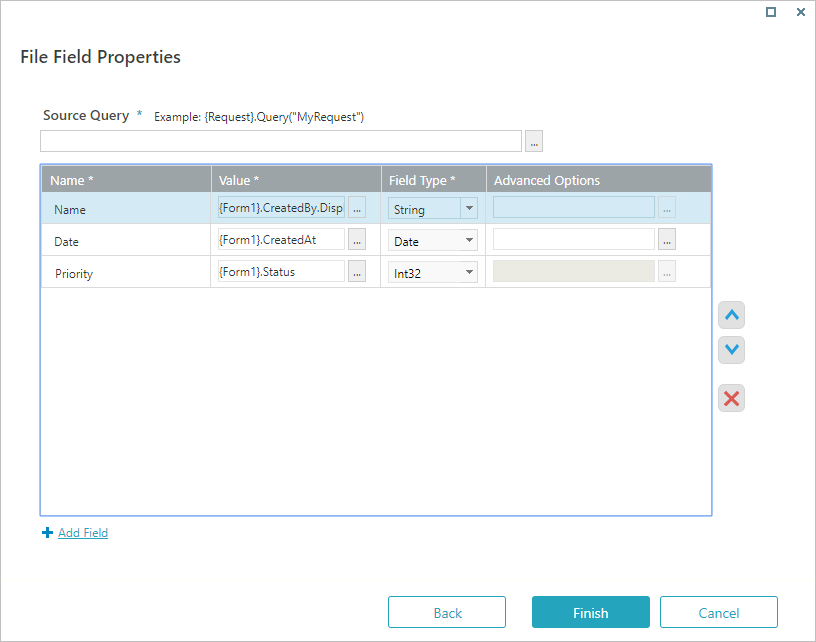
- Define the field properties:
- Name: Define the name of the property in the target file.
- Value: Define the relevant value in the Expression Wizard.
- Field Type: Select a relevant type for each field.
For Field Type as Fixed Width, in the File Properties screen, define the Field Width property, which determines the number of characters allowed in the column.
- Click Add Field, if additional fields are required.
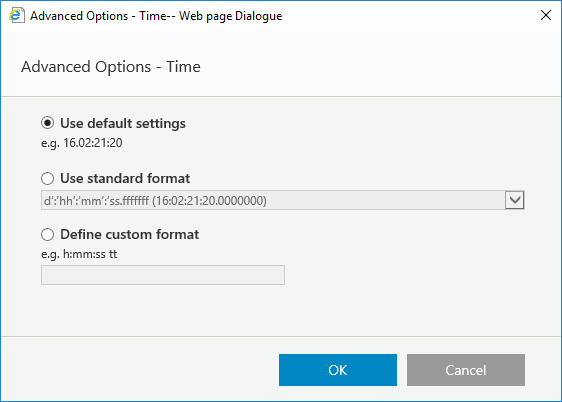
- (Optional) Click Advanced Options, and select the required format to define additional options for Date, Time, DateTime, and Boolean fields.

| Date, Time, DateTime | Boolean |
|---|---|
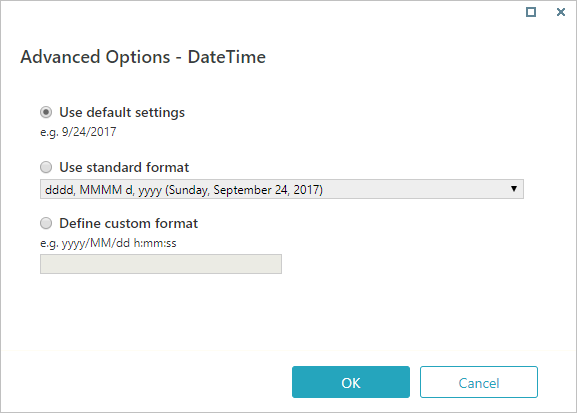
| 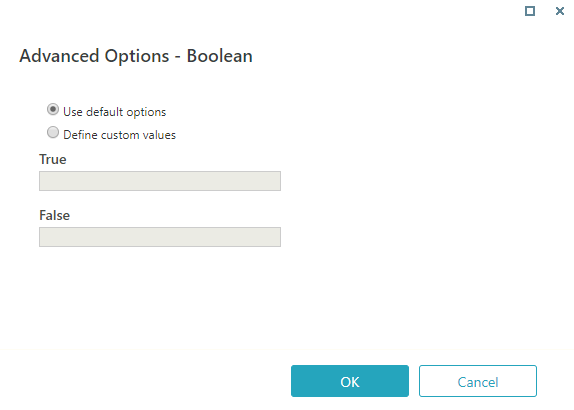
|
NOTE
To make sure that the output files can be easily shared, starting with V9.2, new files created with the File Writer activity are set to public access mode by default.
Starting from V9.5, for OpenXML files, the date, time, and numeric fields are mapped to the relevant data types per the source file, and calculation can be done on these using specific data functions.
For example, numeric field mapped to Int32 field type appears with General data type in the OpenXML file, and all calculations can be done on it using numeric functions.
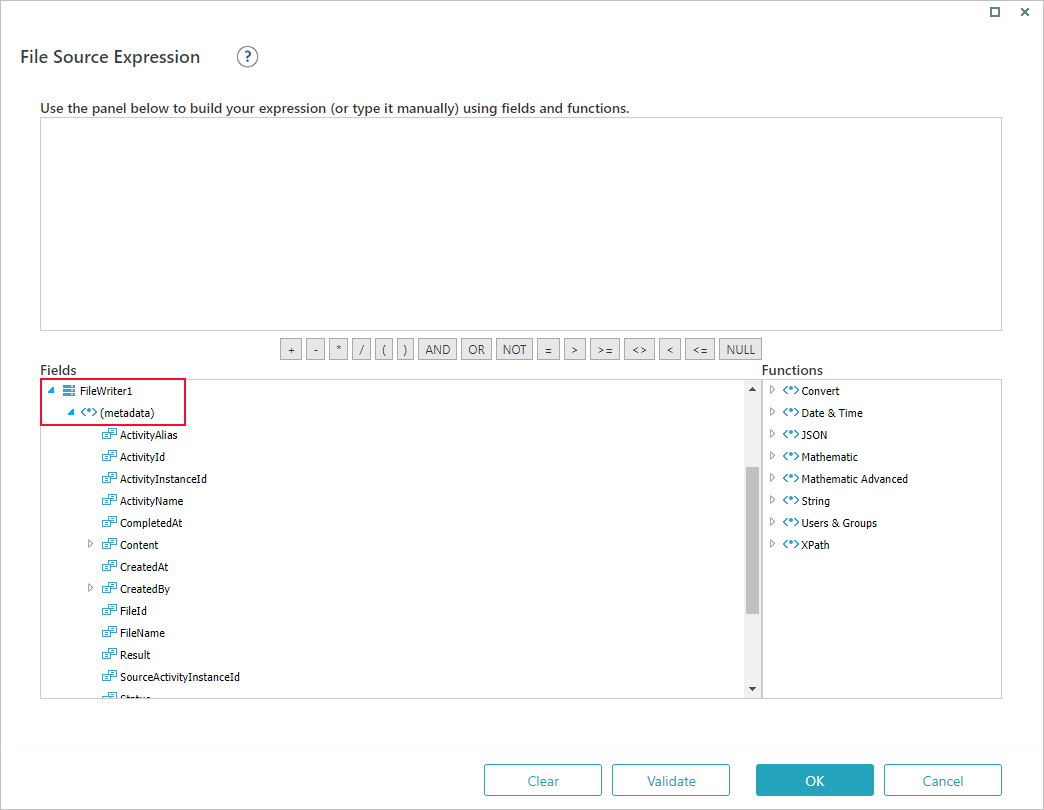
Access and use the file's data
After you create the file, you can access its data through the File Writer activity's metadata.
For example, if you want to use data from the created file in a Put File activity, you can set the created file as the file source.
V9.3-V10.4
Overview
Use the File Writer activity to create, edit, and save a file into the database as part of a workflow. After you create the file, you can access and use its data in other activities.
You can also use the File Writer activity to generate a PDF file with data from forms.
Use cases
- Create a spreadsheet of all support tickets with a designated severity level.
- Create a file from large, unstructured data, and import it to Cora SeQuence.
- Create a file and use it as an attachment in File Activities.
- Create PDF files for archiving or printing purposes. For example, you can create a PDF that includes all the sign-off forms of a workflow for future auditing procedures.
Configuration properties by file type
You can create three types of files with the File Writer activity.
- CSV
- OpenXML
For all file types, you need to define the file's access mode:
- Internal (default): Allows the system to access the file and share it with a different workflow.
- Private: Only you can access the file.
- Public: Anyone can access the file.
Each file type requires different properties.
Main CSV file properties
| Property | Description | Interface |
|---|---|---|
| Format | Defines the language, date, and time format for the CSV file. For example: English (United States) format will set language as en-US, date format as M/d/yyyy, and time format as h:mm tt. | Click image to enlarge it. |
| Encoding | Supported character encoding types:
| |
| Field Type | Select Delimited to separate each field with a special character like comma (,) or select Fixed Width to align fields in columns with a space between each field. | |
| Field Delimiters | Select the character you want to use as a delimiter. Enabled only when field type is Delimited. | |
| First row contains header | Select this option, if the first row of the source file contains a header. In this case, the first row is skipped when the file is processed. | |
| Trim white spaces | Removes unnecessary spaces in cell values. This option is selected by default for both field types and can be unselected for Delimited field type only. |
Main OpenXML file properties
| Property | Description | Interface |
|---|---|---|
| Format | Defines the language, date, and time format for the CSV file. For example: English (United States) format will set language as en-US, date format as M/d/yyyy, and time format as h:mm tt. | Click image to enlarge it. |
| Encoding | Supported character encoding types:
| |
| Sheet Name | If the source file contains more than one sheet, specify the name of the sheet that you want to process. | |
| Invalid Character Handling Method | Selects how the invalid characters will be handled in the sheet. In case of an invalid character, either the invalid character will be replaced with a space or the activity will fail. | |
| First row contains header | Select this option, if the first row of the source file contains a header. In this case, the first row is skipped when the file is processed. |
Main PDF file properties
| Property | Description | Interface |
|---|---|---|
| HTML Content | URL: Enter the URL where the PDF file content is. | 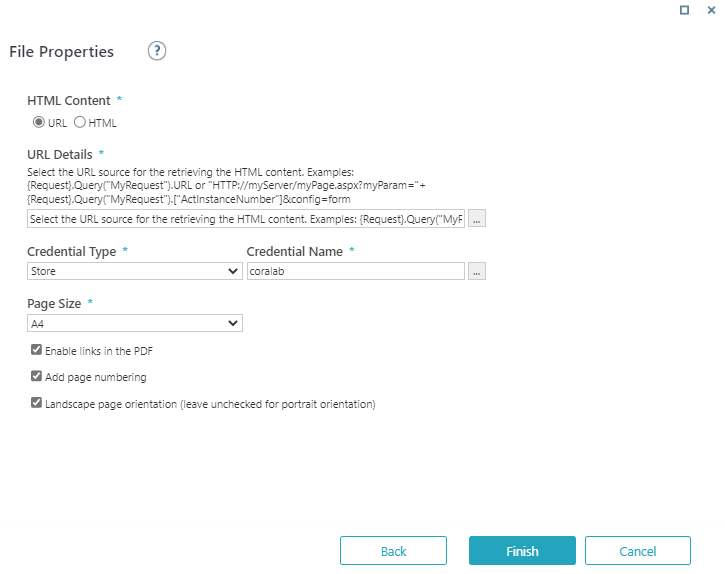 Click image to enlarge it. Click image to enlarge it. |
| HTML: Paste the HTML code from which the PDF file is to be created. | ||
| Credential Type | Required only for URL sources. If the URL that you entered requires credentials, set the credential type and name. | |
| Page Size | Select the required paper size to print the PDF file. | |
| Enable links in the PDF | Select this option to activate hyperlinks from the source HTML in the PDF file. | |
| Add page numbering | Select this option to display page numbers in the PDF file. | |
| Landscape page orientation Available from V9.9.2 and V10.3 onwards | Select this option to set the page orientation to landscape while printing. The default page orientation is portrait. |
Best practices for creating PDF files
When you specify a URL, make sure that:
- All the external resources, such as CSS, JavaScript, and image files, referenced in the HTML can be accessed.
- You don't use any JavaScript that dynamically changes the HTML DOM, as the changes may not be reflected in the generated PDF document.
- The Persist on Creation property of a Form or a Task activity is enabled, if the URL is of a Form or a Task activity that is on the same workflow execution path.
When designing your own HTML:
- Take into consideration the target paper size dimensions (width and height), and use the correct units of measurement when placing controls on the page.
- If you don't need to print the PDF file, then select a larger paper size for complex forms. For example, select A3 instead of A4.
- Use a simple page layout.
- Reduce image size and avoid embedded objects and JavaScript.
- Design the HTML code to fit a PDF output, and not as a regular HTML page.
Configure the File Writer activity
- Add the File Writer activity to your workflow.
- In the File Writer Activity Properties screen, enter the activity name, and then click Next.
- In the File Writer Definition screen, enter file properties.
- File Name: Enter a name for the file that you want to create, including file extension.
- File Type: Select a file type: CSV, OpenXML, or PDF.
- Access Mode: Select an access mode, Private, Internal, Public.
For details, see the Configuration properties by file type section above.IMPORTANT
After you select a file type and click Next, you cannot change the file type. To change the file type, cancel the current activity wizard and start a new.
- Click Finish, if you are creating a PDF file.
- Click Next, if you are creating CSV and OpenXML files. In the File Field Properties screen map the fields in the file with values from a source file.
For more details, see the Define field properties section below.
Define field properties
When configuring CSV and OpenXML files, you need to map the fields in the file with values retrieved from the source file.
You can set up advanced formatting properties for Date, Time, DateTime, and Boolean values.
- In the File Field Properties screen, set the source file used to create the file.
- Define the field properties:
- Name: Define the name of the property in the target file.
- Value: Define the relevant value in the Expression Wizard.
- Field Type: Select a relevant type for each field.
For Field Type as Fixed Width, in the File Properties screen, define the Field Width property, which determines the number of characters allowed in the column.
- Click Add Field, if additional fields are required.
- (Optional) Click Advanced Options, and select the required format to define additional options for Date, Time, DateTime, and Boolean fields.
| Date, Time, DateTime | Boolean |
|---|---|
|
|
NOTE
To make sure that the output files can be easily shared, starting with V9.2, new files created with the File Writer activity are set to public access mode by default.
Starting from V9.5, for OpenXML files, the date, time, and numeric fields are mapped to the relevant data types per the source file, and calculation can be done on these using specific data functions.
For example, numeric field mapped to Int32 field type appears with General data type in the OpenXML file, and all calculations can be done on it using numeric functions.
Access and use the file's data
After you create the file, you can access its data through the File Writer activity's metadata.
For example, if you want to use data from the created file in a Put File activity, you can set the created file as the file source.
V9.2
Overview
Use the File Writer activity to create, edit, and save a file into the Cora SeQuence database as part of a workflow. After you create the file, you can access and use its data in other activities.
You can also use the File Writer activity to generate a PDF file with data from forms.
Use cases
- Create a spreadsheet of all support tickets with a designated severity level.
- Create a file from large, unstructured data, and import it to Cora SeQuence.
- Create a file and use it as an attachment in File Activities.
- Create PDF files for archiving or printing purposes.
Configuration properties by file type
You can create three types of files: CSV, OpenXML, or PDF. Each file type requires different properties.
Main CSV file properties
| Property | Description | Wizard |
|---|---|---|
| Encoding | Supported character encoding types:
| Click image to enlarge it. |
| First row contains header | Select this option, if the first row of the source file contains a header. In this case, the first row is skipped when the file is processed. | |
| Trim white spaces | Removes unnecessary spaces in cell values. This option is selected by default. |
Main OpenXML file properties
| Property | Description | Wizard |
|---|---|---|
| Encoding | Supported character encoding types:
| Click image to enlarge it. |
| Sheet Name | If the source file contains more than one sheet, specify the name of the sheet that you want to process. | |
| First row contains header | Select this option, if the first row of the source file contains a header. In this case, the first row is skipped when the file is processed. |
Main PDF file properties
| Property | Description | Wizard |
|---|---|---|
| HTML Content | URL: Enter the URL where the content for the PDF file is. | 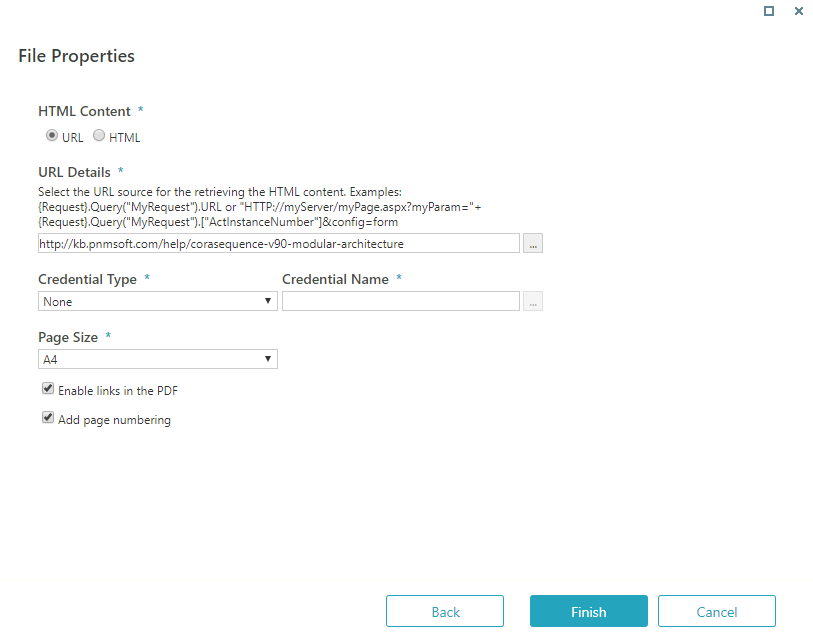 Click image to enlarge it. Click image to enlarge it. |
| HTML: Paste the HTML code from which to create the PDF file. | ||
| Credential Type | Required only for URL sources. If the URL that you entered requires credentials, set the credential type and name. | |
| Page Size | If the PDF needs to be printed, select the required paper size. | |
| Enable links in the PDF | Select this option to activate hyperlinks from the source HTML in the PDF file. | |
| Add page numbering | Select this option to display page numbers in the PDF file. |
Best practices for creating PDF files
You can create PDF files for archiving or printing purposes. For example, you can create a PDF that includes all the sign-off forms of a workflow for future auditing procedures.
When you create a PDF file, you can either specify a URL that contains the required HTML content, or write your own HTML using a code editor.
When you specify a URL, make sure that:
- All the external resources, such as CSS, JS, and image files, referenced in the HTML can be accessed.
- Do not use any JavaScript that dynamically changes the HTML DOM as the changes may not be reflected in the generated PDF document.
When designing your own HTML:
- Take into consideration the target paper size dimensions (width and height) and use the correct units of measurement when placing controls on the page.
- If the PDF file does not need to be printed, select a larger paper size for complex forms. For example, select A3 instead of A4.
- Use a simple page layout.
- Reduce image size and avoid embedded objects and JavaScript.
- Design the HTML code to fit a PDF output, and not as a regular HTML page.
Configure the File Writer activity
- Add the File Writer activity to your workflow.
- In the Properties screen, enter a name for the activity, and then click Next.
- Define the file type.
- In the Definition screen, enter a name for the file that you want to create, including file extension.
- Select a file type: CSV, OpenXML, or PDF.
IMPORTANT
After you select a file type and click Next, you cannot change the file type. To change the file type, cancel the activity wizard and start a new activity wizard.
- Define the file properties.
For details, see the Configuration properties by file type section above. - Do one of the following:
- If you are creating a PDF file, click Finish.
- If you are creating CSV and OpenXML files, you need to map the fields in the file with values from a source file.
For more details, see the Define field properties section below.
Click Next.
Define field properties
When configuring CSV and OpenXML files, you need to map the fields in the file with values retrieved from the source file.
You can set up advanced formatting properties for Date, Time, and DateTime values.
- In the File Field Properties screen, set the source file used to create the CSV or OpenXML file.
- Define the field properties:
- Under Name, define the name of the property in the target file.
- Under Value, click the ellipsis button to define the relevant value in the Expression Wizard.
- For each field, select a relevant type.
- If additional fields are required, click Add Field.
- (Optional) For date, dateTime, time, and Boolean fields, you can define additional options.
Click Advanced Options, and select the required format:
| Date, Time, DateTime | Boolean |
|---|---|
|
|
NOTE
To make sure that the output files can be easily shared, starting with V9.2, new files created with the File Writer activity are set to public access mode by default.
Access and use the file's data
After you create the file, you can access its data through the File Writer activity's metadata.
For example, if you want to use data from the created file in a Put File activity, you can set the created file as the file source.
V9.1 and earlier
Context
Use the File Writer Activity to create a file, write (edit) to the file, and save the file to the Cora SeQuence database as part of a workflow. After you create the file, you can access and use the file's data in other activities.
Use Cases
- Create a spreadsheet of all support tickets with a designated severity level.
- Create a file from large, unstructured data that you import to .
- Create a file and use it as an attachment in File Activities.
- File enrichment.
Define the File
- Type a file name including the file extension.
- Select a file type: CSV or OpenXML
IMPORTANT: After you select a file type and click Next, you cannot change the file type (even if you click back). If you need to change the file type, cancel the activity wizard and start a new activity wizard. See the screenshot below.

CSV Files
CSV Files Configuration Parameters
| Parameter | Description |
|---|---|
| Encoding |
|
| First row contains header | Select if the first row of the source file contains a header. This row is skipped when the file is processed. |
| Has fields enclosed in quotes | Fields contain quotations when they are used to count separator symbols as part of the field value. For example, if a field value is 52,345 and comma is a defined separator, the entire field is wrapped in quotations "52,345". Cases in which a field is wrapped in quotations for other reasons, and the Has fields enclosed in quotes checkbox is selected, the quotations are removed from the field. |
| Trim white spaces | Removes unnecessary spaces in cell values. This option is selected by default. |

OpenXML Files
OpenXML Files Configuration Parameters
| Parameter | Description |
|---|---|
| Encoding |
|
| Sheet Name | If the file contains more than one sheet, specify the sheet name that you want to process. If this field is empty, the first sheet in the file is selected. |
| First row contains header | Select if the first row of the source file contains a header. This row is skipped when the file is processed. |

Define Field Properties - All File Types
This window depends on previous configurations. In this example, we selected a CSV file with fixed width.
File Field Properties Configuration Parameters
| Parameter | Description |
|---|---|
| Source Query | The source of the data that you want to include in the file. |
| Name | Field name that you enter. |
| Value | Field value. |
| Field Type | Determines the valid values for the property. |
| Advanced Options | See the Advanced Options section. |

Define Advanced Options - All Files (optional)
DateTime Configuration

Time Configuration
Access and Use the File's Data
After you create the file, you can access the file's data from the activity's metadata. For example, if you want to use data from the created file in a Put File Activity, you can use the created file when defining the file source.

