Starting with V10.0, Cora SeQuence has been renamed to Cora Orchestration.
V9.7 and later
Overview
Conversation View is a solution-level component that enables business users to see all case-related conversations in one place within a case.
You can use this component in a form within any solution-based workflow, to display different types of case-related conversations available in Cora SeQuence.
The Conversation View is deployed with the solution package, and you can configure different conversation types to be enabled or disabled in the relevant Solution. The list of conversation types is loaded from all the system-available solutions.
Conversation types are enabled by default for Solutions. When conversation types are disabled, there is no option to add them through UI, built-in command, or API. Any existing disabled conversation items are displayed with the default template.
The Delete action is allowed only through API.
Starting from V10.9, the Email Sender Job supports dynamic email connection to send emails from multiple Graph API connections (endpoints) based on runtime conditions.
Starting from V10.6, the API supports two new capabilities, adding tag to the conversation item and removing tag from the conversation item.
Starting with V9.6, you can make the case conversations as read-only. For read-only conversations, the users can only read an email or comment and download any existing attachments in the conversation. They can't send new emails or comments from the conversations.
Starting with V9.7, you can filter conversation items in the Conversation View based on different parameters.
In V9.9.2 and from V10.3 onwards:
- you have different indications for read and unread conversation items in the Conversation View.
| Indication | Unread conversation item | Read conversation item |
|---|---|---|
| Vertical bar | Blue | Gray |
| Subject line | Bold | Regular |
| Envelope icon | Closed envelope | Open envelope |
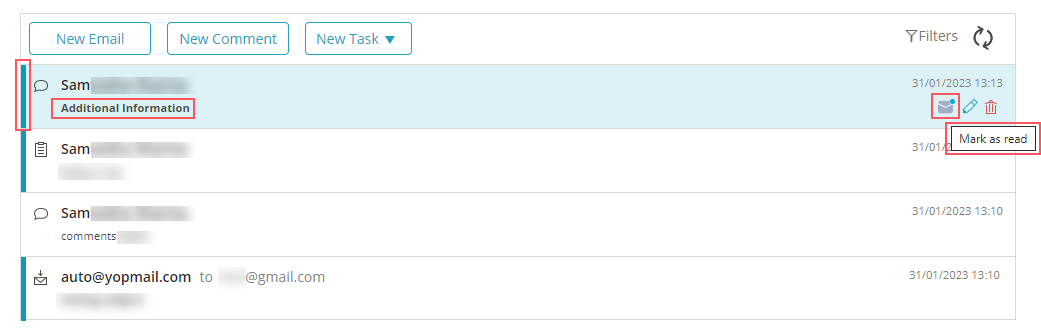
- With one click on the envelope icon, you can mark the read conversations as unread and vice versa.
- You can add tags to the conversation items from an existing list of preconfigured tags. You need to configure this list of tags for each Solution, in the Administration site. You can configure a maximum of 10 tags for each Solution.
For details, see Configure conversation tags section below. - You can filter the conversation items by Read/Unread conversations and by tags.
NOTE
Post upgrade, for any existing Solutions, all the conversation types are disabled. To enable them, open and close the Conversation View window in the Solution once.
Starting from V10.5, you can cancel sending of a send email in the conversations. A Cancel Send option appears in the email conversation, using which you can cancel the email from being send while in queue.
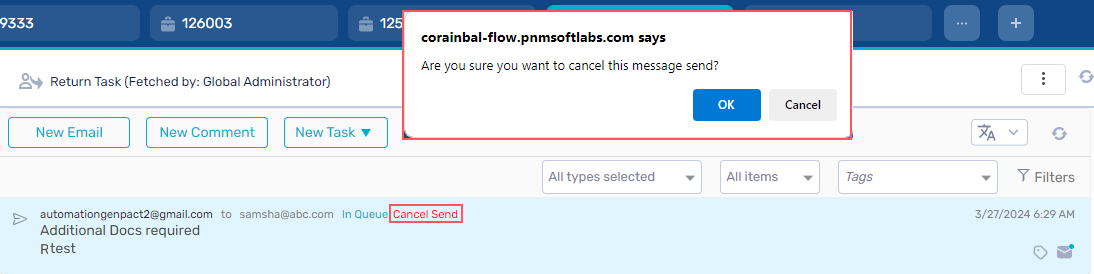
You can cancel sending of emails that are In Queue status. You can configure the email sending delay time by setting the JES.EmailSender.DelaySendOfMessagesInQueueBySeconds application variable.
For details, see this article.
Conversation types
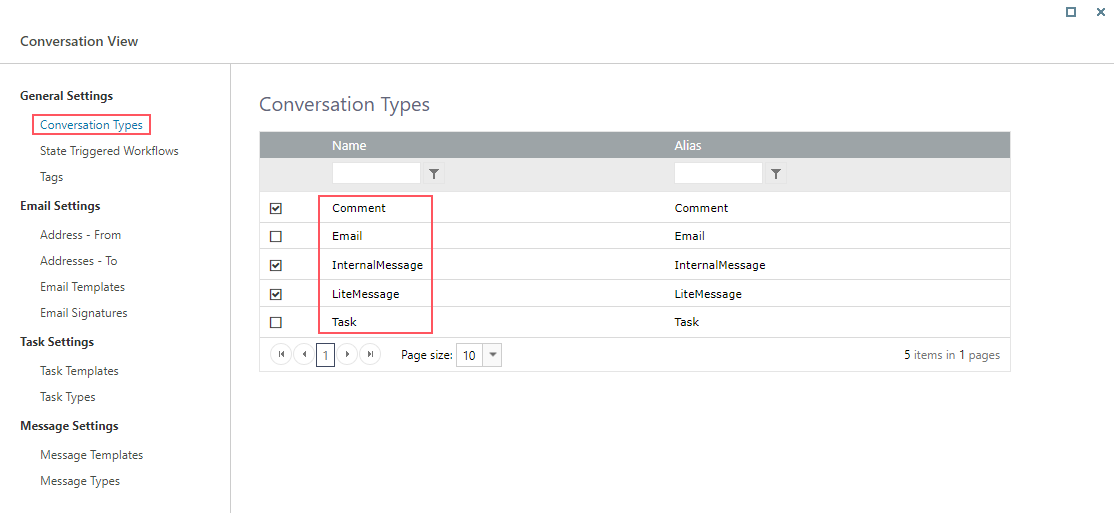
All conversation-related items are saved in a product database table. The Comment, Email, InternalMessage, LiteMessage, Task, and General conversation types are the out-of-the-box types available in Cora SeQuence.
For configuring Email conversation type, see this article.
For configuring Comment conversation type, see this article.
For configuring InternalMessage and LiteMessage conversation types, see this article.
For configuring Task conversation type, see this article.
You can add any custom conversation type to your Solutions per need.
For adding Custom Conversation type, see this article.
You can add a General conversation item to the Conversation View. The general items are added using a system default type called Conversation Item. This type uses the default template and is the basis of all conversation items.
Configure the Conversation View
To enable conversation view functionality in a workflow instance, you need to configure this functionality in the Solution, of which the workflow is part.
- In the Administration site, open the Solution from the list.
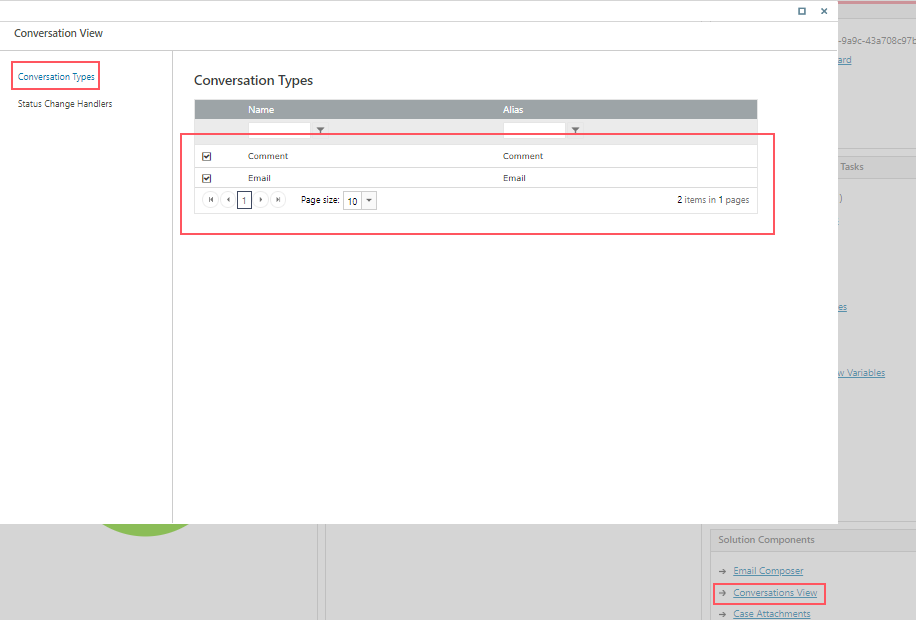
- In the Solution Components section, click Conversations View.
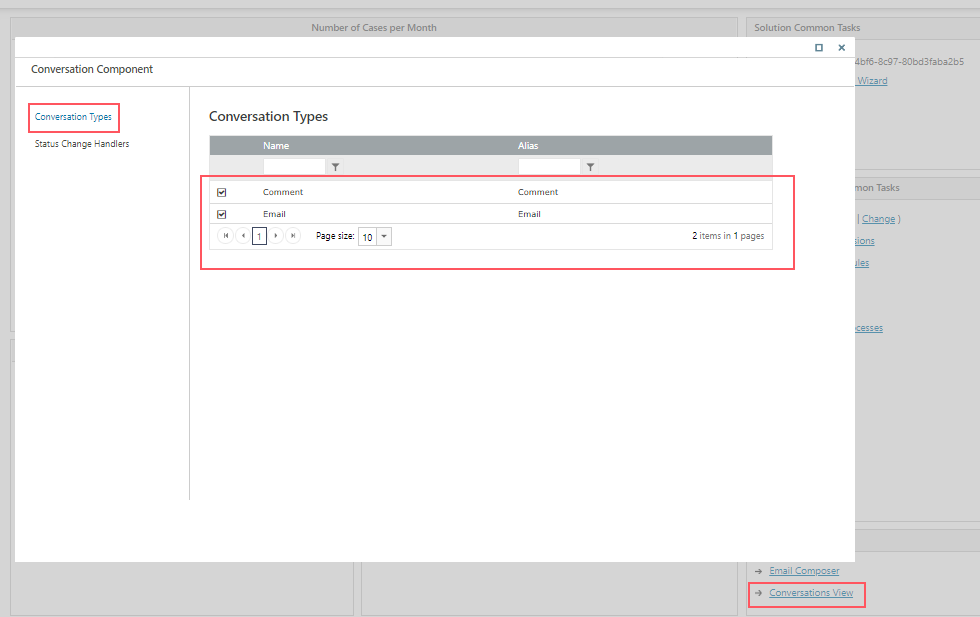
- In the Conversation View window:
- Select conversation types you want to enable for the Solution.
- Configure state triggered workflows for event handling.
For details, see the Configure state triggered workflows section in this article below. - Configure tags for conversations.
For details, see Configure conversation tags section in this article below.
Based on the type of conversation you have selected, you need to configure the Email settings, Task Settings, or Message Settings for your conversation view.
Add the Conversation View to a form
You can add Conversation View to a form in two ways:
- Add a code snippet to the form source
- Add the Conversation View control from the Toolbox
Add snippet to the form source
- In a workflow, add or edit a form or task activity.
- Add the following script to the source in the relevant location.
<div>
<sq:ConversationView runat="server" Id="Conversations"></sq:ConversationView>
</div>
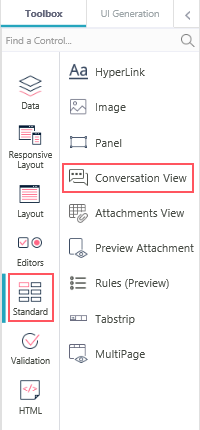
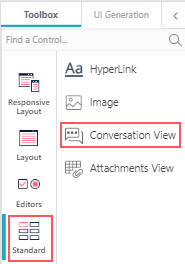
Add the Conversation View from the Toolbox
- In a workflow, edit the form activity.
- Select from the Toolbox, Standard > Conversation View.
 In the Conversation View properties, select Read-only under Behavior to make the conversations read-only.
 - Save the form.
 In the Conversation View properties, select Read-only under Behavior to make the conversations read-only.
NOTE
- Only the workflows that are in a Solution support Conversation View.
- Conversations used in sub workflows can also work in the master workflow and will display the same conversation items.
Conversation View UI
Consider the following design parameters for the conversation view in Solutions.
- Supported resolution in the form is:
- Height: Minimal height for the view in the form (empty state) is 100px
- Width: 33% - 100% of the screen; minimum 600px
- The view is responsive.
- The most recent item is listed on top, from newest to oldest, or last update date descending.
Configure state triggered workflows
You can configure the system to initiate a specific workflow and perform an action when a conversation item changes to a specific status.
You can configure the conversation item events to initiate a workflow in the master workflow context. The initiated workflow should start with a Built-in Command Listener activity to listen to the conversation item event.
- In the Administration site, open a Solution from the list.
- In the Solution Components section, click Conversations View.
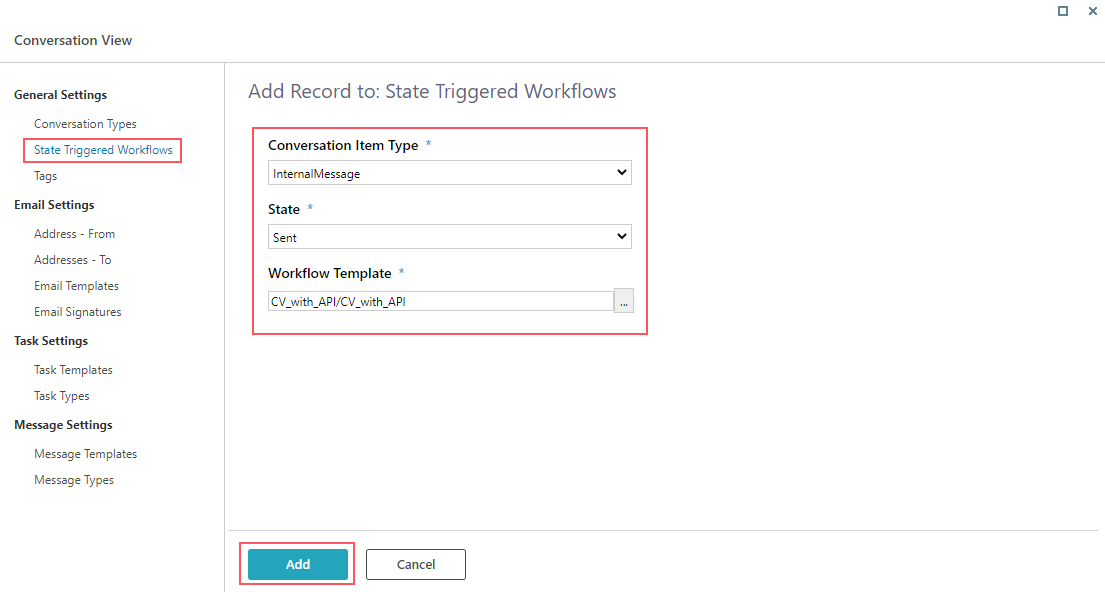
- In the Conversation View window, click State Triggered Workflows.
- Click Add New Record.
- Select the following:
- Conversation Item Type
- State
- Workflow Template: The workflow to initiate for conversation item.
- Click Add.

NOTE
If the State is not changed the workflow is not initiated. For example, editing a draft and saving it will not trigger the configured workflow.
Configure conversation tags
You can configure a maximum of 10 tags to the conversation view in a Solution. The conversation items in the case conversation view displays the list of configured tags for the user to choose from. Users can filter specific conversations based on the tags.
- In the Administration site, open a Solution from the list.
- In the Solution Components section, click Conversations View.
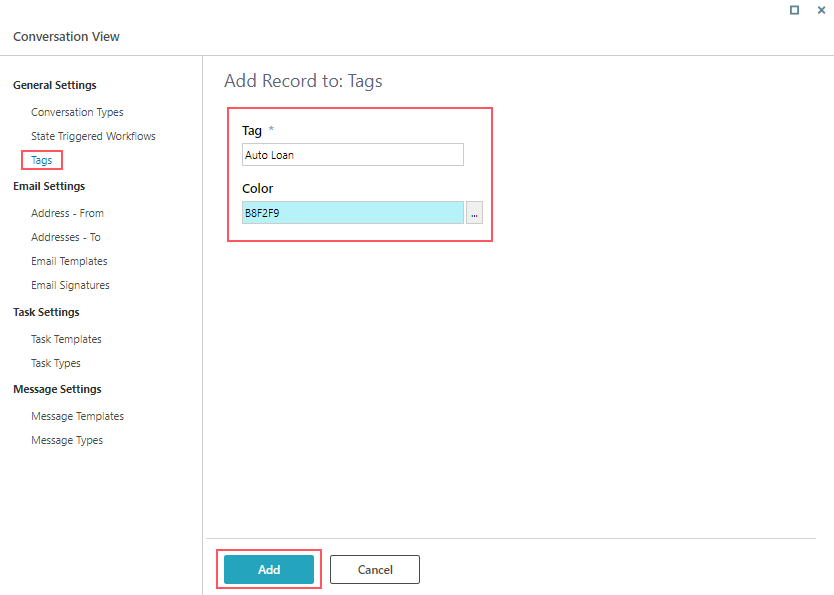
- In the Conversation View window, click Tags.
- Click Add New Record.
- Add tag name.
You can opt to add a color for the tag too. - Click Add.

Connect translation services to a Conversation View in a Solution
Once you create the translation service, you need to connect the translation service to the Solution.
For details, see this article.
Language support
You can localize the Conversation View in an implementation.
For details, see this article.
The Conversation View component is translated according to the form's Globalization settings:
- if Localizable = False, use the Language activity definition
- if Localizable = True, use the user's language
Conversation translations
Starting from V10.5, you can translate case conversation items. You need to enable this functionality for Conversation View option in a Solution.
For details, see this article.
The language translation option appears in the case conversations section.
Translate a conversation
- Click the language option to set the preferred translation language.

- Select the To language.
The From language is set to auto-detect by default. - Click Apply. The translation gets enabled for case conversations.
- Click the conversation item you want to translate.
- Enable the Translate option.
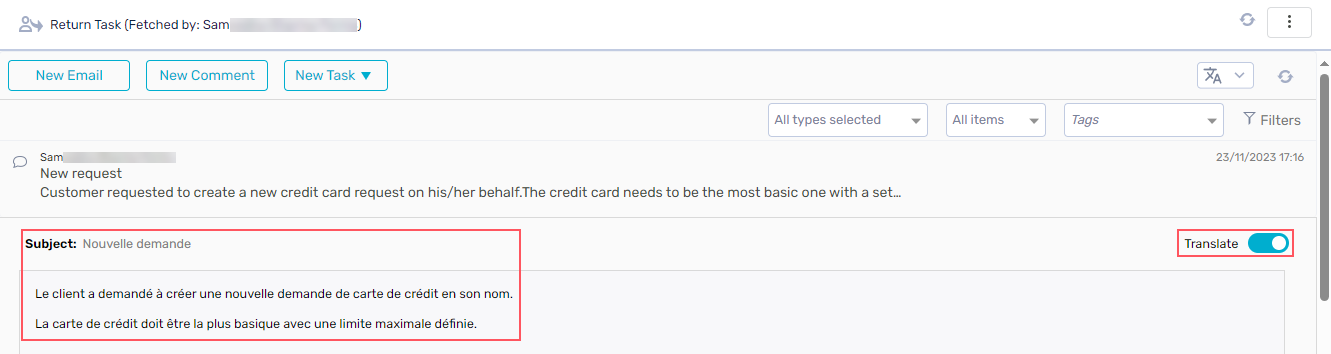
The conversation item appears in translated language.
NOTE
- The system remembers your translation language preference and you don’t need to set the translation language for each case.
- The translation happens only for conversation items for which it is enabled.
Configure Create Conversation Item built-in command
Various built-in commands within the Case Operations category lets you create and manage different conversation items.
Create Conversation Item built-in command
The Create Conversation Item built-in command lets you insert conversation items into the Conversations View in the master workflow context.
- Add a Built-In Command activity.
- Select Case Operations>Create Conversation Item.
- Click Next.
- Add the command parameters.
- workflowInstanceId: can be the instance id of the master or the sub workflow.
- conversationItemState: can be any state depending on the conversation item selected.
For details, see this article. - ConversationItem: select from the list the conversation item you want to add.
Unselect 'IsNull' to display the command parameters for the selected conversation type. The command parameters for each conversation type are explained in their respective articles listed in the Related Articles section below. - createdByUserId: the current user executing the built-in command.
- Click Finish.
Update Conversation Item built-in command
The Update Conversation Item built-in command lets you update conversation items added in the Conversations View in the master workflow context.
- Add a Built-In Command activity.
- Select Case Operations>Update Conversation Item.
- Click Next.
- Set the following command parameters.
- workflowInstanceId: can be the instance id of the master or the sub workflow.
- conversationItemId: The guid of the conversation item to be updated.
- ConversationItemPropertyAssignment: Add a list of conversation item properties you want to update.
- Key: name of the property to be updated. For example "Subject".
- Value: the updated value. For example "New Request".
- Click Finish.
Copy Case Conversation Items Between Cases built-in command
The Copy Case Conversation Items Between Cases built-in command lets you copy case conversations between cases.
For details, see this article.
IMPORTANT
Make sure you have Execute permissions in the master workflow.
Conversation expressions
In some scenarios, you may need to display or use the conversation item details. For example, there may be a need to create a new Cora SeQuence task based on a conversation task. The conversation task triggers a workflow through the configured State Triggered Workflows. You can then execute the expression to fetch the conversation item details.
Execute the expression in the following format:
mwf.Extensions["ConversationsItemsExtension"].Items[CONVERSATION_ITEM_UNIQUE_ID].AsType("TYPE_NAME").PROPERTY
Examples
mwf.Extensions["ConversationsItemsExtension"].Items[{Builtin command listener1}.In["conversationItemParameters"].ConversationItemUniqueId].AsType("Email").Bodymwf.Extensions["ConversationsItemsExtension"].Items[{Send to Lite Solution Listener}.In["conversationItemParameters"].ConversationItemUniqueId].AsType("InternalMessage").From
Conversation View client API
The Conversations View component exposes the following four events to define additional actions and configurations.
| Parameter | Description |
|---|---|
| addConversationViewItemActionClicked | Is called when a user clicks on an action related to a specific item.
For example, click on Reply. |
| addConversationViewItemToolbarActionClicked | Is called when a user clicks on the Conversation View toolbar buttons.
For example, click on New email. |
| addConversationViewItemTagAdded
(Starting from V10.6 onwards) |
Is called when a user adds a tag to a specific item. |
| addConversationViewItemTagRemoved
(Starting from V10.6 onwards) |
Is called when a user removes a tag from a specific item. |
| addConversationViewParametersBinding | Is called when Conversation View binds the Conversation Item parameters.
This event helps the implementation set the Email Composer properties. |
| addConversationViewActionCompleted | Is called when a user completes an action performed in the Conversation View.
For example, when closing the Email Composer window, either by clicking the X button, or by clicking Save or Send. |
| addConversationViewEditorLoading | Is called for finding the custom control user added to the editor and putting it in the data. |
| addConversationViewEditorClosing | Is called for taking the data from the control and saving it into parameters object.
It can be cancelled by using event.preventDefault(). |
All the events receive the args object parameters that include the following:
- args.details.actionName: The selected action.
For example, New. - args.details.itemType: The conversation item type on which the action applies.
For example, Email. - args.detail.parameters: The conversation item related parameters.
For example, windowTitle for Email Composer. - args.detail.editor: The window object to find user-added controls.
- args.detail.context: The message context of translations resource file.
Client API example
<script type="application/javascript">
  $sq(document).ready(function(){
    var conversationsId = $sq("[id$=Conversations]").attr("id");
                var conversations = $findByControlId(conversationsId);


    conversations.addConversationViewItemActionClicked(function(args){
      console.log("i am item action");
                console.log(args.detail);
    });


    conversations.addConversationViewItemToolbarActionClicked(function(args){
               console.log("i am toolbar action");
              console.log(args.detail);
    });

    conversations.addConversationViewItemTagAdded(function(args){
               console.log("tag added " + args.tagName + ' ' + args.itemType );
                console.log(args.dataItem);
    });

    conversations.addConversationViewItemTagRemoved(function(args){
               console.log("tag removed " + args.tagName + ' ' + args.itemType );
                console.log(args.dataItem);
    });

    conversations.addConversationViewParametersBinding(function(args){
               if (args.detail.actionName == "new")
                {
                  args.detail.parameters.windowTitle = "New email title";
                  args.detail.parameters.from = "xyz@genpact.com,bbb@genpact.com";
                  args.detail.parameters.template = "DefaultTemplateAlias"; // the value should be the alias of the template
                  args.detail.parameters.to = "xyzso@genpact.digital,abcgen@genpact.digital";
                  args.detail.parameters.cc = "xyzso@genpact.digital,abcgen@genpact.digital";
                  args.detail.parameters.bcc = "xyzso@genpact.digital,abcgen@genpact.digital";
                  args.detail.parameters.subject = 'Email Composer Subject';
                  args.detail.parameters.body = 'Test test test';
                  args.detail.parameters.signature = 'alias'; // the value should be the alias of the template
                }


console.log(args.detail);
    });
    conversations.addConversationViewActionCompleted(function(args){
              console.log("i am completed");
console.log(args.detail);
    });
  });


</script>
V9.5
Overview
The Conversation View is a solution-level component that enables business users to see all case-related conversations in one place within a case.
You can use this component in a form within any solution-based workflow, to display different types of case-related conversations available in Cora SeQuence.
The Conversation View is deployed with the solution package, and you can configure different conversation types to be enabled or disabled in the relevant Solution. The list of conversation types is loaded from all the system-available solutions.
Conversation types are enabled by default for Solutions. When conversation types are disabled, there is no option to add them through UI, built-in command, or API. Any existing disabled conversation items are displayed with the default template.
The Delete action is allowed only through API.
Starting with V9.6, you can make the case conversations as read-only. For read-only conversations, the users can only read an email or comment and download any existing attachments in the conversation. They can't send new emails or comments from the conversations.
NOTE
Post upgrade, for any existing Solutions, all the conversation types are disabled. To enable them, open and close the Conversation View window in the Solution once.
Conversation types
All conversation related items are saved in a product database table. The Email and Comment conversation types are the out-of-the-box types available in Cora SeQuence.
For configuring Email Conversation type, see this article.
For configuring Comment Conversation type, see this article.
You can add any custom conversation type to your Solutions per need.
For adding Custom Conversation type, see this article.
Configure the Conversation View
To enable conversation view functionality in a workflow instance, you need to configure this functionality in the Solution, of which the workflow is part of.
- In the Administration site, open the Solution from the list.
- In the Solution Components section, click Conversations View.
- In the Conversations View window:
- Select conversation types you want to enable for the Solution.
- Add status change handlers for event handling.
For details, see the Configure conversation item events for the event handling section in this article below.
Add the Conversation View to a form
You can add conversations view to a form in two ways:
- Add a code snippet to the form source
- Add Conversation View control from the Toolbox
Add snippet to the form source
- In a workflow, add or edit a form or task activity.
- Add the following script to the source in the relevant location.
<div>
<sq:ConversationView runat="server" Id="Conversations"></sq:ConversationView>
</div>
Add the Conversation View from the Toolbox
- In a workflow, edit the form activity.
- Select from the Toolbox, Standard > Conversation View.
In the Conversation View properties, select Read-only under Behavior to make the conversations read-only. - Save the form.

NOTE
- Only the workflows that are in the context of a Solution support Conversation View.
- Conversations used in sub workflows can also work in the master workflow and will display the same conversation items.
Conversation View UI
Consider the following design parameters for the conversation view in Solutions.
- Supported resolution in the form is:
- Height: Minimal height for the view in the form (empty state) is 100px
- Width: 33% - 100% of the screen; minimum 600px
- The view is responsive.
- The most recent item is listed on top, from newest to oldest, or last update date descending.
Language support
You can localize the Conversation View in an implementation.
For details, see this article.
The Conversation View component is translated according to the form's Globalization settings:
- if Localizable = False, use the Language activity definition
- if Localizable = True, use the user's language
Conversations item built-in command
The Create Conversations Item built-in command lets you insert conversation items into the Conversation View. You can add a general conversation item or a specific conversation item related to the type of conversation available in the system. The general items are added using a system default type called Conversation Item. This type uses the default template and is the basis of all conversation items.
For details, see this article.
Command parameters
Command parameters for Conversations Item built-in command can be set for different conversation types.
- workflowIinstanceId
- conversationItemState
- conversationItem
- Title
- Body
- Attachments
- createdByUserId
IMPORTANT
Make sure you have Execute permissions in the master workflow.
Conversation View client API
The Conversations View component exposes the following four events to define additional actions and configurations.
| Parameter | Description |
|---|---|
| addConversationViewItemActionClicked | is called when a user clicks on an action related to a specific item.
For example, click on Reply. |
| addConversationViewItemToolbarActionClicked | is called when a user clicks on the Conversation View toolbar buttons.
For example, click on New email. |
| addConversationViewParametersBinding | is called when Conversation View binds the Conversation Item parameters.
This event helps the implementation set the Email Composer properties. |
| addConversationViewActionCompleted | is called when a user completes an action performed in the Conversation View.
For example, when closing the Email Composer window, either by clicking the X button, or by clicking Save or Send. |
| addConversationViewEditorLoading | is called for finding the custom control user added to the editor and putting it in the data. |
| addConversationViewEditorClosing | is called for taking the data from the control and saving it into parameters object.
It is cancellable by using ‘event.preventDefault()’ |
All the events receive the args object parameters that include the following:
- args.details.actionName: The selected action.
For example, New. - args.details.itemType: The Conversation item type on which the action applies.
For example, Email. - args.detail.parameters: The Conversation item related parameters.
For example, windowTitle for Email Composer. - args.detail.editor: The window object to find user-added controls.
- args.detail.context: The message context of translations resource file.
Client API example
<script type="application/javascript">
  $sq(document).ready(function(){
    var conversationsId = $sq("[id$=Conversations]").attr("id");
                var conversations = $findByControlId(conversationsId);


    conversations.addConversationViewItemActionClicked(function(args){
      console.log("i am item action");
                console.log(args.detail);
    });


    conversations.addConversationViewItemToolbarActionClicked(function(args){
               console.log("i am toolbar action");
              console.log(args.detail);
    });
    conversations.addConversationViewParametersBinding(function(args){
               if (args.detail.actionName == "new")
                {
                  args.detail.parameters.windowTitle = "New email title";
                  args.detail.parameters.from = "xyz@genpact.com,bbb@genpact.com";
                  args.detail.parameters.template = "DefaultTemplate";
                  args.detail.parameters.to = "xyzso@genpact.digital,abcgen@genpact.digital";
                  args.detail.parameters.cc = "xyzso@genpact.digital,abcgen@genpact.digital";
                  args.detail.parameters.bcc = "xyzso@genpact.digital,abcgen@genpact.digital";
                  args.detail.parameters.subject = 'Email Composer Subject';
                  args.detail.parameters.body = 'Test test test';
                  args.detail.parameters.signature = 'alias';
                }


console.log(args.detail);
    });
    conversations.addConversationViewActionCompleted(function(args){
              console.log("i am completed");
console.log(args.detail);
    });
  });


</script>
Configure conversation item events for event handling
The conversation item events hook up to implementations and make them capable of performing actions on conversation item status change. You can configure the system to initiate a specific workflow and perform an action when an email conversation item changes to a specific status.
You can configure the conversation item events to hook up to implementations at the solution level.
- In the Administration site, open a Solution from the list.
- In the Solution Components section, click Conversation Component.
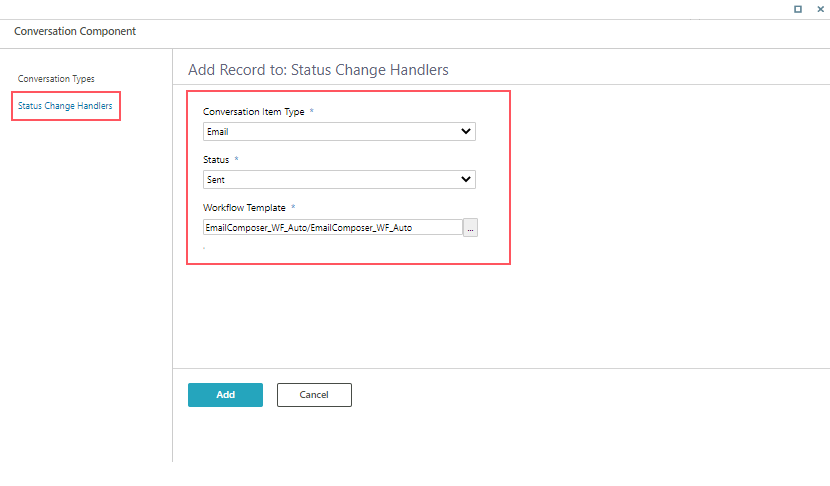
- In the Conversation Component window, click Status Change Handlers.
- Click Add New Record.
- Select Conversation Item Type as Email.
- Select Status, Sent or Undelivered.
- Select Workflow Template, the workflow to initiate for conversation item.
- Click Add.
- In the selected workflow, add a Built-in Command Listener activity to listen to the conversation item event.

V9.4.1
Overview
Conversation View is a solution-level component that enables the users to have all the case related conversations at one place within a case. This reusable component can be combined in a form within any solution-based workflow.
Conversation types
All conversation related items are saved in a product database table. The Email and Comment conversation types are the out-of-the-box conversation types available in Cora SeQuence.
For configuring Email Conversation type, see this article.
For Comment Conversation type, see this article.
You can add any custom conversation type to your solutions per need.
For adding Custom Conversation type, see this article.
Add Conversations View to Cora SeQuence forms
- In a workflow, add or edit a form or task activity.
- Add the following script to the form’s source in the relevant location.
<div>
<sq:ConversationView runat="server" Id="Conversations"></sq:ConversationView>
</div>
NOTE
- Only the workflows that are in the context of a Solution support Conversations View.
- Conversations View component should be used in the master workflow forms.
Conversations view UI
Consider the following design parameters for Conversations view in Solutions.
- Supported resolution in the form is:
- Height: Minimal height for the view in the form (empty state) is 100px
- Width: 33% - 100% of the screen; minimum 600px
- View is responsive.
- Most recent item is listed on top, from newest to oldest, or last update date descending.
Conversation item built-in command
The Create Conversation Item built-in command lets business users insert conversation items into the Conversations View. You can add a general conversation item, or a specific conversation item related to the type of conversation available in the system. The general items are added using a system default type called Conversation Item. This type uses the default template, and is the basis of all conversation items.
For details on the Email Conversation type, see this article.
Command parameters
- workflowIinstanceId
- conversationItemState
- Title
- Body
- Attachments
- createdByUserId
IMPORTANT
To execute built-in command that writes into the Conversations View, make sure you have Execute permissions in the master workflow.
To use Conversations View in a sub-workflow, the WF instance Id parameter should be mapped to the master workflow instance Id.
Conversation solution configuration
You can configure the conversation types to be enabled or disabled in the relevant solution. The list of conversation types is loaded from all of the system-available solutions.
When conversation types are disabled, there is no option to add them through the UI, built-in command, or API. Any existing disabled conversation items are displayed with the default template.
The Delete action is allowed only through API.
These reusable solution components are deployed with the solution package.
NOTE
Conversation Types are enabled by default for new created Solutions. Post upgrade, for any existing Solutions, all the conversation types are disabled.
Post-upgrade, if you want to enable the Conversations View component for an existing Solution, then open and close the Conversations View window in the solution once.
Conversations View client API
The Conversations View component exposes the following four events to define additional actions and configurations.
- addConversationViewItemActionClicked: is called when a user clicks on an action related to a specific item.
For example, click on Reply. - addConversationViewItemToolbarActionClicked: is called when a user clicks on the Conversations View toolbar buttons.
For example, click on New email. - addConversationViewParametersBinding: is called when Conversations View binds the Conversation Item parameters.
This event helps implementation set the Email Composer properties. - addConversationViewActionCompleted: is called when a user completes an action performed in the Conversations View.
For example, when closing the Email Composer window, either by clicking the X button, or by clicking Save or Send.
All the events receive the args object parameters that include the following:
- args.details.actionName: The selected action.
For example, New. - args.details.itemType: The Conversation item type on which the action applies.
For example, Email. - args.detail.parameters: The Conversation item related parameters.
For example, windowTitle for Email Composer.
Client API example
<script type="application/javascript">
  $sq(document).ready(function(){
    var conversationsId = $sq("[id$=Conversations]").attr("id");
                var conversations = $findByControlId(conversationsId);


    conversations.addConversationViewItemActionClicked(function(args){
      console.log("i am item action");
                console.log(args.detail);
    });


    conversations.addConversationViewItemToolbarActionClicked(function(args){
               console.log("i am toolbar action");
              console.log(args.detail);
    });
    conversations.addConversationViewParametersBinding(function(args){
               if (args.detail.actionName == "new")
                {
                  args.detail.parameters.windowTitle = "New email title";
                  args.detail.parameters.from = "xyz@genpact.com,bbb@genpact.com";
                  args.detail.parameters.template = "DefaultTemplate";
                  args.detail.parameters.to = "xyzso@genpact.digital,abcgen@genpact.digital";
                  args.detail.parameters.cc = "xyzso@genpact.digital,abcgen@genpact.digital";
                  args.detail.parameters.bcc = "xyzso@genpact.digital,abcgen@genpact.digital";
                  args.detail.parameters.subject = 'Email Composer Subject';
                  args.detail.parameters.body = 'Test test test';
                  args.detail.parameters.signature = 'alias';
                }


console.log(args.detail);
    });
    conversations.addConversationViewActionCompleted(function(args){
              console.log("i am completed");
console.log(args.detail);
    });
  });


</script>
Configure conversation item events for event handling
The Conversation item events hook up to implementations, and make them capable of performing actions on conversation item status change. You can configure the system to initiate a specific workflow and perform action when an email conversation item changes to a specific status.
You can configure the conversation item events to hook up to implementations at the solution level.
- In the Administration site, open a Solution from the list.
- In the Solution Components section, click Conversation Component.
- In the Conversation Component window, click Status Change Handlers.
- Click Add New Record.
- Select Conversation Item Type as Email.
- Select Status, Sent or Undelivered.
- Select Workflow Template, the workflow to initiate for conversation item.
- Click Add.
- In the selected workflow, add a Built-in Command Listener activity to listen to the conversation item event.
V9.4
Overview
Conversations View is a solution-level component that enables the business users to have all the case related conversations at one place within a case. This reusable component can be combined in a form within any solution-based workflow.
Conversation types
All conversation related items are saved in a product database table. The Email conversation type is the out-of-the-box conversation type available in Cora SeQuence. You can add any custom conversation type to your solutions per need.
For configuring email conversation type, see this article.
For adding custom conversation type, see this article.
Add Conversations View to Cora SeQuence forms
- Add or edit a form or task activity in a workflow.
- Add the following script to the form’s source in the relevant location.
<div>
<sq:ConversationView runat="server" Id="Conversations"></sq:ConversationView>
</div>
NOTE
Conversations View is supported only in workflows that are in the context of a Solution.
Conversations view UI
Consider the following design parameters for Conversations view in Solutions.
- Supported resolution in the form is:
- Height: Minimal height for the view in the form (empty state) is 100px
- Width: 33% - 100% of the screen; minimum 600px
- View is responsive.
- Most recent item is listed on top, from newest to oldest, or last update date descending.
Built-in command
The Create Conversation Item built-in command lets business users insert conversation items into the Conversations View. You can add a General conversation item, or a specific conversation item related to the type of conversation available in the system. The general items are added using a system default type called Conversation Item. This type uses the default template, and is the basis of all conversation items.
Command parameters
- WF instance Id
- conversationItemState
- Title
- Body
- Attachments
IMPORTANT
To execute built-in-command that write into the Conversations View, make sure you have Execute permissions in the master workflow.
Conversation solution configuration
You can configure the conversation types to be enabled or disabled in the relevant solution. The list of conversation types is loaded from all of the system-available solutions.
When conversation types are disabled, there is no option to add them through the UI, built-in-command, or API. Any existing disabled conversation items are displayed with the default template.
The Delete action is allowed only through API.
These reusable solution components are deployed with the solution package.
Conversations View client API
The Conversations View component exposes four events to define additional actions and configurations.
- addConversationViewItemActionClicked: is called when a user clicks on an action related to a specific item.
For example, click on Reply. - addConversationViewItemToolbarActionClicked: is called when a user clicks on the conversation view toolbar buttons.
For example, click on New email. - addConversationViewParametersBinding: is called when Conversation View binds the Conversation Item parameters.
This event helps implementation set the Email Composer properties. - addConversationViewActionCompleted: is called when a user closes the Email Composer window, either by clicking the X button, or by clicking Save or Send.
All the events receive the args object parameters that include:
- args.details.actionName: The selected action. For example, New.
- args.details.itemType: The Conversation item type on which the action applies. For example, Email.
- args.detail.parameters: The Conversation item related parameters. For example, windowTitle for Email Composer.
Client API example
<script type="application/javascript">
  $sq(document).ready(function(){
    var conversationsId = $sq("[id$=Conversations]").attr("id");
                var conversations = $findByControlId(conversationsId);


    conversations.addConversationViewItemActionClicked(function(args){
      console.log("i am item action");
                console.log(args.detail);
    });


    conversations.addConversationViewItemToolbarActionClicked(function(args){
               console.log("i am toolbar action");
              console.log(args.detail);
    });
    conversations.addConversationViewParametersBinding(function(args){
               if (args.detail.actionName == "new")
                {
                  args.detail.parameters.windowTitle = "New email title";
                  args.detail.parameters.from = "xyz@genpact.com,bbb@genpact.com";
                  args.detail.parameters.template = "DefaultTemplate";
                  args.detail.parameters.to = "xyzso@genpact.digital,abcgen@genpact.digital";
                  args.detail.parameters.cc = "xyzso@genpact.digital,abcgen@genpact.digital";
                  args.detail.parameters.bcc = "xyzso@genpact.digital,abcgen@genpact.digital";
                  args.detail.parameters.subject = 'Email Composer Subject';
                  args.detail.parameters.body = 'Test test test';
                }


console.log(args.detail);
    });
    conversations.addConversationViewActionCompleted(function(args){
              console.log("i am completed");
console.log(args.detail);
    });
  });


</script>

— Gil Shental on 06/22/2021
Need to add a tab for 9.7, with the new Task, Internal message and Lite Message options.