Starting with V10.0, Cora SeQuence has been renamed to Cora Orchestration.
V9.9 and later
Overview
Setting up the archiving mechanism involves configuring:
- Archive policies: Each policy determines the data to be archived based on your organization's data retention needs and business and legal requirements for retrieving data.
- Archive jobs: Data archiving is performed by JES jobs that you need to set up on the Administration site.
| Job | Description |
|---|---|
| Archiving Data Collector | Marks the data that needs to be archived based on a JSON file. |
| Archiving Data Worker | Runs right after the Archiving Data Collector job. Collects the marked data, transforms it from SQL to CSV format, and moves it to the archiving location. |
| Archiving File Worker | Moves the case files (attachments) to the archiving location. |
| Archiving Data Cleaner | Deletes the archived data from the operational database. |
| Archiving Data Retriever | Creates a ZIP file with the archived data for download. |
Configure archive
All the archiving configuration steps are defined in the Administration site.
| Step | Performed by | |
|---|---|---|
| 1 | Define archive data |
|
| 2 | Set up archiving jobs |
|
Prerequisites
Before you configure the archiving policies and jobs, make sure that:
- The application administrator or the DBA has deployed an archive database.
- You have the connection string to the archive database.
- You have the connection string to the operational database.
1. Define archive data
Archive policies determine which data from the operational database will be moved to the archiving database. Archive policies can also determine if the data will be deleted without archiving or kept in the operational database (not deleted and not archived). You configure archive policy requirements in a JSON file.
The JSON file includes two main objects:
- "collector": Here you mainly define which workflow's data you want to archive and from when should it be archived.
- "archive": Here you mainly define how to archive and retrieve the collected data (system tables, custom tables, archive filters).
JSON parameters
IMPORTANT
The JSON parameters are case sensitive.
| Parameter | Description | |||||||||||||
|---|---|---|---|---|---|---|---|---|---|---|---|---|---|---|
collector\workflowSpaceId | Determines which workflow configuration will be considered for archiving. To use system archiving configuration, delete this parameter. (Mandatory) Value: Workflow space template GUID The workflow instance determines the archive or delete date. | |||||||||||||
collector\variables | Array of variables which determine the criteria for archiving the completed instances of the specified workflow space. If not set, then the collector job will archive all the completed instances of that workflow space. For each variable, set these parameters:
| |||||||||||||
collector\completedAfter | Sets the date after which data is archived or deleted. Value: Date (yyyy-mm-dd) Example: 2015-12-23 | |||||||||||||
collector\olderThan | Sets the upper limit date for archiving data. All the data created before this date is archived. Set these parameters within:
For example, amount set as 1, and timeUnit set as d archives all the data that is 1 day older than the current date. NOTE If completedAfter is set, then the policy archives the completed instances that meet both the olderThan and the completedAfter values. | |||||||||||||
collector\archiveWhenOpenChildrenExists | Determines whether open workflows are archived or not. Value:
false, the master workflow is archived only after all subworkflows are closed.If set to true, the master workflow is archived with closed subworkflows only, and does not check for open subworkflows. The open subworkflows remain in the operational database. | |||||||||||||
collector\archiveAsStandAlone | Determines which configuration is used for archiving. If set to true, each completed workflow instance is archived separately.Value:
Correlation between collector\archiveAsStandAlone and collector\archiveWhenOpenChildrenExists
| |||||||||||||
collector\childWorkflowSpaceIdsToExclude | Determines which subworkflows should be excluded from archiving. For example: ["182b2d2b-ebb2-45c2-a94f-ab276912c22a"] | |||||||||||||
archive\defaultArchiveGroup | Determines which tables to archive. Value:
| |||||||||||||
archive\tables | Array of tables, and specific actions for each table. Define this parameter to include custom tables or exclude/delete unnecessary tables. The action depends on the setting of the parameter defaultArchiveGroup.
| |||||||||||||
archive\simulationMode | Determines whether or not, after archiving, the data is removed from the Cora SeQuence database. (Mandatory) Value:
In Simulation Mode, the data is not written to the archiving tables like Tip | |||||||||||||
moveFilesToFilesArchiveStorage | Determines whether archived files will be moved to archive file storage. Value:
If set to | |||||||||||||
Create an archive policy
When you create a policy you define which data needs to be archived, deleted, or left in the operational database. You also set time parameters, such as "older than" or "completed after," and grant permissions to individuals or groups to access the archived data.
- In the Administration site, go to Administration>Archiving>Policy Management.
- Click Add New record.
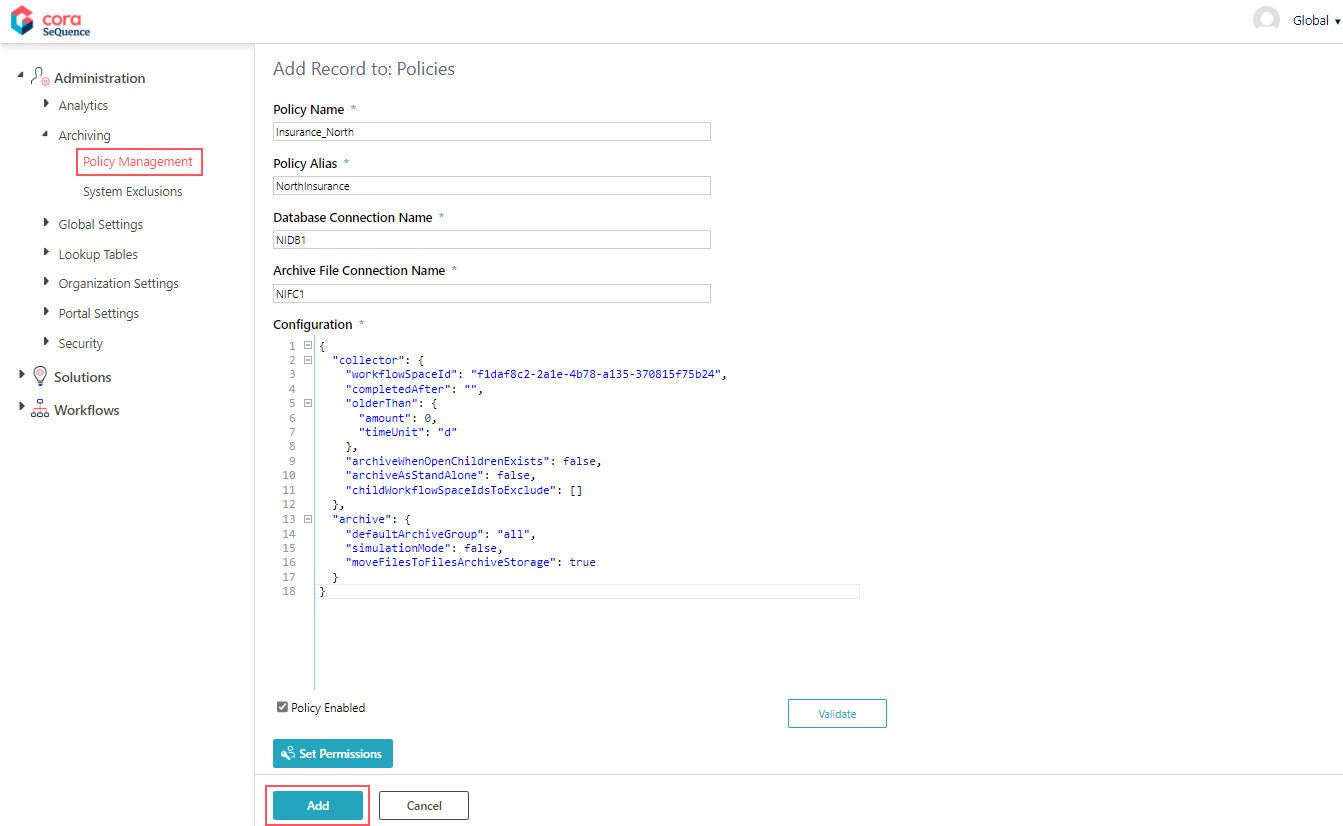
- Enter the following details:
- Policy Name: A unique policy name. It is used as the root of the archive folder structure.
- Policy Alias: An alias for the policy. The alias you enter here displays on the archive page in the portal, when the user selects a policy.
- Database Connection Name: Name of the operational database connection: From where the data is taken.
- Archive File Connection Name: Name of the archive database connection: Where the data will be archived.
The supported storage types are AWS S3, Azure File Storage and Network Storage. - Configuration: JSON parameters that determine which data to archive.
- Policy Enabled: Select the checkbox to activate the policy.
- Set Permissions: Specify the users who can access the archived data in the portal.
- Click Add.

The Validate button checks the JSON syntax and prompts any issues.
2. Set up the archiving jobs
The configuration of most archiving jobs is similar. You basically set up the job's name, batch size, and scheduler. For the Archiving Data Retriever job, you only need to set up its timeout.
The archiving jobs are interdependent and work in a linear mode. For example, the Data Worker job only runs after the Data Collector job.
| Order | Job | Parameters |
|---|---|---|
| 1 | Archiving Data Collector | Name Work Batch Size Batch Iteration Delay (seconds) Job Execution Scheduler Job Start and End (optional) Delay job start Stop Job if it executes more than |
| 2 | Archiving Data Worker | |
| 3 | Archiving Data Cleaner | |
| 4 | Archiving Files Worker | |
| 5 | Archiving Data Retriever | Retrieval Data Timeout (minutes) |
NOTE
The archiving jobs do not support Scaling.
Configuring the archiving jobs
- Go to Administration>Global Settings>Jobs Management, and click Add Job.
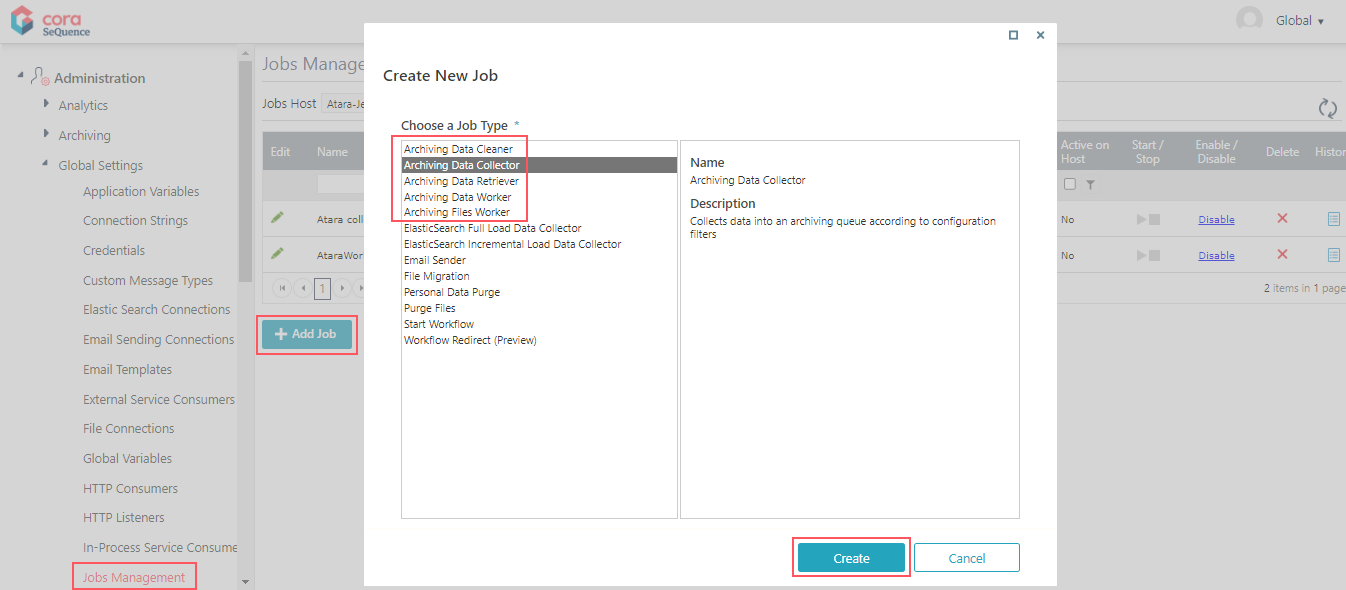
- Select an archiving job, and then click Create.
- Configure the archiving job:
- On the Job tab, define the following:
- Name: Enter a meaningful name for the job.
- Job is enabled: Select the checkbox only if you want to run the job for testing purposes.
- Click Next.
- On the Command tab, set the following:
- Work Batch Size: Batch Size is the number of records that are synced at one time.
Depending on the complexity of the cases, you may consider to set a smaller batch size. The default is set to 100. You can enter up to 10000. - Batch Iteration Delay (seconds): Time in seconds, after which the next batch will be synced. Default is 5 seconds.
- Click Next.
- Work Batch Size: Batch Size is the number of records that are synced at one time.
- On the Advanced Options tab, set the following:
- Job Execution Schedule: Set the job to execute once a day.
- Click Finish.
- On the Job tab, define the following:

Configuring the Archiving Data Retriever job
- Go to Administration>Global Settings>Jobs Management, and click Add Job.
- On the Job tab, define the following:
- Name: Enter a meaningful name for the job.
- Job is enabled: Select the checkbox only if you want to run the job for testing purposes.
- Click Next.
- On the Command tab, enter a retrieval timeout value in minutes.
After you set up all the archive jobs and policies, enable the jobs on the Jobs Management page.
Archive index
The indexColumns array defines how the data is indexed and stored. When you set up this parameter, you define the columns that are displayed on the Archive page and by which the end user can filter the retrieved data.
When the Archiving Data Worker job runs, it populates the archive database with the columns that you specify in the indexColumns array and the Case ID and Completion Date columns, which are created by default.
| Policy configuration | Portal |
|---|---|
 "indexColumns": [
    {
    "name": "text",
    "indexColumnName": "textaliasIndex"
    }
    ],

        "action": "Archive"
}, | 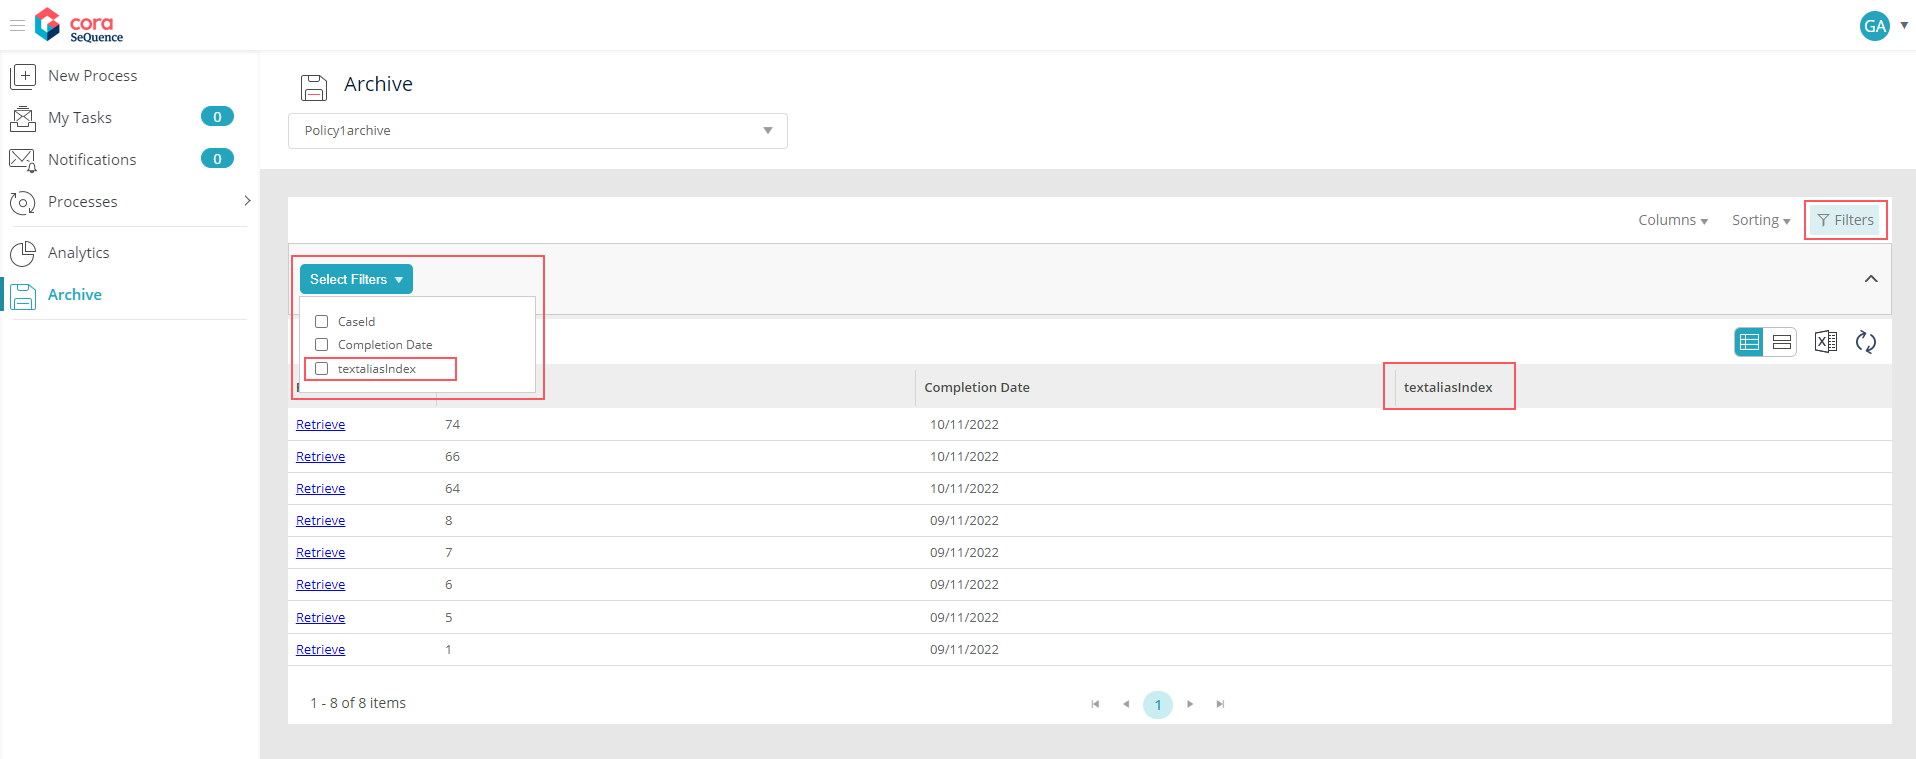 Click to enlarge. Click to enlarge. |
Use cases
In general, you define a policy to archive data, but if required, you can exclude specific tables from archiving or completely delete the data from the operational database.
- Exclude specific tables:
- Set the
defaultArchiveGroupparameter to "all", and under "Tables", specify the tables that you want to exclude with the "Exclude" action.
- Set the
- Delete specific tables from the operational database without archiving them.
- Set the
defaultArchiveGroupparameter to "all", and under "Tables", specify the tables that you want to exclude with the "Delete" action.
- Set the
When you set the "exclude" or "delete" actions, there's no need to define "columns" or "indexColumns".
