Starting with V10.0, Cora SeQuence has been renamed to Cora Orchestration.
V9.8.3-V10.x
Overview
The search feature provides Google-like search capabilities. When search is enabled, users can retrieve any data related to processes and cases.
The search feature uses the Elasticsearch engine. The Elasticsearch cluster needs to be set up and running before you can configure the search feature on Cora SeQuence.
Starting from V10.3, Cora Orchestration supports Elasticsearch V7 and V8. By default, V7 is installed, but you can switch from V7 to V8 and vice versa.
For details, see the Switch between Elasticsearch V7 and V8 below.
Configuring search involves several procedures, including defining the index (retrievable data), setting search permissions, and enabling search on the system.
IMPORTANT
Cora SeQuence supports AWS Elasticsearch with both basic and AWS Identity and Access Management (IAM) authentication (key/secret).
Search configuration steps
| Steps | Location | Performed by | |
|---|---|---|---|
| 1 | Define retrievable data | JSON file |
|
| 2 | Enable change tracking | Cora SeQuence database | |
| 3 | Create connection string | Administration site |
|
| 4 | Set up indexing jobs | Administration site | |
| 5 | Enable search in Flowtime | PowerShell function |
![]() Watch this video for a demonstration of the search configuration steps.
Watch this video for a demonstration of the search configuration steps.
1. Define retrievable data
Create a JSON for each solution or workflow that you want to enable search for. The JSON file defines the fields of the Cora SeQuence database that will be indexed by Elasticsearch and can be retrieved by user's search.
HTML Transformers in JSON
To optimize data indexing and to reduce the Elasticsearch database size, you can define HTML transformers in the JSON. These transformers transform the data collected by the incremental and full indexing jobs.
See a sample JSON with transformers here.
NOTE
To use HTML transformers you need Elasticsearch V7.2 or above.
Cora Orchestration supports Nest 7.17, so Elasticsearch V7.x is supported and V8 is not. (Not applicable for V10.3 onwards)
The inhouse HtmlMinimizeTransformer transformer cleans images, heads, and styles in the HTML tags without removing the tags.
Create Ingest pipelines for Elasticsearch in the Administration site. In the JSON, under the pipeline section add the name(s) of the pipeline. You can add more than one pipeline so, the pipeline name in JSON can be an array.
For more details, see this page.
Points to consider
Consider the following factors when you create the JSON file:
- The database change-tracking mechanism uses primary keys to point to rows that have changed. To make sure that changing data is correctly tracked, the
keyFieldsvalue in the JSON file must contain only primary key columns. - If you want custom data to be retrievable, you need to add the custom table's fields to the JSON.
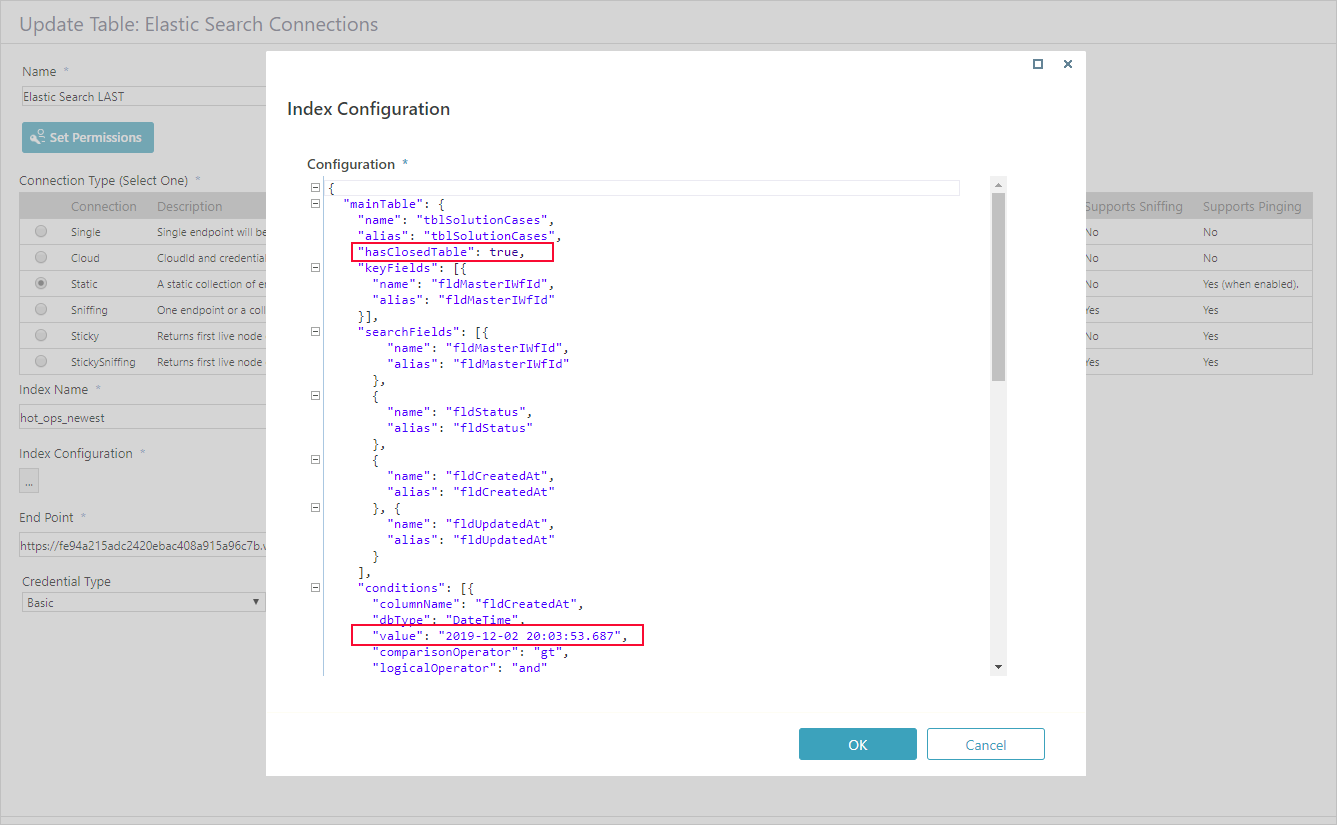
- To ensure that users can retrieve data from workflows that have been already closed, make sure that the
hasClosedTableproperty is set to "true". - If you do not want to index all the data in a table, you can use the
Conditionssection to filter out data. To do that, specify the column that should be filtered out, its value, data type, and condition type, such as gt, lt, or eq. For example, if you want to index only the data that was created from a certain date and on, you can set the creation date as a condition. - If the first letter of any property name in index may be in UPPER case, then it is converted to LOWER case by NEST client.
For example, BODY > bODY; Body > body.
We recommend using lower case to prevent issues. For more details, see this page. - Ingest pipeline property names MUST be in same case as alias in the index configuration.
2. Enable change tracking
To make sure that the Elasticsearch index is up to date with the latest data, you need to enable change tracking in the Cora SeQuence database. Change tracking enables applications to track changes to data and access information that is related to the changes.
For details on how to configure change tracking, see this page.
The change tracking of closed instances is disabled by default. However, you can enable index changes by setting the value of trackClosedTableChanges and hasClosedTable to true.
3. Create the connection string
Configure the connection to the Elasticsearch service. You set up one connection per index. In this step, you also define who will be able to search the specific index.
Prerequisites
Before you create the connection string, make sure that:
- The Elasticsearch cluster is setup.
- You have the Elasticsearch connection details, such as:
- Connection type
- End Points
- Required credentials
- You have the relevant JSON file.
- You know which teams or users should be allowed to search the data defined in the JSON.
Procedure
- Go to Administration > Global Settings > Elastic Search Connections, and click Add New Record.
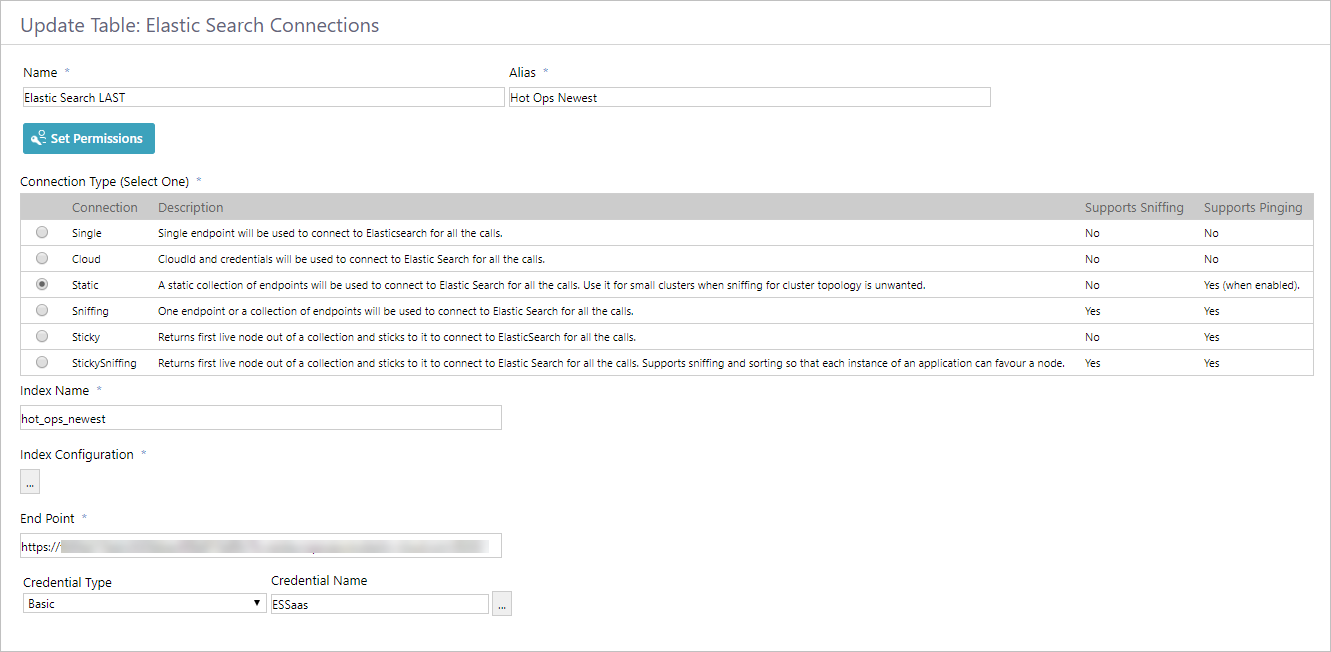
- Enter a name for the connection string.
This is the name displayed in the list of connections. - Under Alias, enter a meaningful name for the search index.
This is the name that will display in the Search bar on Flowtime. - Click Set Permissions, and then select one of the following:
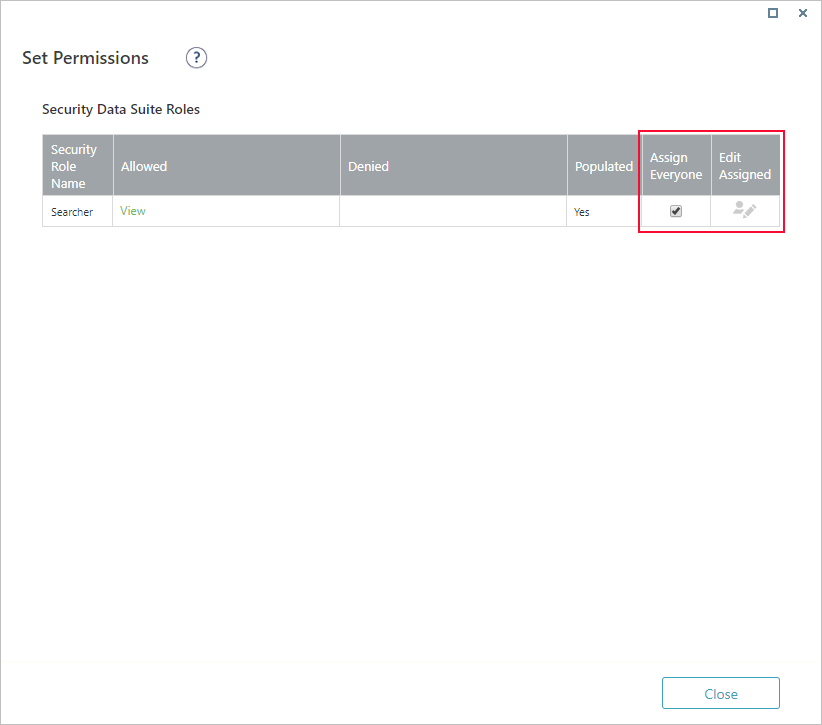
- Assign Everyone: To allow anyone to search this index.
- Edit Assigned: To set search permissions to specific teams or users.
- Select the connection type.
- Enter a meaningful name under Index Name.
This is the name that you use to view log data and analytics about the solution's index in Kibana. - Click the ellipsis button to open the Index Configuration screen.
- In the Index Configuration screen, paste the content from the JSON file that you created for this index.
- Under End Point, enter the connection to the Elasticsearch cluster.
- If your connection requires credentials, select the credential type and enter a credential name.
- Click Add.


4. Set up the indexing jobs
Data indexing is performed by a JES job. You need to set up two jobs:
- Full load: Creates the Elasticsearch index based on the JSON definitions. This job copies the relevant data from the Cora SeQuence database to the Elasticsearch database.
NOTE
Depending on the size of your database, this job can take some time. To avoid performance issues, configure it to run during the weekend or during low-peak hours.
- Incremental load: This job starts to run right after the full load job completes. This job makes sure that any changes to the Cora SeQuence database are synced to the Elasticsearch database.

Prerequisites

Before you create the indexing jobs, make sure that:
- Change tracking was enabled in the database.
- The Elasticsearch connection has been setup.
Configure the full load indexing job
- Go to Administration > Global Settings > Jobs Management, and click Add Job.
- Select ElasticSearch Full Load Data Collector, and then click Create.
- On the job definition screen, define the following:
- Name: Enter a meaningful name for the full load job.
- Scaling: Set the required scaling settings. (Scaling is available only for Cora SeQuence V9.3 and later versions.)
For more details, see this article. - Job is enabled: Select this option only after you complete the workflow, or if you want to run the job for testing purposes.
- Click Next.
- On the Command tab, set the following:
- Connection to ElasticSearch (mandatory): Select the relevant connection string.
- Batch Size (mandatory): You can enter up to 10000.
Batch Size is the number of records that are synced at one time. Depending on the complexity of the cases, you may consider to set a smaller batch size. Default is 100. - Bulk Operation Batch Size: set the bulk operation batch size in the call to the ElasticSearch. Max is 100.
- Bulk Operation Max Degree of Parallelism: set the value as the number of executing parallel calls to the ElasticSearch. Max is 100. When left empty, takes the default value (half of the executing server's logical cores count).
- Query Operation Batch Size: set a value to increase the query bulk size and to minimize the elastic index performance. Default is 100.
- Click Next.
- On the Advanced Options tab, set the following options:
- Set the job to execute every 2 minutes.
- Select the "If a job is currently running, do not start the next job..." checkbox.
- If not defined, job will run with default options.
- Click Finish.
Configure the incremental indexing job
Configuring the incremental job is similar to configuring the full load job. Just note the following settings:
- Job Type: ElasticSearch Incremental Load Data Collector
- Batch Size (mandatory): You can enter up to 10000.
Batch Size is the number of changes introduced to the database. Default is 100. - Bulk Operation Batch Size: set the bulk operation batch size in the call to the ElasticSearch. Max is 100.
- Bulk Operation Max Degree of Parallelism: set the value as the number of executing parallel calls to the ElasticSearch. Max is 100. When left empty, takes the default value (half of the executing server's logical cores count).
- Query Operation Batch Size: set a value to increase the query bulk size and to minimize the elastic index performance. Default is 100.
For the detailed procedure, see the Configure the full load indexing job section above.
If you need to reset the full-load index synchronization, see this article.
5. Enable search in Flowtime
You need to enable search to display the Search bar on Flowtime. 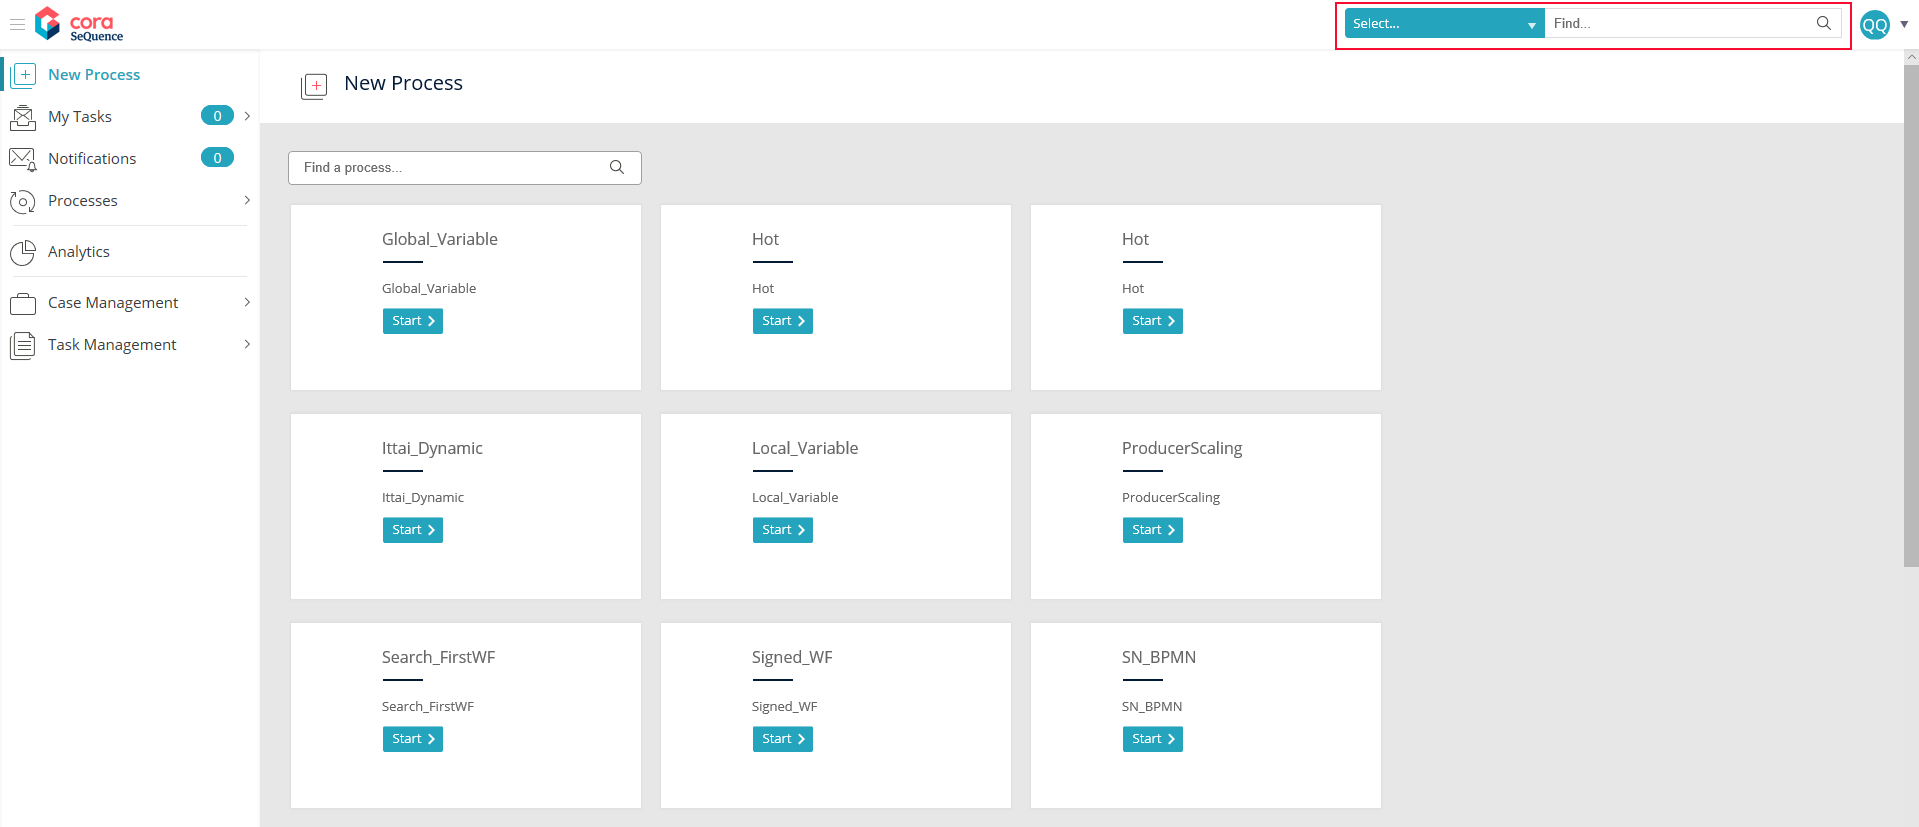
After enabled, the Search bar displays only if:
- There is at least one workflow or solution indexed.
- Your user, or the team you belong to, has permissions to access the index.
You run a PowerShell function to enable or disable the search feature. You can also use this function to set the total number of retrieved records for each search query.
Procedure
- Run the Set-CoraSeQuenceQuickSearchConfiguration function on every server that hosts the Flowtime application.
- To define the total number of retrieved records, set the
PageSizeparameter.
NOTE
To use Elasticsearch, set the default batch size for BRS thread move to closed and ElasticSearch as 100 or more.
Customizing results grid
As with the portal grids, you can customize the search results grid to display relevant columns, filters, and sortable fields.
Customization is applied using the grid’s config file, SearchServiceMetadata.config, located in /Shared Resources\Components\Flowtime\Config\ServiceMetadata.
Following are some differences between the portal’s grid configuration and the search result's grid configuration:
- The search results grid is based on a dataset returning from Elasticsearch. This means that the dataset may and will vary between clients or environments and even different searches within the same deployment.
- The same gird is used for all defined searches, there is no specific instance for each search index.
- If a column is defined in the grid but does not exist in the returning dataset, the grid displays blank in the rows.
- Results dataset is based on the search definition as set in Administration > Global Settings > Search Management.
- The search results grid does not display multiple rows per case fields, as it might impact the grid’s UI.
- There is no option to sort text fields. In case a user tries to, it will show an error message, so it is advisable to set these columns to Sortable = false.
Switch between Elasticsearch V7 and V8
Cora Orchestration V10.3 supports Elasticsearch V7 as default, but supports both Elasticsearch V7 and V8.
You can switch from V7 to V8 by running the following script in installation:
Set-CoraSeQuenceApplicationConfiguration -ConfigurationName "ElasticSearchV8" -ApplicationType Flowtime
Set-CoraSeQuenceApplicationConfiguration -ConfigurationName "ElasticSearchV8" -ApplicationType Jes
To switch back from V8 to V7, run the following script in installation:
Set-CoraSeQuenceApplicationConfiguration -ConfigurationName "ElasticSearchV7" -ApplicationType Flowtime
Set-CoraSeQuenceApplicationConfiguration -ConfigurationName "ElasticSearchV7" -ApplicationType Jes
IMPORTANT
For Elasticsearch V8:
- Sorting on the search grid is disabled.
- Advanced filter on columns is disabled.
NOTE
If there are repeating key field names in the main table and joined tables, then make sure these key fields are given unique aliases. Otherwise, this may lead to unexpected indexing behavior.
V9.8
Overview
The search feature provides Google-like search capabilities. When search is enabled, users can retrieve any data related to processes and cases.
The search feature uses the Elasticsearch engine. The Elasticsearch cluster needs to be set up and running before you can configure the search feature on Cora SeQuence.
Configuring search involves several procedures, including defining the index (retrievable data), setting search permissions, and enabling search on the system.
IMPORTANT
Cora SeQuence supports AWS Elasticsearch with both basic and AWS Identity and Access Management (IAM) authentication (key/secret).
Search configuration steps
| Steps | Location | Performed by | |
|---|---|---|---|
| 1 | Define retrievable data | JSON file |
|
| 2 | Enable change tracking | Cora SeQuence database | |
| 3 | Create connection string | Administration site |
|
| 4 | Set up indexing jobs | Administration site | |
| 5 | Enable search in Flowtime | PowerShell function |
![]() Watch this video for a demonstration of the search configuration steps.
Watch this video for a demonstration of the search configuration steps.
1. Define retrievable data
Create a JSON for each solution or workflow that you want to enable search for. The JSON file defines the fields of the Cora SeQuence database that will be indexed by Elasticsearch and can be retrieved by user's search.
View an example of a JSON file.
Consider the following factors when you create the JSON file:
- The database change-tracking mechanism uses primary keys to point to rows that have changed. To make sure that changing data is correctly tracked, the
keyFieldsvalue in the JSON file must contain only primary key columns. - If you want custom data to be retrievable, you need to add the custom table's fields to the JSON.
- To ensure that users can retrieve data from workflows that have been already closed, make sure that the
hasClosedTableproperty is set to "true". - If you do not want to index all the data in a table, you can use the
Conditionssection to filter out data. To do that, specify the column that should be filtered out, its value, data type, and condition type, such as gt, lt, or eq. For example, if you want to index only the data that was created from a certain date and on, you can set the creation date as a condition.
2. Enable change tracking
To make sure that the Elasticsearch index is up to date with the latest data, you need to enable change tracking in the Cora SeQuence database. Change tracking enables applications to track changes to data and access information that is related to the changes.
For details on how to configure change tracking, see this page.
3. Create the connection string
Configure the connection to the Elasticsearch service. You set up one connection per index. In this step, you also define who will be able to search the specific index.
Prerequisites
Before you create the connection string, make sure that:
- The Elasticsearch cluster is setup.
- You have the Elasticsearch connection details, such as:
- Connection type
- End Points
- Required credentials
- You have the relevant JSON file.
- You know which teams or users should be allowed to search the data defined in the JSON.
Procedure
- Go to Administration > Global Settings > Elastic Search Connections, and click Add New Record.
- Enter a name for the connection string.
This is the name displayed in the list of connections. - Under Alias, enter a meaningful name for the search index.
This is the name that will display in the Search bar on Flowtime. - Click Set Permissions, and then select one of the following:
- Assign Everyone: To allow anyone to search this index.
- Edit Assigned: To set search permissions to specific teams or users.
- Select the connection type.
- Enter a meaningful name under Index Name.
This is the name that you use to view log data and analytics about the solution's index in Kibana. - Click the ellipsis button to open the Index Configuration screen.
- In the Index Configuration screen, paste the content from the JSON file that you created for this index.
- Under End Point, enter the connection to the Elasticsearch cluster.
- If your connection requires credentials, select the credential type and enter a credential name.
- Click Add.
4. Set up the indexing jobs
Data indexing is performed by a JES job. You need to set up two jobs:
- Full load: Creates the Elasticsearch index based on the JSON definitions. This job copies the relevant data from the Cora SeQuence database to the Elasticsearch database.
NOTE
Depending on the size of your database, this job can take some time. To avoid performance issues, configure it to run during the weekend or during low-peak hours.
- Incremental load: This job starts to run right after the full load job completes. This job makes sure that any changes to the Cora SeQuence database are synced to the Elasticsearch database.
Prerequisites
Before you create the indexing jobs, make sure that:
- Change tracking was enabled in the database.
- The Elasticsearch connection has been setup.
Configure the full load indexing job
- Go to Administration > Global Settings > Jobs Management, and click Add Job.
- Select ElasticSearch Full Load Data Collector, and then click Create.
- On the job definition screen, define the following:
- Name: Enter a meaningful name for the full load job.
- Scaling: Set the required scaling settings. (Scaling is available only for Cora SeQuence V9.3 and later versions.)
For more details, see this article. - Job is enabled: Select this option only after you complete the workflow, or if you want to run the job for testing purposes.
- Click Next.
- On the Command tab, set the following:
- Connection to ElasticSearch (mandatory): Select the relevant connection string.
- Batch Size (mandatory): You can enter up to 10000.
Batch Size is the number of records that are synced at one time. Depending on the complexity of the cases, you may consider to set a smaller batch size. Default is 100. - Bulk Operation Batch Size: set the bulk operation batch size in the call to the ElasticSearch. Max is 100.
- Bulk Operation Max Degree of Parallelism: set the value as the number of executing parallel calls to the ElasticSearch. Max is 100. When left empty, takes the default value (half of the executing server's logical cores count).
- Click Next.
- On the Advanced Options tab, set the following options:
- Set the job to execute every 2 minutes.
- Select the "If a job is currently running, do not start the next job..." checkbox.
- If not defined, job will run with default options.
- Click Finish.
Configure the incremental indexing job
Configuring the incremental job is similar to configuring the full load job. Just note the following settings:
- Job Type: ElasticSearch Incremental Load Data Collector
- Batch Size (mandatory): You can enter up to 10000.
Batch Size is the number of changes introduced to the database. Default is 100. - Bulk Operation Batch Size: set the bulk operation batch size in the call to the ElasticSearch. Max is 100.
- Bulk Operation Max Degree of Parallelism: set the value as the number of executing parallel calls to the ElasticSearch. Max is 100. When left empty, takes the default value (half of the executing server's logical cores count).
For the detailed procedure, see the Configure the full load indexing job section above.
If you need to reset the full-load index synchronization, see this article.
5. Enable search in Flowtime
You need to enable search to display the Search bar on Flowtime.
After enabled, the Search bar displays only if:
- There is at least one workflow or solution indexed.
- Your user, or the team you belong to, has permissions to access the index.
You run a PowerShell function to enable or disable the search feature. You can also use this function to set the total number of retrieved records for each search query.
Procedure
- Run the Set-CoraSeQuenceQuickSearchConfiguration function on every server that hosts the Flowtime application.
- To define the total number of retrieved records, set the
PageSizeparameter.
NOTE
To use Elasticsearch, set the default batch size for BRS thread move to closed and ElasticSearch as 100 or more.
Customizing results grid
As with the portal grids, you can customize the search results grid to display relevant columns, filters, and sortable fields.
Customization is applied using the grid’s config file, SearchServiceMetadata.config, located in /Shared Resources\Components\Flowtime\Config\ServiceMetadata.
Following are some differences between the portal’s grid configuration and the search result's grid configuration:
- The search results grid is based on a dataset returning from Elasticsearch. This means that the dataset may and will vary between clients or environments and even different searches within the same deployment.
- The same gird is used for all defined searches, there is no specific instance for each search index.
- If a column is defined in the grid but does not exist in the returning dataset, the grid displays blank in the rows.
- Results dataset is based on the search definition as set in Administration > Global Settings > Search Management.
- The search results grid does not display multiple rows per case fields, as it might impact the grid’s UI.
- There is no option to sort text fields. In case a user tries to, it will show an error message, so it is advisable to set these columns to Sortable = false.
V9.3 and later
Overview
The search feature provides Google-like search capabilities. When search is enabled, users can retrieve any data related to processes and cases.
The search feature uses the Elasticsearch engine. The Elasticsearch cluster needs to be set up and running before you can configure the search feature on Cora SeQuence.
Configuring search involves several procedures, including defining the index (retrievable data), setting search permissions, and enabling search on the system.
IMPORTANT
Cora SeQuence supports AWS Elasticsearch with both basic and AWS Identity and Access Management (IAM) authentication (key/secret).
Search configuration steps
| Steps | Location | Performed by | |
|---|---|---|---|
| 1 | Define retrievable data | JSON file |
|
| 2 | Enable change tracking | Cora SeQuence database | |
| 3 | Create connection string | Administration site |
|
| 4 | Set up indexing jobs | Administration site | |
| 5 | Enable search in Flowtime | PowerShell function |
![]() Watch this video for a demonstration of the search configuration steps.
Watch this video for a demonstration of the search configuration steps.
1. Define retrievable data
Create a JSON for each solution or workflow that you want to enable search for. The JSON file defines the fields of the Cora SeQuence database that will be indexed by Elasticsearch and can be retrieved by user's search.
View an example of a JSON file.
Consider the following factors when you create the JSON file:
- The database change-tracking mechanism uses primary keys to point to rows that have changed. To make sure that changing data is correctly tracked, the
keyFieldsvalue in the JSON file must contain only primary key columns. - If you want custom data to be retrievable, you need to add the custom table's fields to the JSON.
- To ensure that users can retrieve data from workflows that have been already closed, make sure that the
hasClosedTableproperty is set to "true". - If you do not want to index all the data in a table, you can use the
Conditionssection to filter out data. To do that, specify the column that should be filtered out, its value, data type, and condition type, such as gt, lt, or eq. For example, if you want to index only the data that was created from a certain date and on, you can set the creation date as a condition.
2. Enable change tracking
To make sure that the Elasticsearch index is up to date with the latest data, you need to enable change tracking in the Cora SeQuence database. Change tracking enables applications to track changes to data and access information that is related to the changes.
For details on how to configure change tracking, see this page.
3. Create the connection string
Configure the connection to the Elasticsearch service. You set up one connection per index. In this step, you also define who will be able to search the specific index.
Prerequisites
Before you create the connection string, make sure that:
- The Elasticsearch cluster is setup.
- You have the Elasticsearch connection details, such as:
- Connection type
- End Points
- Required credentials
- You have the relevant JSON file.
- You know which teams or users should be allowed to search the data defined in the JSON.
Procedure
- Go to Administration > Global Settings > Elastic Search Connections, and click Add New Record.
- Enter a name for the connection string.
This is the name displayed in the list of connections. - Under Alias, enter a meaningful name for the search index.
This is the name that will display in the Search bar on Flowtime. - Click Set Permissions, and then select one of the following:
- Assign Everyone: To allow anyone to search this index.
- Edit Assigned: To set search permissions to specific teams or users.
- Select the connection type.
- Enter a meaningful name under Index Name.
This is the name that you use to view log data and analytics about the solution's index in Kibana. - Click the ellipsis button to open the Index Configuration screen.
- In the Index Configuration screen, paste the content from the JSON file that you created for this index.
- Under End Point, enter the connection to the Elasticsearch cluster.
- If your connection requires credentials, select the credential type and enter a credential name.
- Click Add.
4. Set up the indexing jobs
Data indexing is performed by a JES job. You need to set up two jobs:
- Full load: Creates the Elasticsearch index based on the JSON definitions. This job copies the relevant data from the Cora SeQuence database to the Elasticsearch database.
NOTE
Depending on the size of your database, this job can take some time. To avoid performance issues, configure it to run during the weekend or during low-peak hours.
- Incremental load: This job starts to run right after the full load job completes. This job makes sure that any changes to the Cora SeQuence database are synced to the Elasticsearch database.
Prerequisites
Before you create the indexing jobs, make sure that:
- Change tracking was enabled in the database.
- The Elasticsearch connection has been setup.
Configure the full load indexing job
- Go to Administration > Global Settings > Jobs Management, and click Add Job.
- Select ElasticSearch Full Load Data Collector, and then click Create.
- On the job definition screen, define the following:
- Name: Enter a meaningful name for the full load job.
- Scaling: Set the required scaling settings. (Scaling is available only for Cora SeQuence V9.3 and later versions.)
For more details, see this article. - Job is enabled: Select this option only after you complete the workflow, or if you want to run the job for testing purposes.
- Click Next.
- On the Command tab, set the following:
- Connection to ElasticSearch (mandatory): Select the relevant connection string.
- Batch Size (mandatory): You can enter up to 10000.
Batch Size is the number of records that are synced at one time. Depending on the complexity of the cases, you may consider to set a smaller batch size. Default is 100.
- Click Next.
- On the Advanced Options tab, set the following options:
- Set the job to execute every 2 minutes.
- Select the "If a job is currently running, do not start the next job..." checkbox.
- If not defined, job will run with default options.
- Click Finish.
Configure the incremental indexing job
Configuring the incremental job is similar to configuring the full load job. Just note the following settings:
- Job Type: ElasticSearch Incremental Load Data Collector
- Batch Size (mandatory): You can enter up to 10000.
Batch Size is the number of changes introduced to the database. Default is 100.
For the detailed procedure, see the Configure the full load indexing job section above.
If you need to reset the full-load index synchronization, see this article.
5. Enable search in Flowtime
You need to enable search to display the Search bar on Flowtime.
After enabled, the Search bar displays only if:
- There is at least one workflow or solution indexed.
- Your user, or the team you belong to, has permissions to access the index.
You run a PowerShell function to enable or disable the search feature. You can also use this function to set the total number of retrieved records for each search query.
Procedure
- Run the Set-CoraSeQuenceQuickSearchConfiguration function on every server that hosts the Flowtime application.
- To define the total number of retrieved records, set the
PageSizeparameter.
NOTE
To use Elasticsearch, set the default batch size for BRS thread move to closed and Elasticearch as 100 or more.
V9.2
Overview
The Case Search feature provides Google-like search capabilities. When the Case Search feature is enabled for a Hot Operations solution, users can search for any data related to the solution's cases.
The search feature is enabled by the integration of Cora SeQuence with Elasticsearch.
Configuring search involves several procedures, including defining the searchable data, creating the search index, setting up indexing jobs, and connecting the the Hot Operations solution to the index.
Configuring the Case Search feature involves the following steps:
| Steps | Location | Performed by | Documentation | |
|---|---|---|---|---|
| 1 | Define searchable fields | JSON file |
| Current article |
| 2 | Enable change tracking | Cora SeQuence database | ||
| 3 | Create connection string | Administration site |
| Setting Up Search for a Hot Operations Solution |
| 4 | Set up indexing jobs | Administration site | ||
| 5 | Enable search in Flowtime | PowerShell function | ||
| 6 | Select a search provider | Administration site |
This article covers the first two configuration steps. The remaining steps are covered in this article.
Define retrievable data
Create a JSON for each Hot Operations solution for which you want to enable case search. The JSON file defines the fields of the Cora SeQuence database that will be indexed by Elasticsearch and can be retrieved by user's search.
View an example of a JSON file.
If your implementation includes custom data that should be retrievable, you need to add the custom table's fields to the JSON.
Enable change tracking
To make sure that the Elasticsearch index is up to date with the latest data, you need to enable change tracking in the Cora SeQuence database. Change tracking enables applications to track changes to data and access information that is related to the changes.
For details on how to configure change tracking, see this page.
Next steps
To continue the search configuration for a specific solution, see this article.
