Starting with V10.0, Cora SeQuence has been renamed to Cora Orchestration.
V10.5
Overview
If you have the Shared Views permission, you can deploy Shared Views across environments. To deploy shared views, you export the existing shared views from one system, and import them onto a target system.
Export Shared Views
Create a ZIP file that contains all the Shared Views created in your system.
Procedure
- In the Administration site, go to Administration > Portal Settings > Portal Shared Views, and then click Manage Versions.
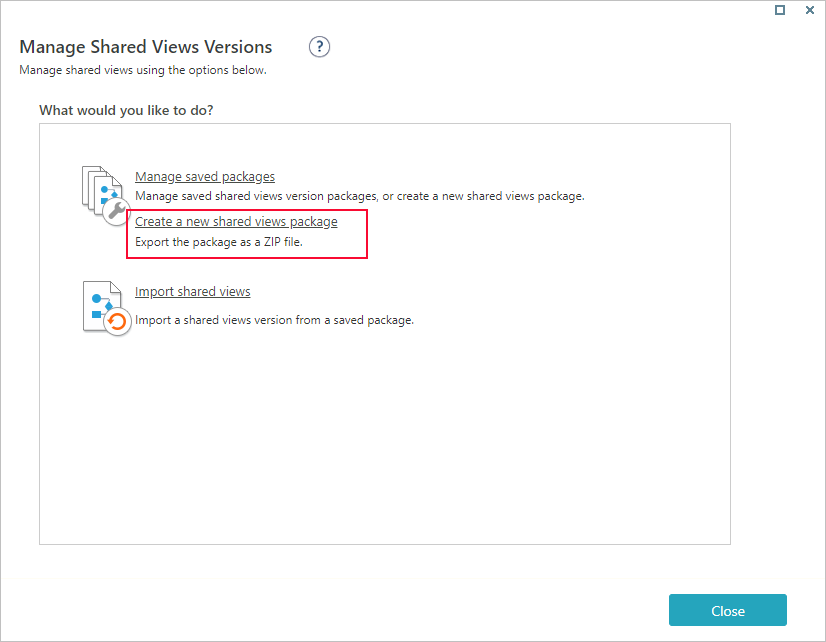
- In the Manage Shared Views Versions screen, select Create a new shared views package.
- Enter a significant name for the exported package, and then click Create.
 A ZIP file is created and saved to the local Downloads folder.
 - Click Close.
Import Shared Views
Import Shared Views from one system to another. After you import a Shared Views package, the views are added to the Portal Shared Views page in the Administration site and become available in the relevant Flowtime and Hot Operations grids.
Procedure
- In the Administration site, go to Administration > Portal Settings > Portal Shared Views, and then click Manage Versions.
- In the Manage Shared Views Versions screen, select Restore Shared Views.
- To locate the package with the relevant Shared Views, click Select.
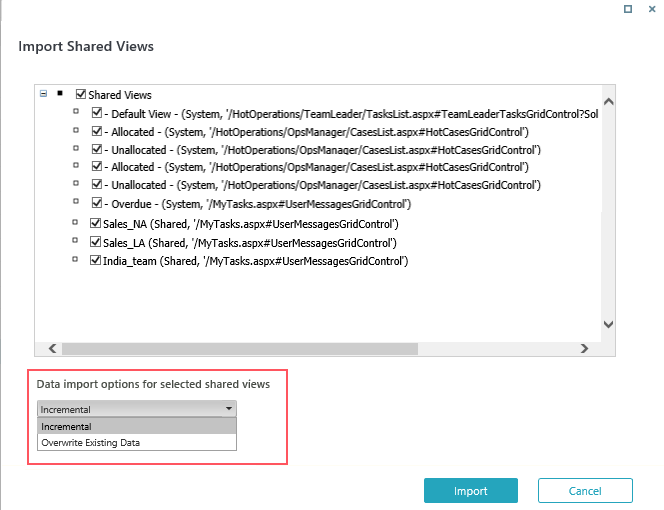
- To select specific shared views, expand the package, and select the views that you want to import.
By default, all shared views are selected. - Under Data import options for the selected shared views, select one of the options:

- Incremental: Adds new shared views to the existing list.
- Overwrite Existing Data: Replaces the existing views with the new ones.
- Click Import.
Update Shared Views
You can update the permission settings for the portal Shared Views from the Administration site.
Procedure
- In the Administration site, go to Administration > Portal Settings > Portal Shared Views, and then click Edit icon for the view you want to update.
- In the Update Portal Shared Views screen, select Set Permissions.
- Update the permissions for the shared view and click Close.
- Click Update.
For more details on Shared Views, see this article.
V9.2
Overview
If you have the Shared Views permission, you can deploy Shared Views across environments. To deploy shared views, you export the existing shared views from one system, and import them onto a target system.
Export Shared Views
Create a ZIP file that contains all the Shared Views created in your system.
Procedure
- In the Administration site, go to Administration > Portal Settings > Portal Shared Views, and then click Manage Versions.
- In the Manage Shared Views Versions screen, select Create a new shared views package.
- Enter a significant name for the exported package, and then click Create.
 A ZIP file is created and saved to the local Downloads folder.
 - Click Close.
Import Shared Views
Import Shared Views from one system to another. After you import a Shared Views package, the views are added to the Portal Shared Views page in the Administration site and become available in the relevant Flowtime and Hot Operations grids.
Procedure
- In the Administration site, go to Administration > Portal Settings > Portal Shared Views, and then click Manage Versions.
- In the Manage Shared Views Versions screen, select Restore Shared Views.
- To locate the package with the relevant Shared Views, click Select.
- To select specific shared views, expand the package, and select the views that you want to import.
By default, all shared views are selected. - Under Data import options for the selected shared views, select one of the options:

- Incremental: Adds new shared views to the existing list.
- Overwrite Existing Data: Replaces the existing views with the new ones.
- Click Import.
For more details on Shared Views, see this article.


